Introduction
StockMaster - Ultimate Inventory with POS.
StockMaster - It is an inventory management system with POS that enables you to manage inventory, sales, purchases, customers, invoices, receiving payments, and more. It will also allow you to make purchases and sales from anywhere, anytime. Whether you run a small business or a large company It's the solution you need to manage inventory, purchases and sales - all in one app.
- Very simple installation in 5 minutes
- Easy POS and Dynamic dashboard
- 6 Months Support
Features
StockMaster Offers Lots of Awesome Features out of the box, such as :
- Easy POS and Dynamic dashboard
- Items , Adjustment , Transfer
- Quotations , Sales , Purchases
- Returns Customer & Supplier
- Users ,Customers, Supppliers
- Currency , Units , Category , Backup
- Payment Sales , Purchases
- Payments Report
- Overview & warehouse stock charts
- Purchases & Sales report
- Customers & suppliers reports
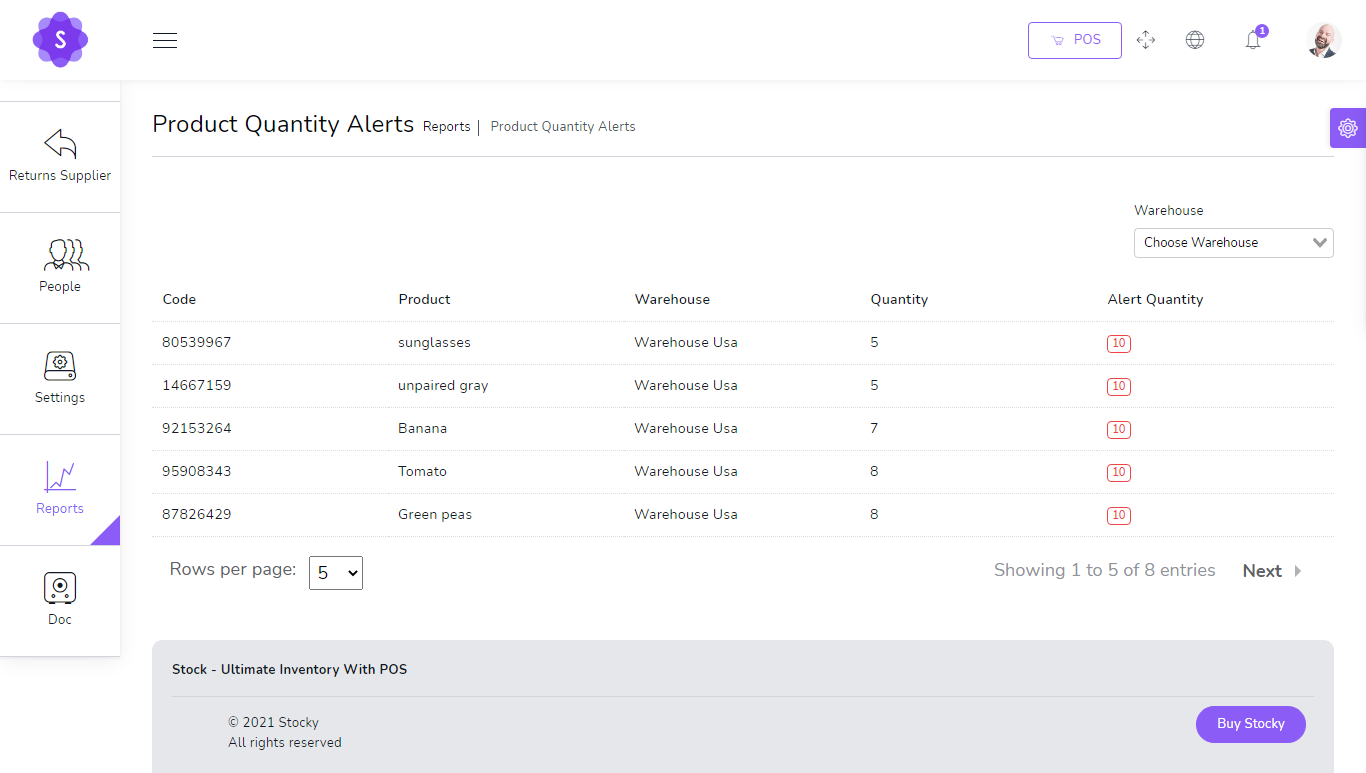
- Product quantity alerts
- Mail notification system addedd
- SMS notification system addedd
- Uses Structured And Customizable Sass Code
- Integrated With Vuex,Vue Router
- Dark Version Included
- Multilingual 15 languages and More Will be added soon
- RTL Support Adeed
- Easy POS and Dynamic dashboard
POS Printer Settings
Guide to Setting Up Receipt Printer to work with POS Small Receipts
To set up receipt printer do the following:
- 1) If printer is not already installed, follow manufacturer instructions to set up the printer and install the software.
- 2) Go to settings for your printer in your operating system.
Note: The next instructions are for Windows 10 printer settings.
- Go to your Start Menu and click the Settings icon.
- Go to Devices, then Printers and Scanners. This is your printer settings.
- Once in your printer settings, find the receipt printer. Click the printer icon.
- Next click Manage, then click Printer Properties.
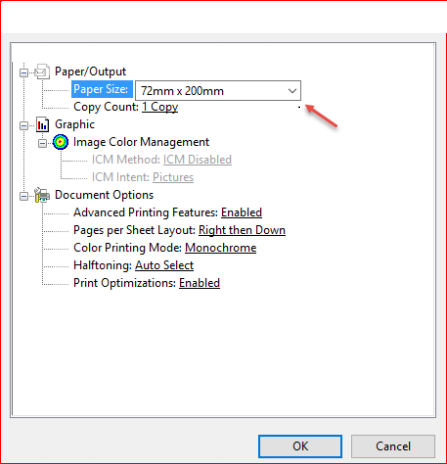
- Click the Advanced Tab.
- Click Printing Defaults.
- In the lower right corner of the Printing Defaults screen, click Advanced
- In Advanced Options > Advanced Document Settings, under Paper/Output the Paper Size needs to be 72mm X 200mm. If this is different change it and click OK.
- The setup of the receipt printer is complete. It should properly print small receipts.


Note: These instructions are for Windows 10. If you are using an earlier version of Windows the
                  settings should be similar. If you are using another operating system, find your printer size, find where
                  to set the paper size and set it to 72mm x 200mm.
code>
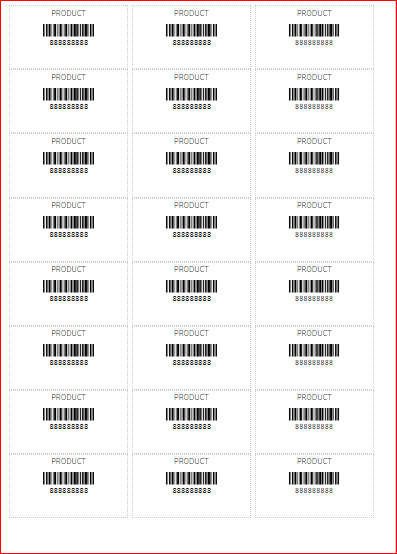
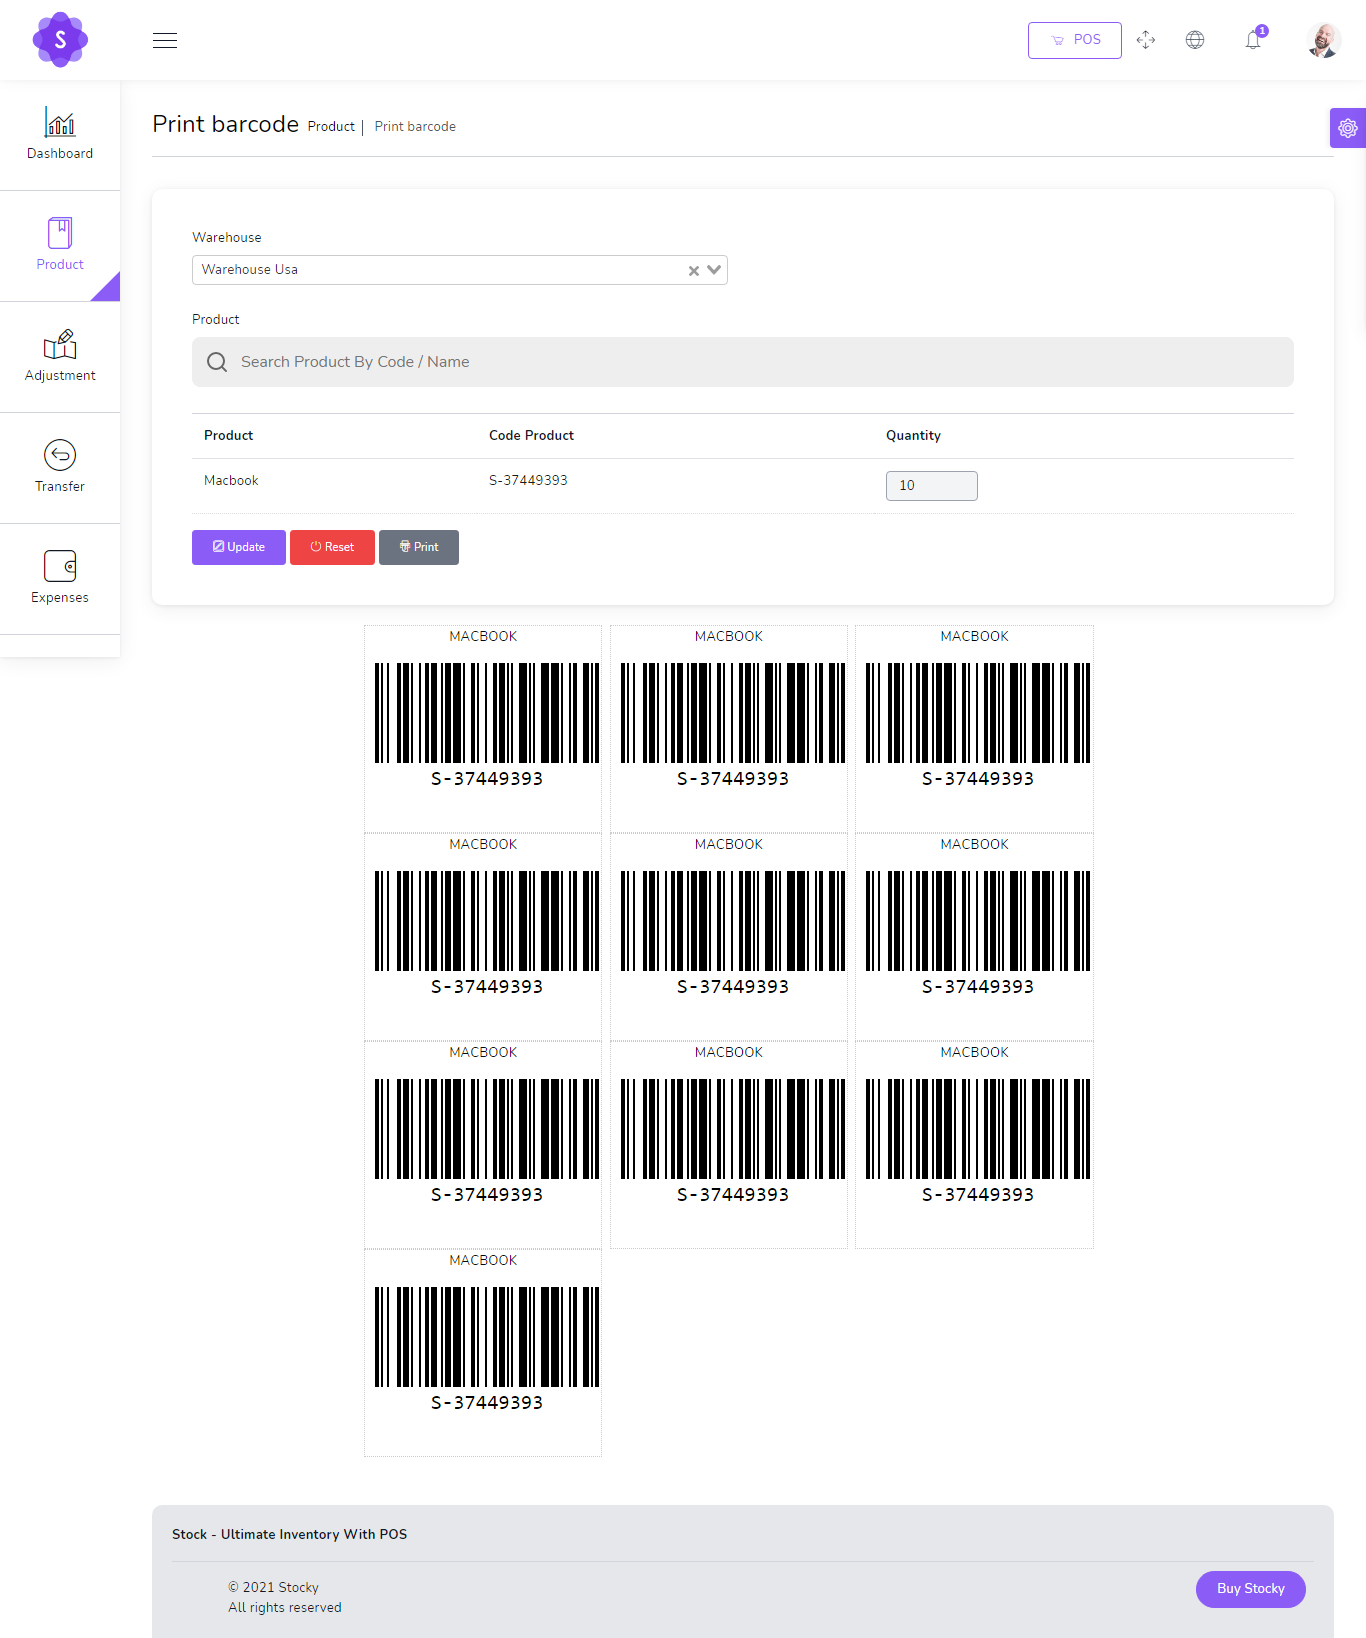
Print barcode/labels
Go to /app/products/barcode

1) select warehouse
2) select Product
3) Set quantity
4) choose Paper size
5) click on Update
5) click on Print
Login
login by default
Email :admin@example.comPassword :123456
you can change password for security purpose
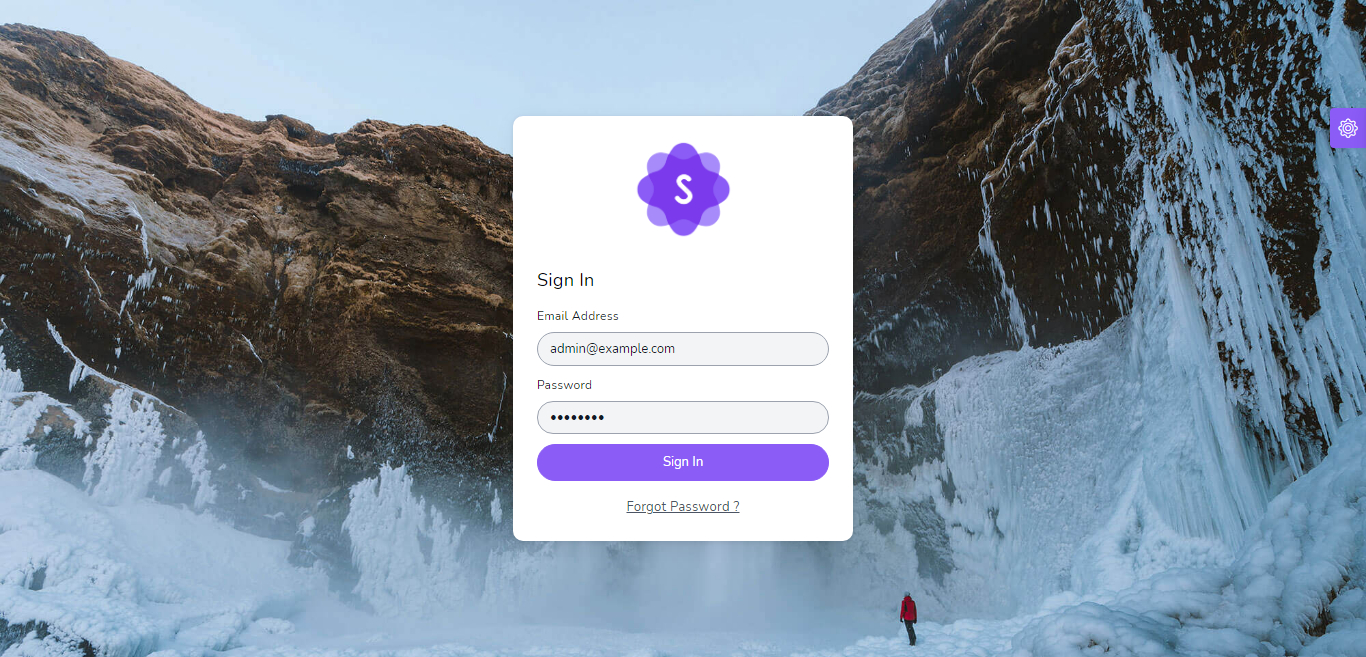
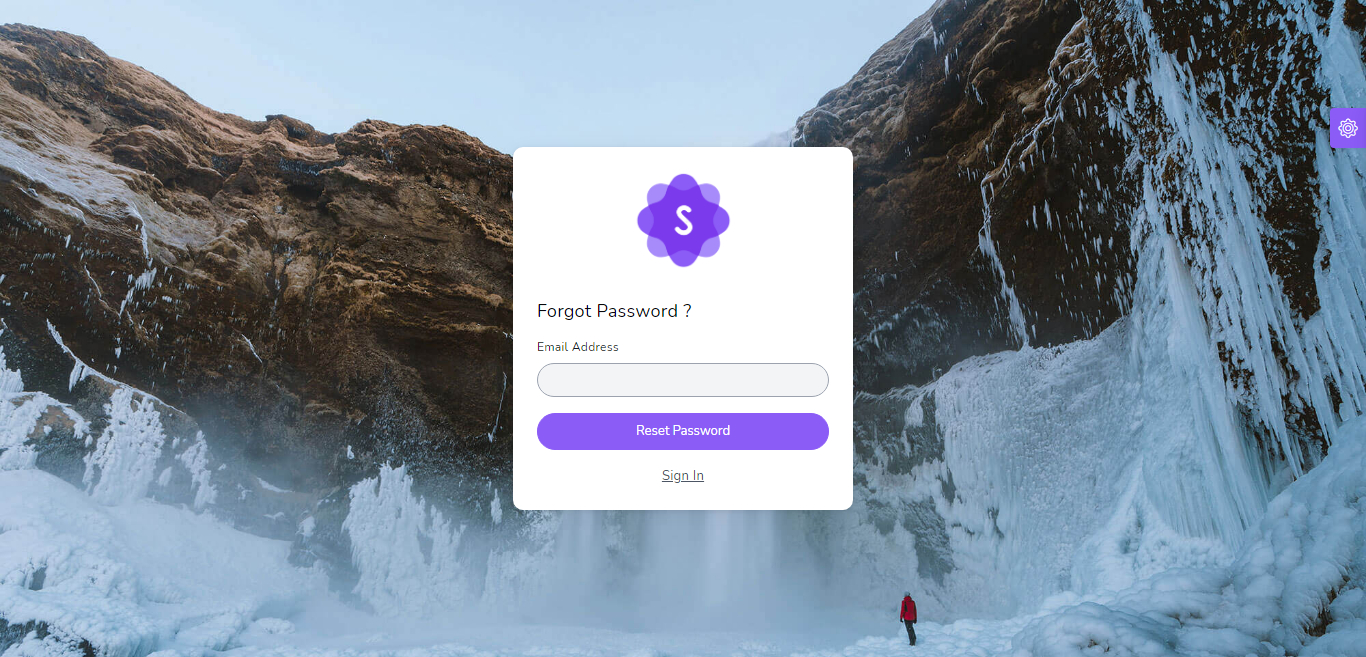
if you are reset password enter your email and click in reset button , and check your email for lien de reinitialisation
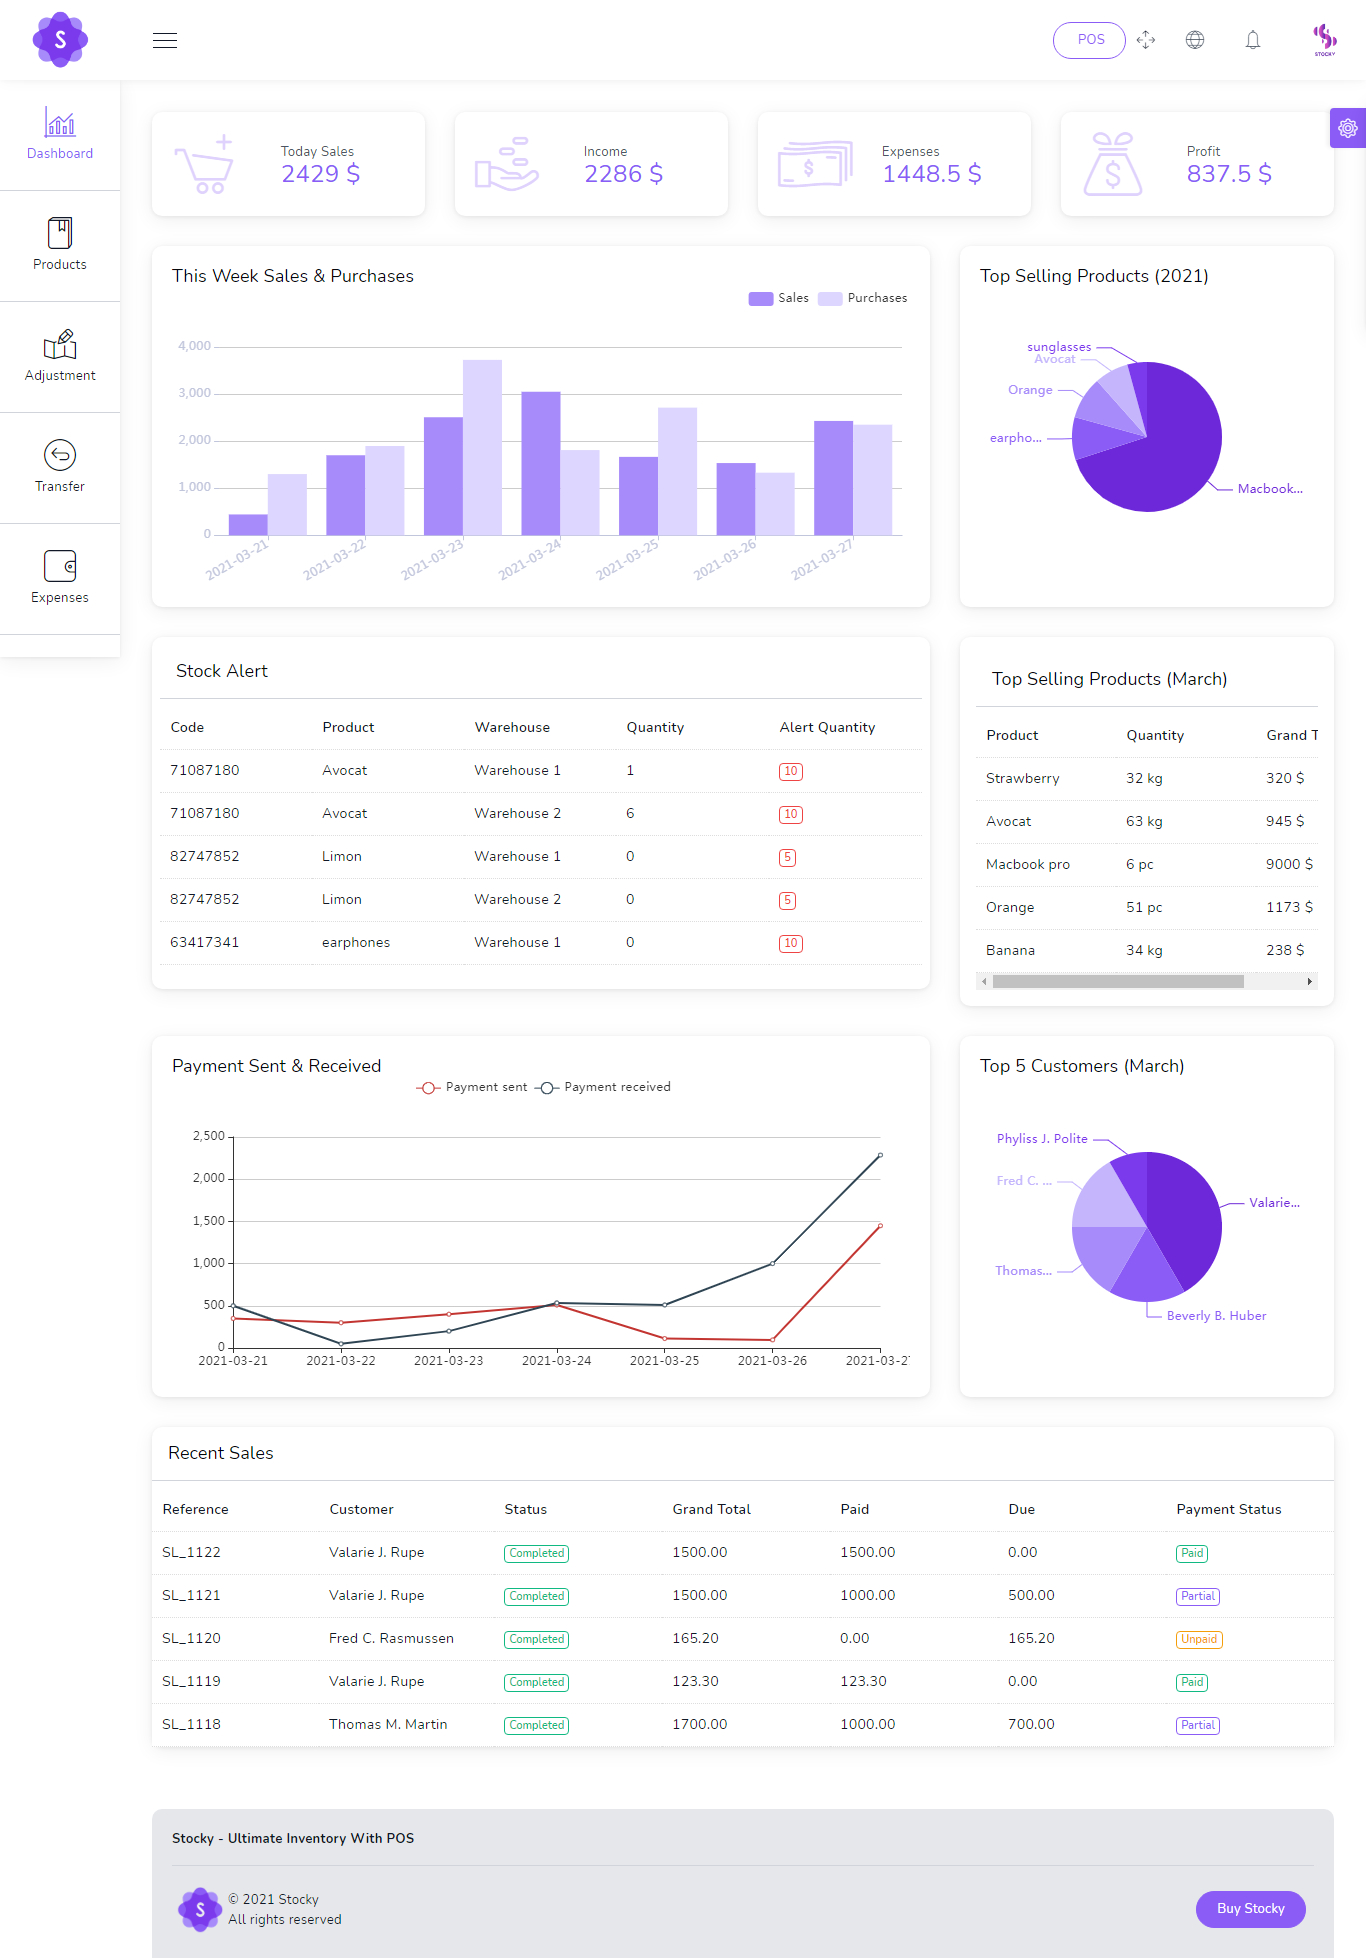
Dashboard
Dynamic dashboard
- Today Sales
- Today Income
- Today Expenses
- Today Profit
- This Week Sales & Purchases
- Top Selling Products This Month
- Payment Sent & Received This Week
- Top 5 Customers This Month
- Recent Sales
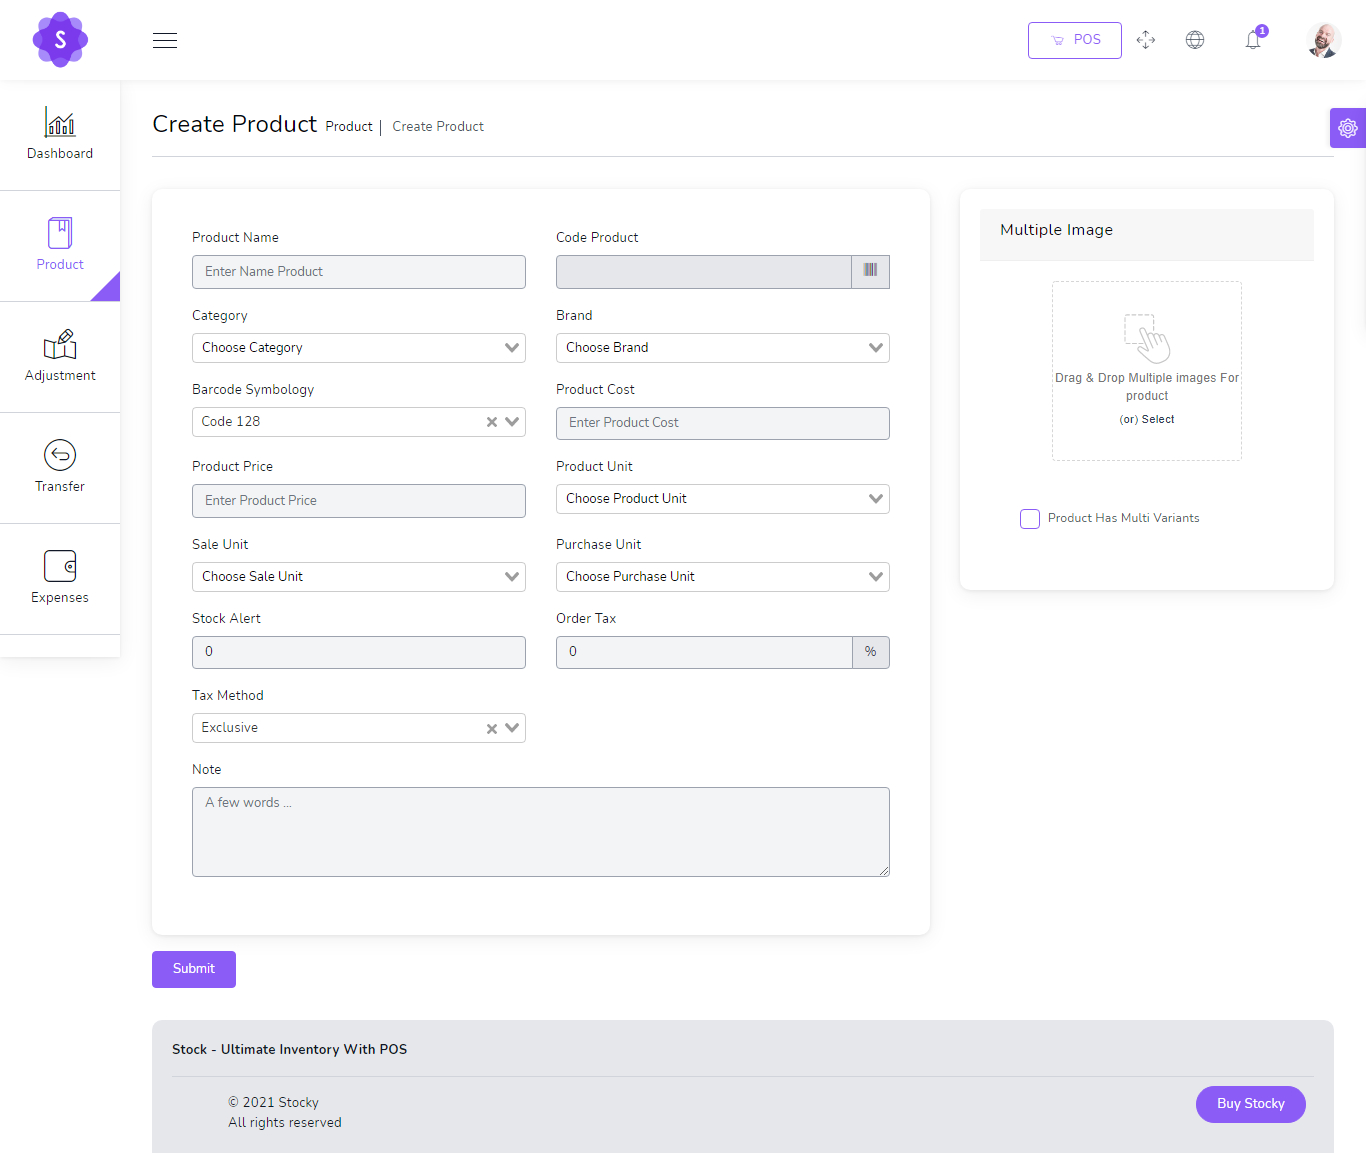
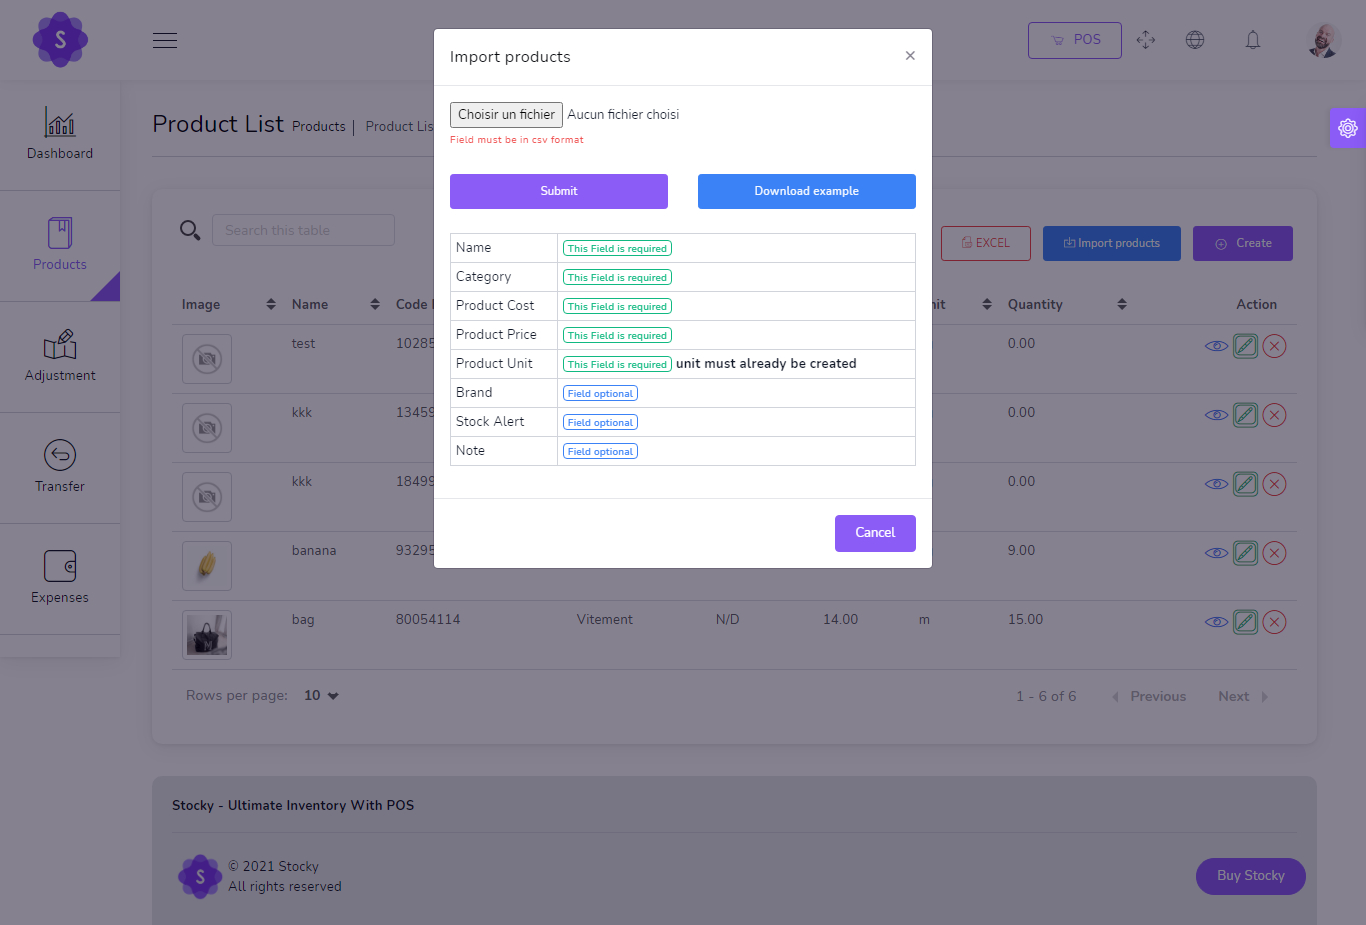
Products
to create a new product it's very easy
- Product Name
(required) - Product Code
(required) - Category
(required) - Brand
(optional) - Barcode Symbology
(required) - Product Cost
(required) - Product Price
(required) - Product Unit
(required) - Sale Unit
(required) - Purchase Unit
(required) - Stock Alert
(optional) - Order Tax
(optional) - Tax Method
(optional) - Note
(optional) - you can add multiple product image
- you can add multiple variant of product
You can manage product list
- Edit Product
- View Details Product
- Delete Product
- Generate Product list in PDF
- Generate Product list in Excel
- Filter product by code , name , category , name
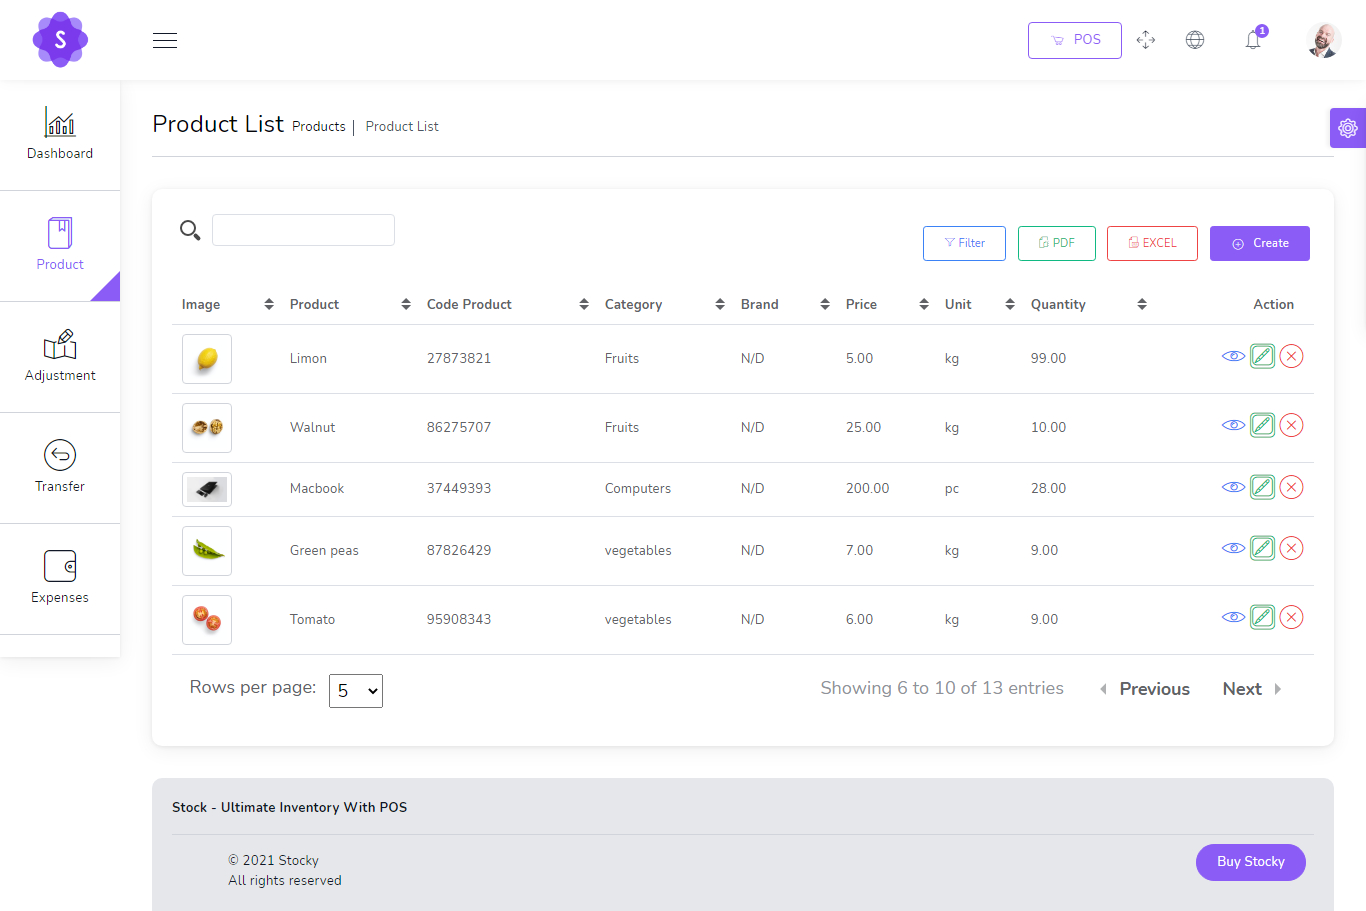
Print Barcode
Import Products by csv
Transfers
to create a new Transfer it's very easy
- From Warehouse
(required) - To Warehouse
(required) - Status
(required)
You can manage Transfer list
- Edit Transfer
- View Details Transfer
- Delete Transfer
- Generate Transfer list in PDF
- Generate Transfer list in Excel
- Filter Transfer by Reference , To warehouse , From Warehouse , Status
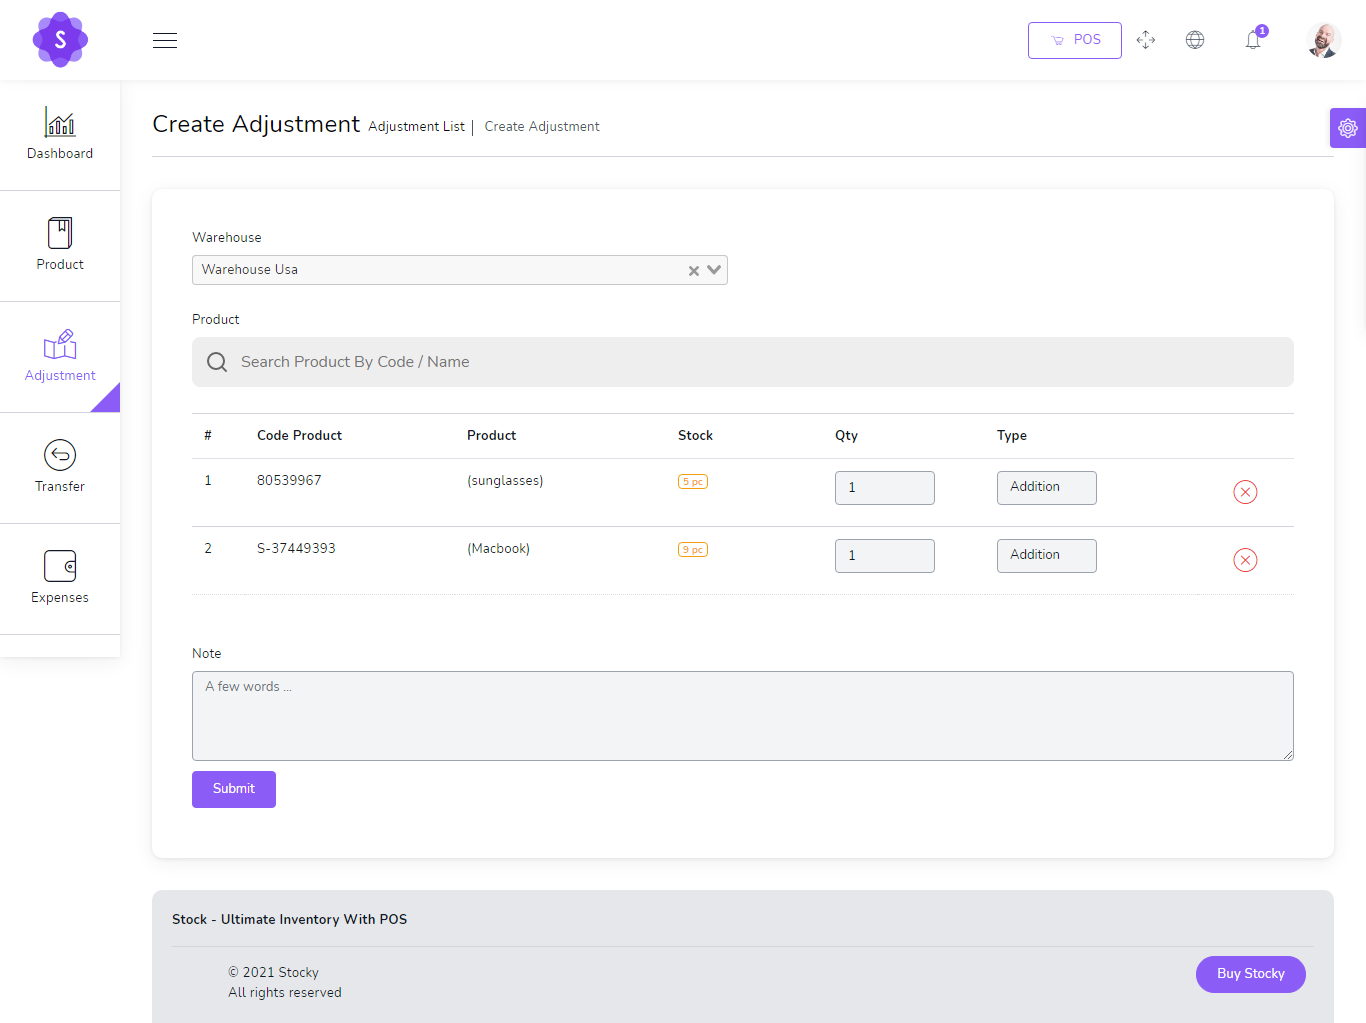
Adjustments
to create a new Adjustment it's very easy
- Warehouse
(required) - Select Product
(required)
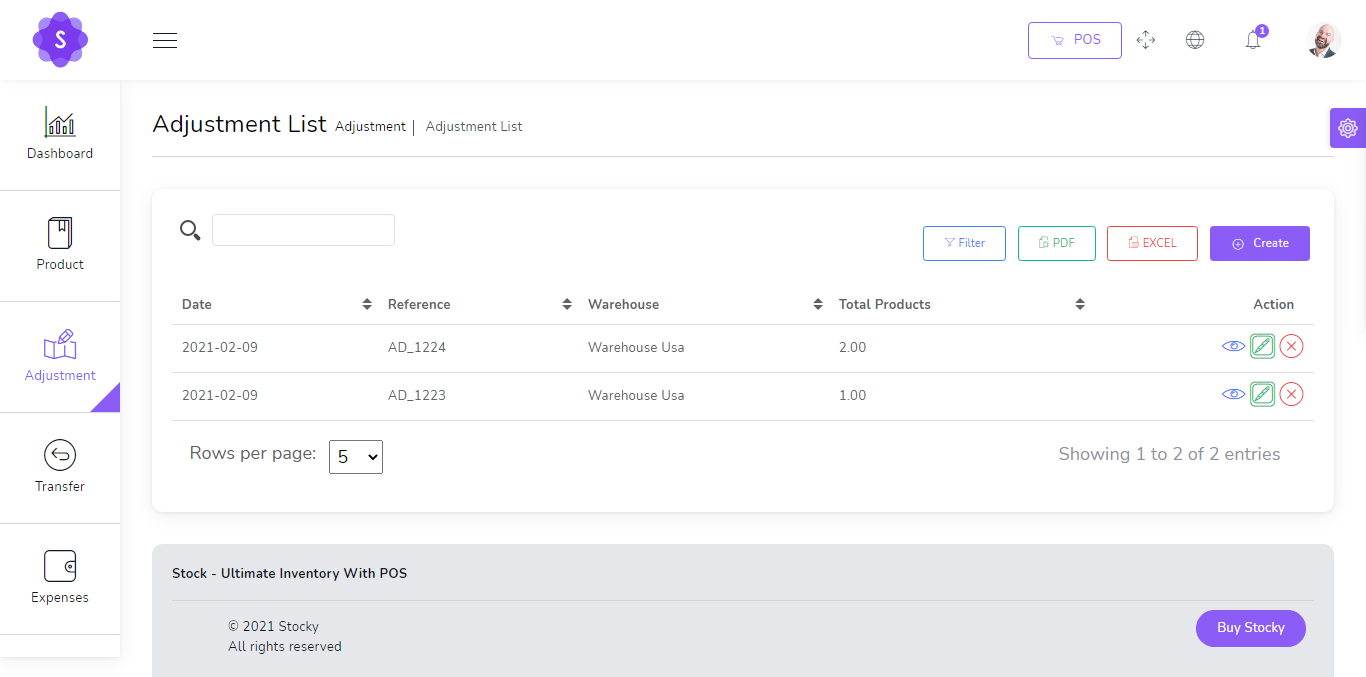
You can manage Adjustment list
- Edit Adjustment
- View Details Adjustment
- Delete Adjustment
- Generate Adjustment list in PDF
- Generate Adjustment list in Excel
- Filter Adjustment by Dtae , Reference , warehouse
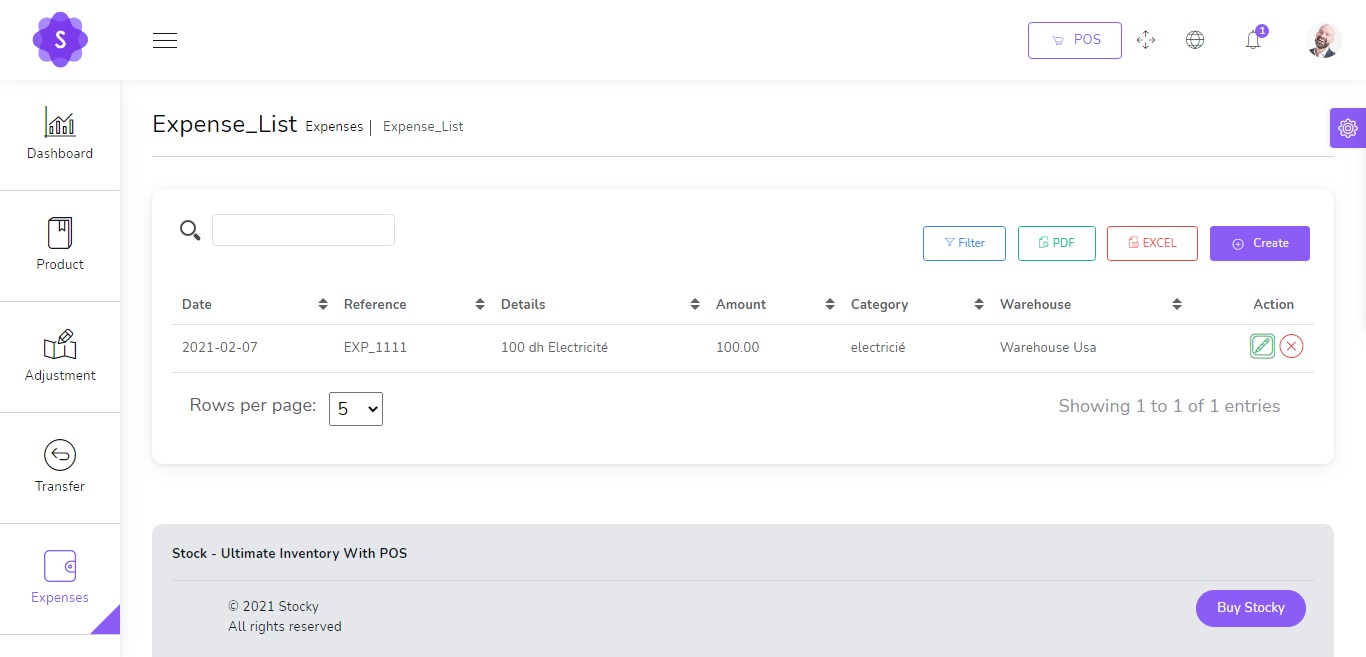
Expenses
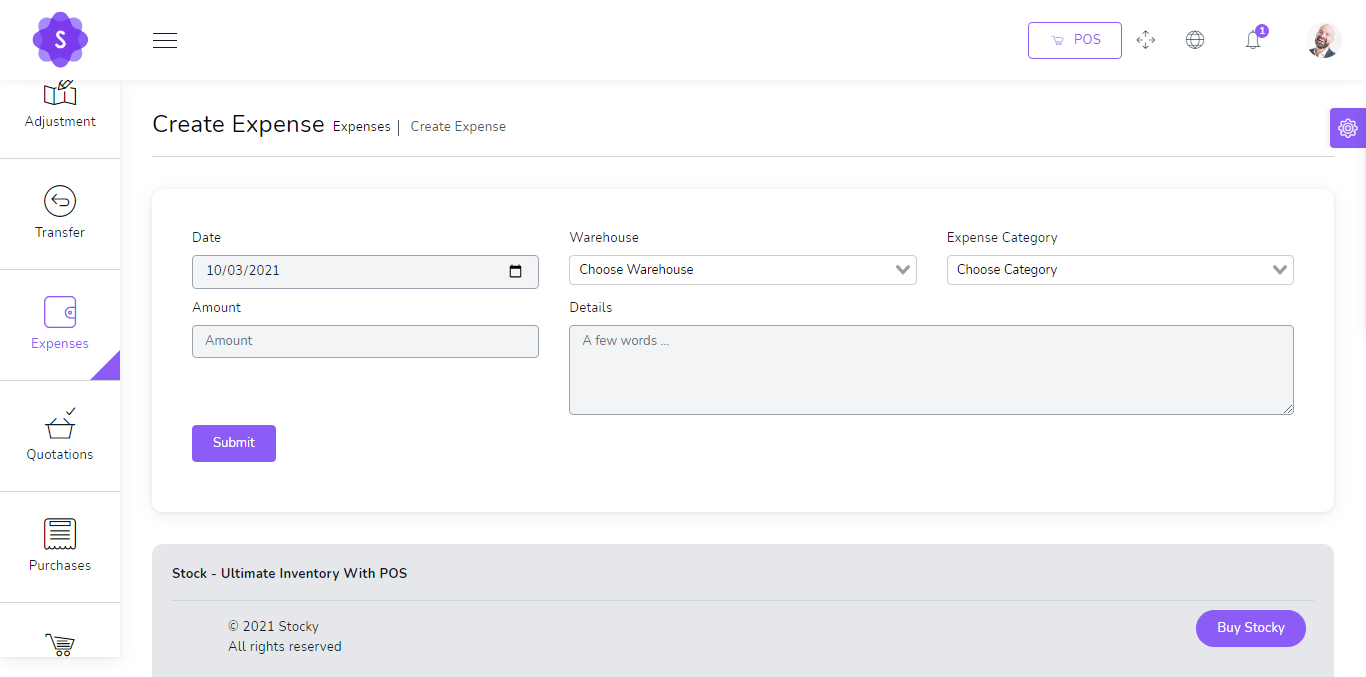
to create a new Expense it's very easy
- Date
(required) - Warehouse
(required) - Expense category
(required) - Amount
(required) - Details
(optional)
You can manage Expense list
- Edit Expense
- Delete Expense
- Generate Expense list in PDF
- Generate Expense list in Excel
- Filter Expense by Dtae , Reference , warehouse , Expense category
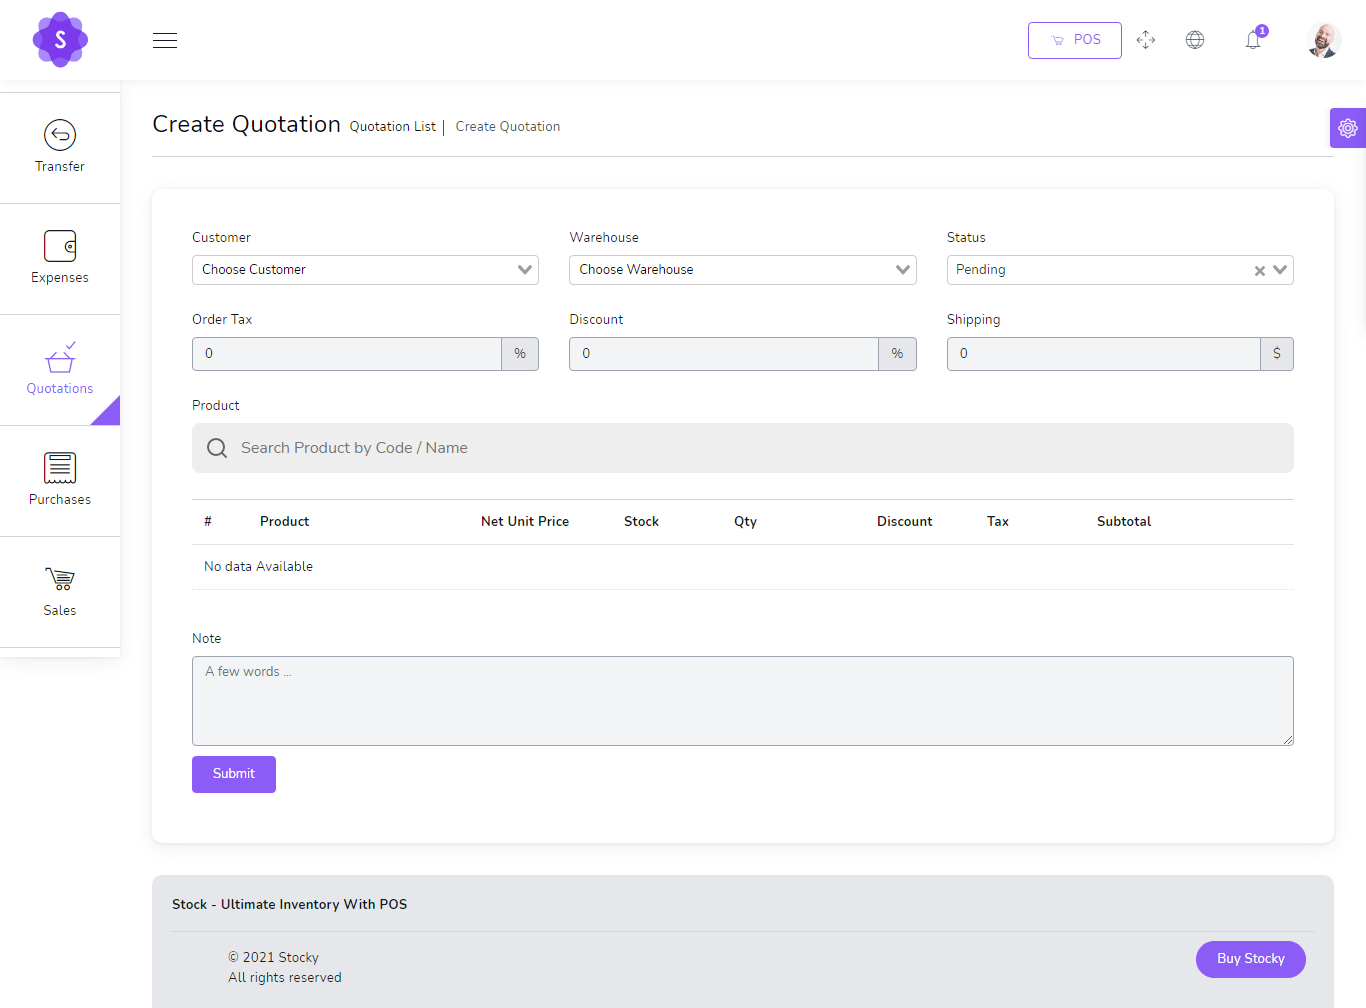
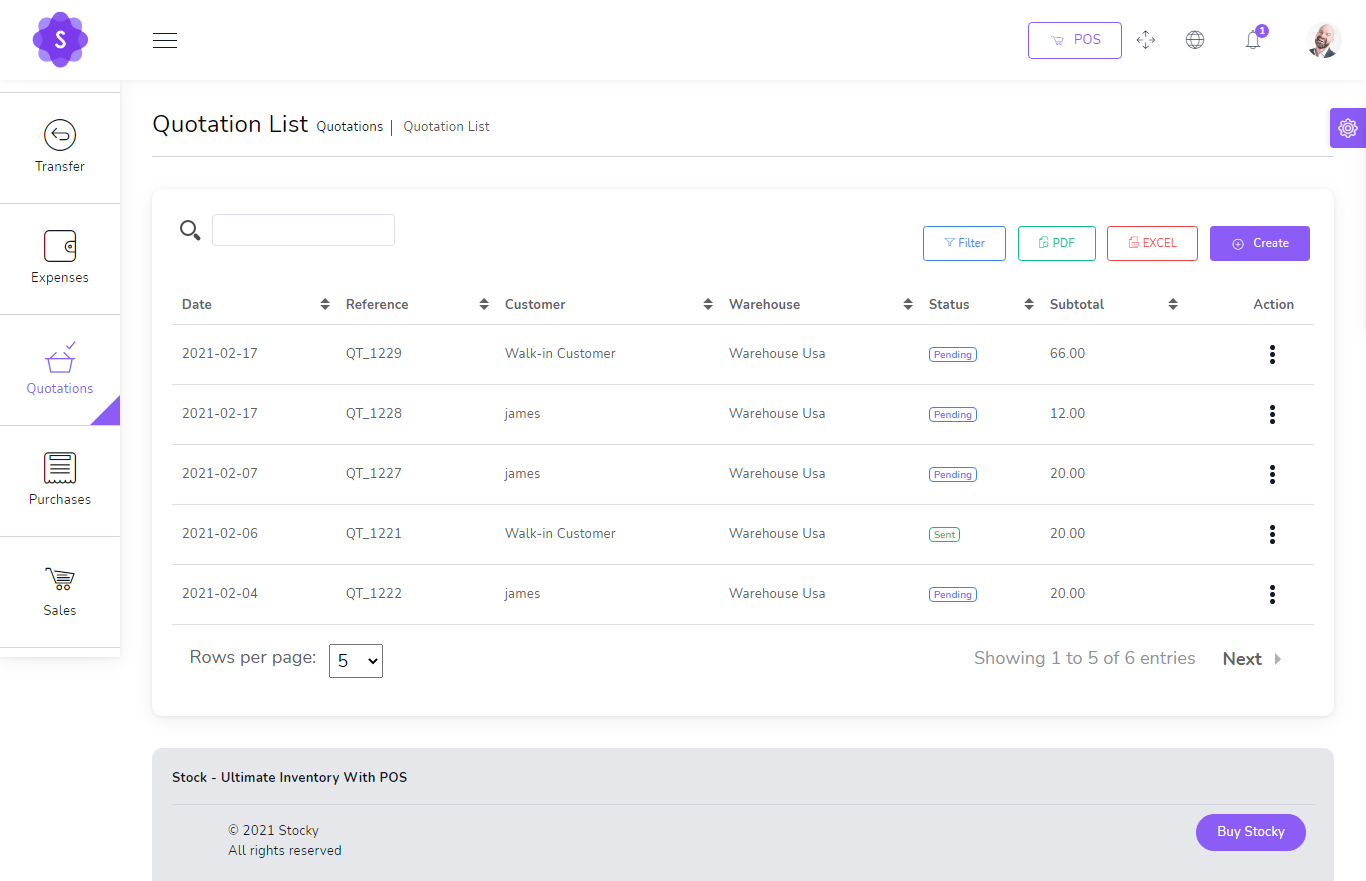
Quotations
to create a new quotation it's very easy
- Customer
(required) - Warehouse
(required) - Status
(required)
You can manage quotation list
- Edit quotation
- View Details quotation
- Delete quotation
- Change to Sale
- Send quotation on email
- Generate quotation list in PDF
- Generate quotation list in Excel
- Filter quotation by Date, Reference , Customer , Warehouse , Status
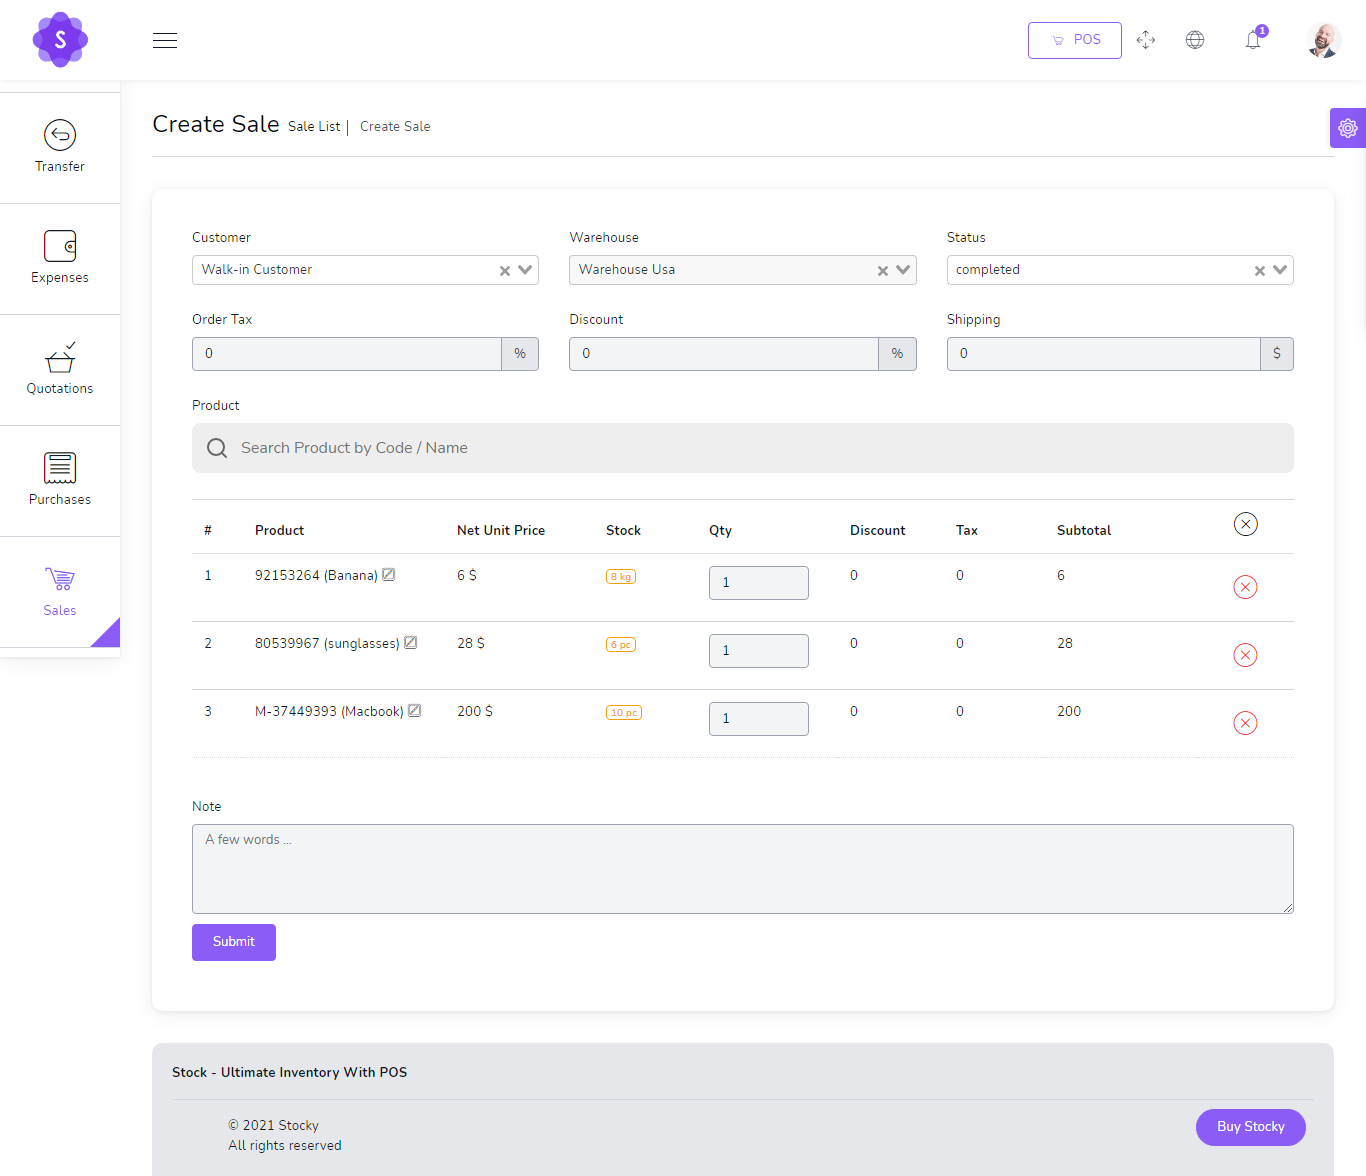
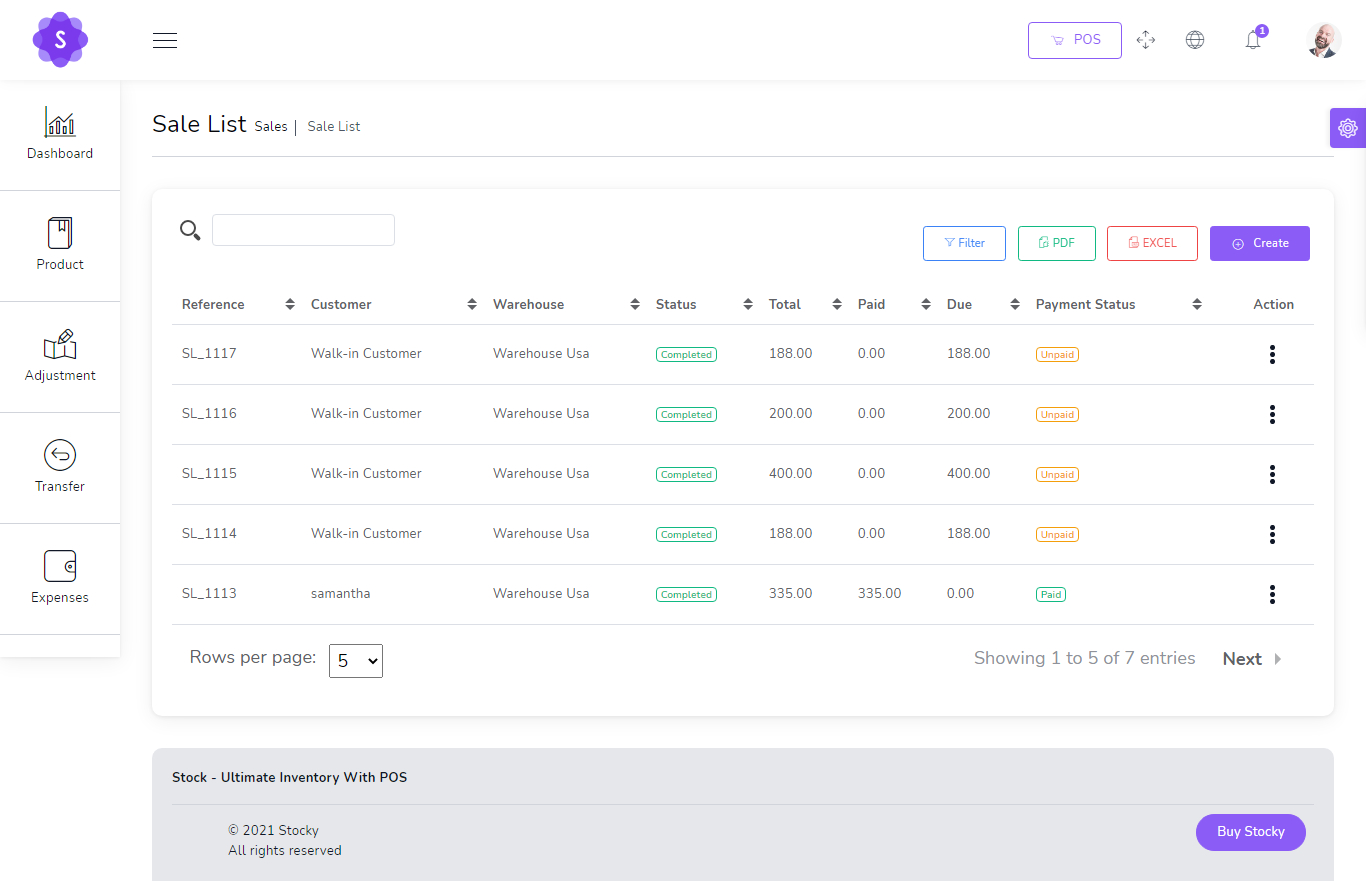
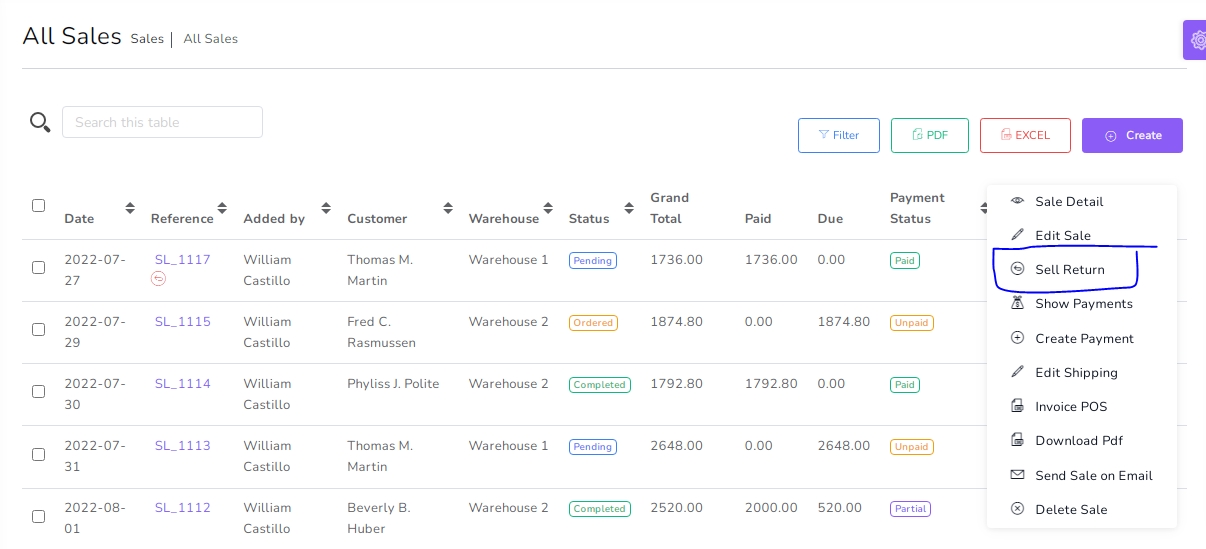
Sales
to create a new sale it's very easy
- Customer
(required) - Warehouse
(required) - Status
(required)
You can manage sale list
- Edit sale
- View Details sale
- Delete sale
- Change to Sale
- Send sale on email
- Generate sale list in PDF
- Generate sale list in Excel
- Filter sale by Date, Reference , Customer , Warehouse , Status , Payment status
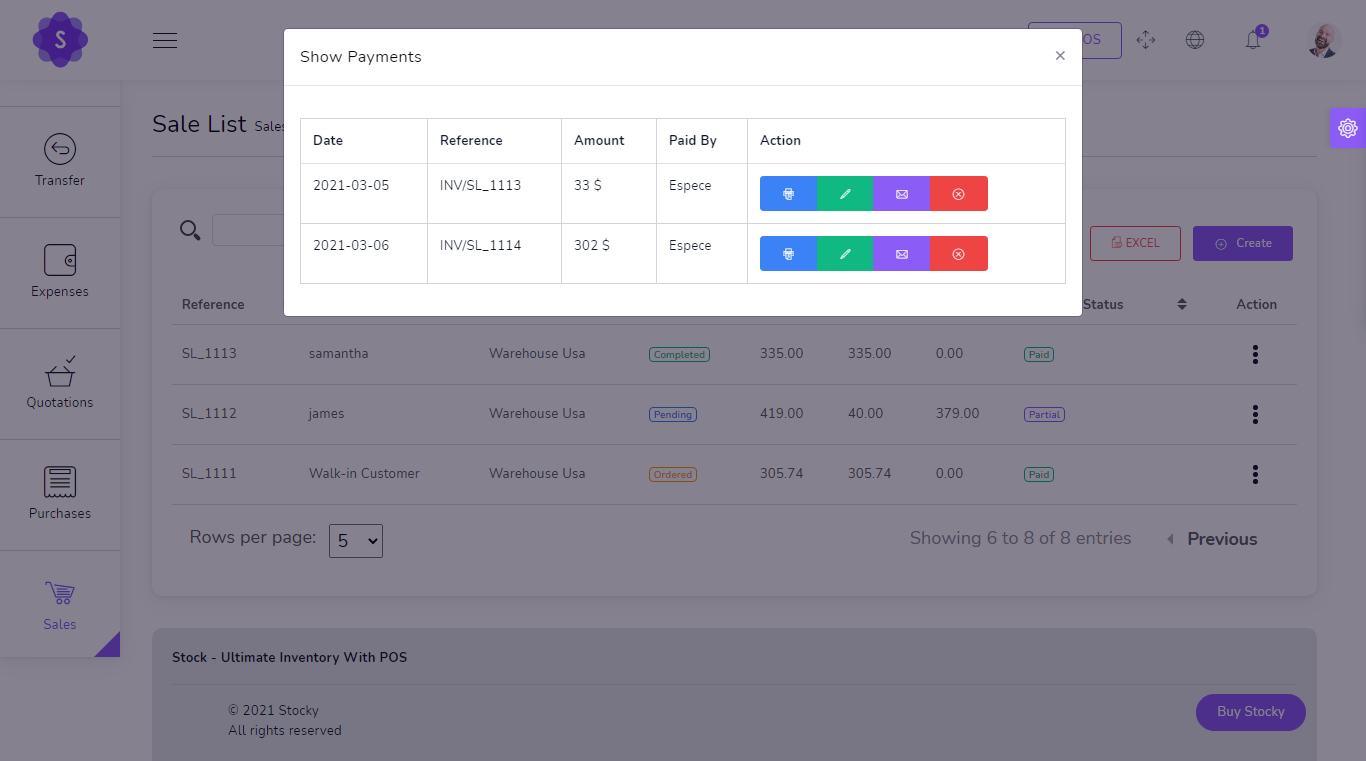
Show Payment
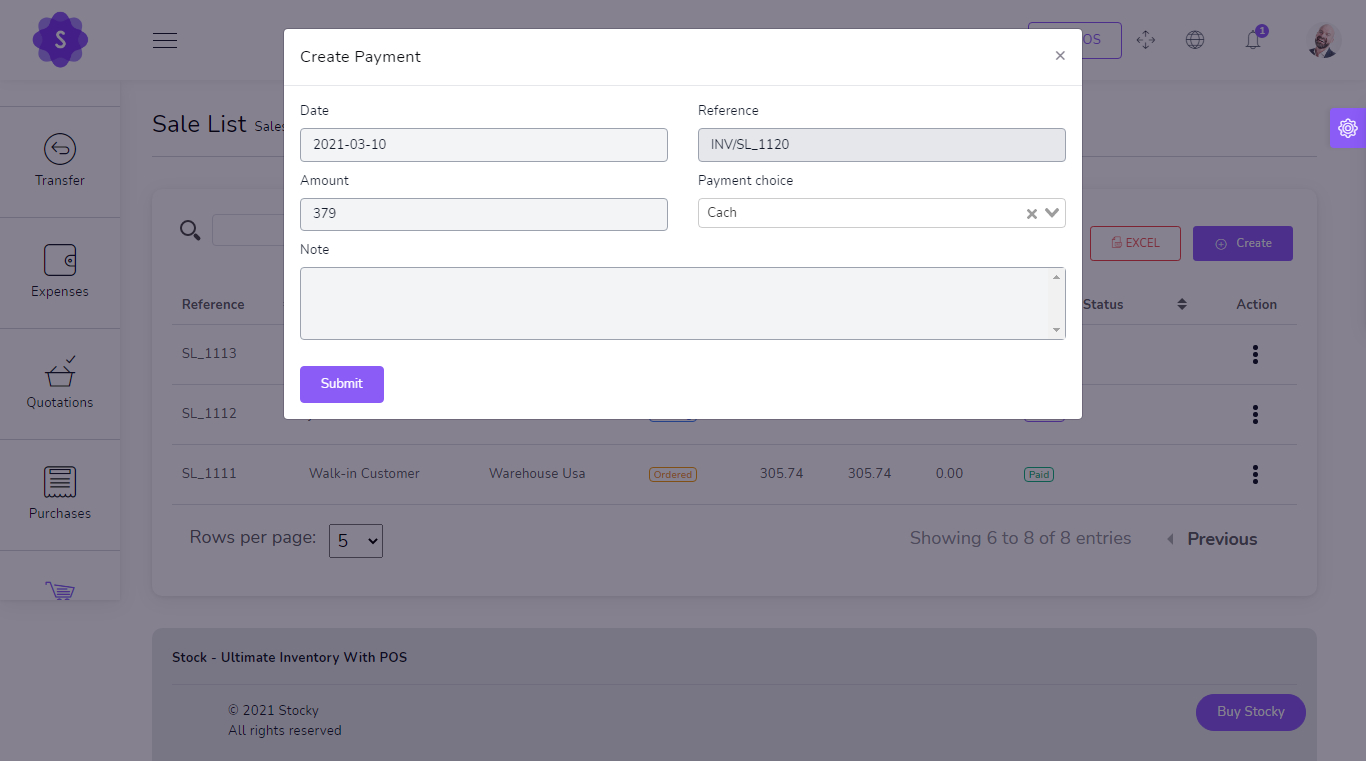
Add Payment
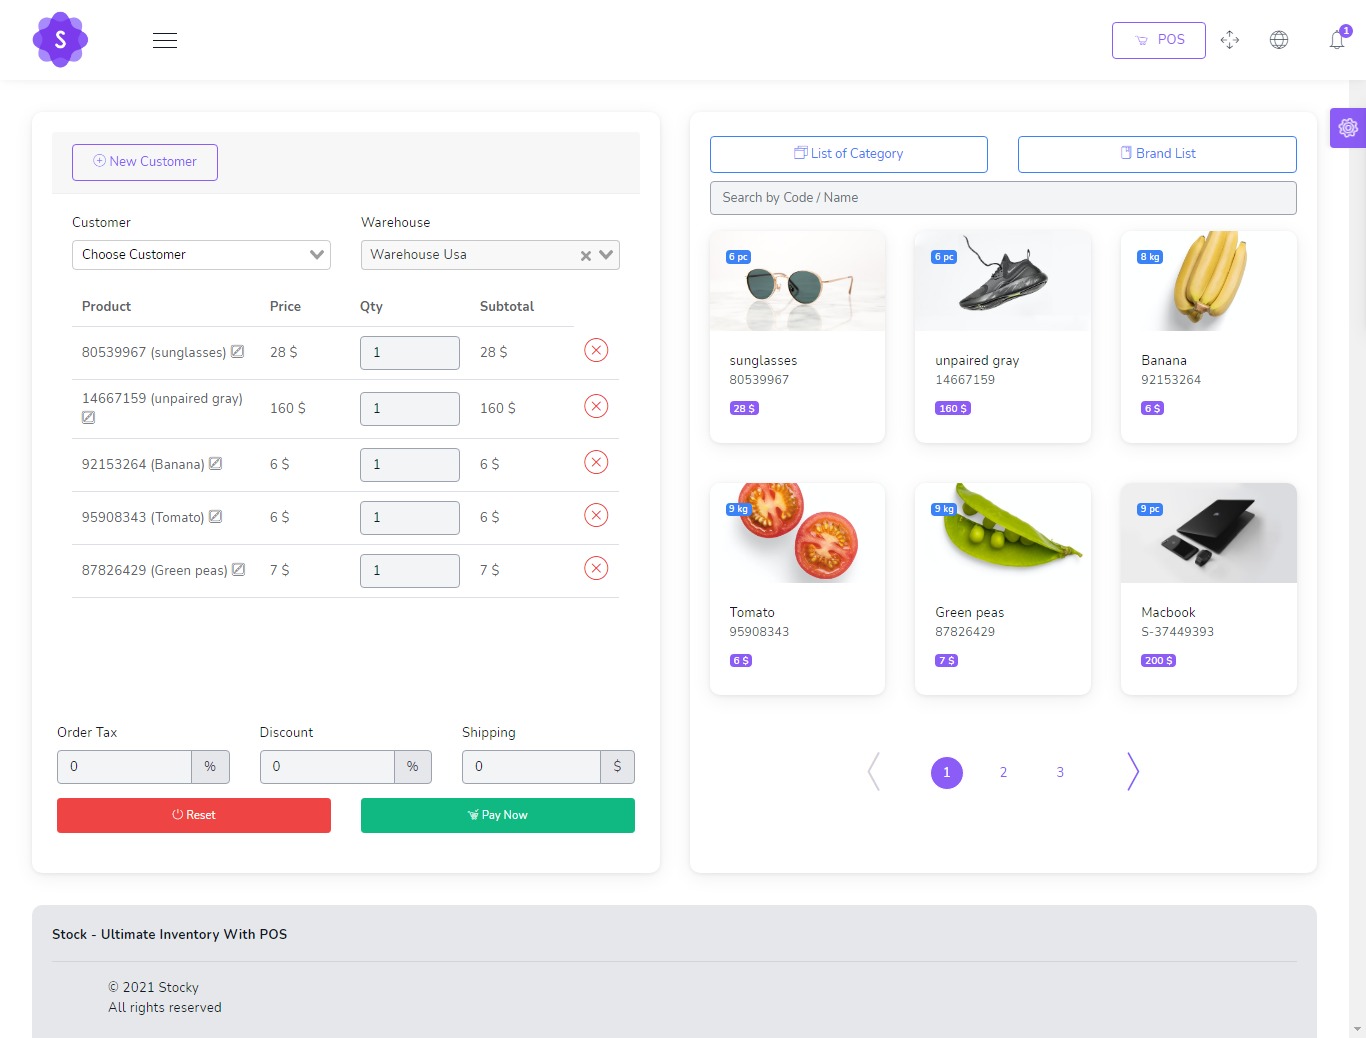
Sales POS
Easy POS
- Barcode Scanner
- you can search for product by name or code
- Filter Product by Brand , Category
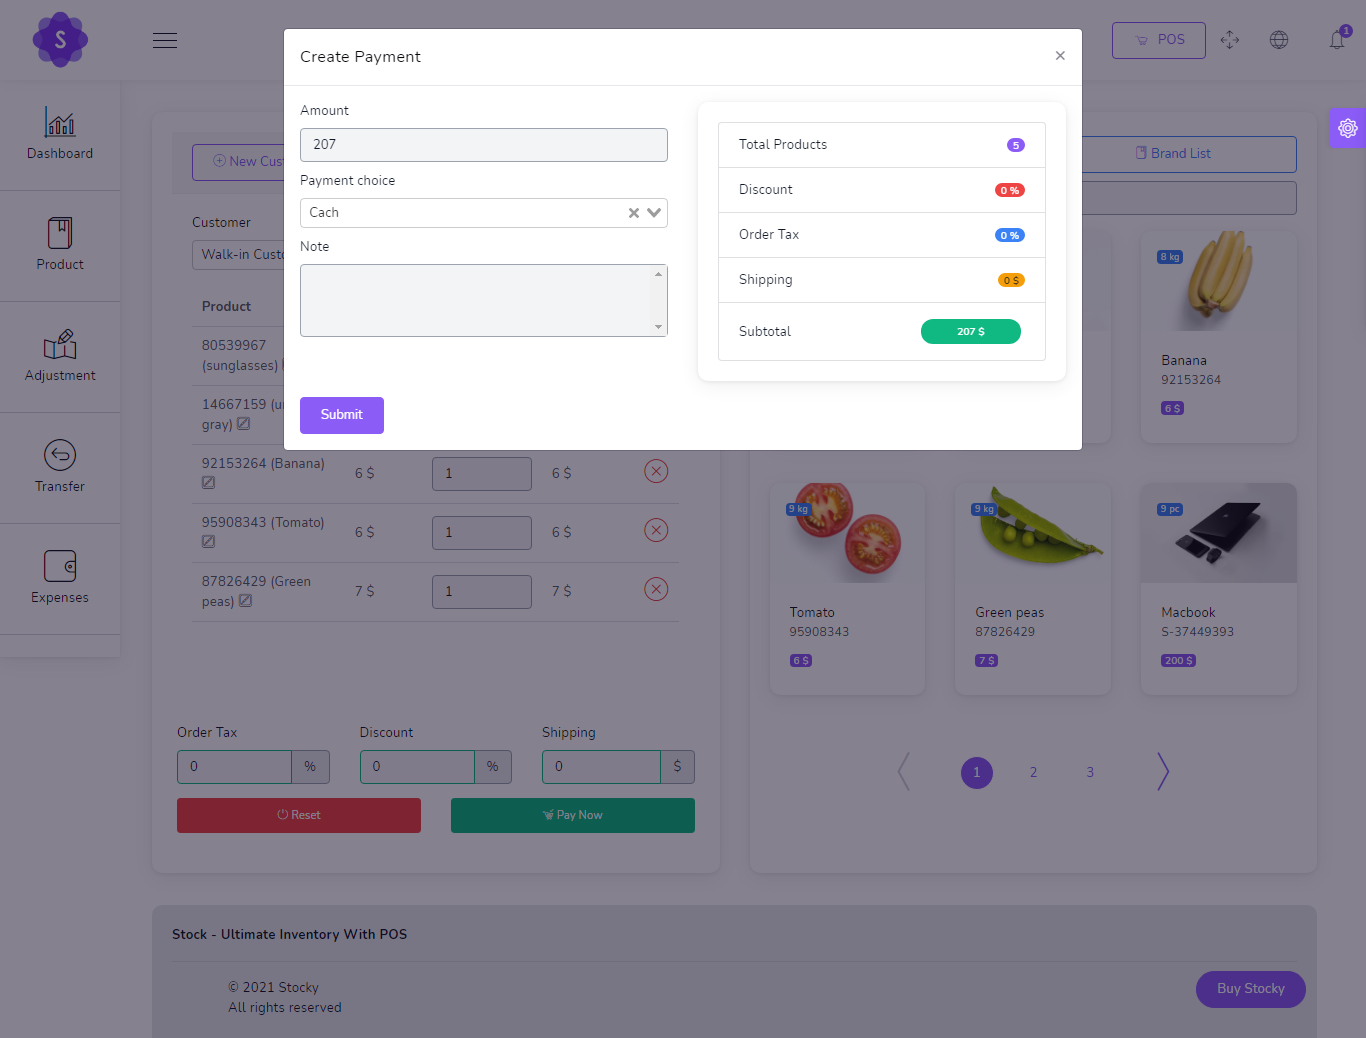
POS Payment
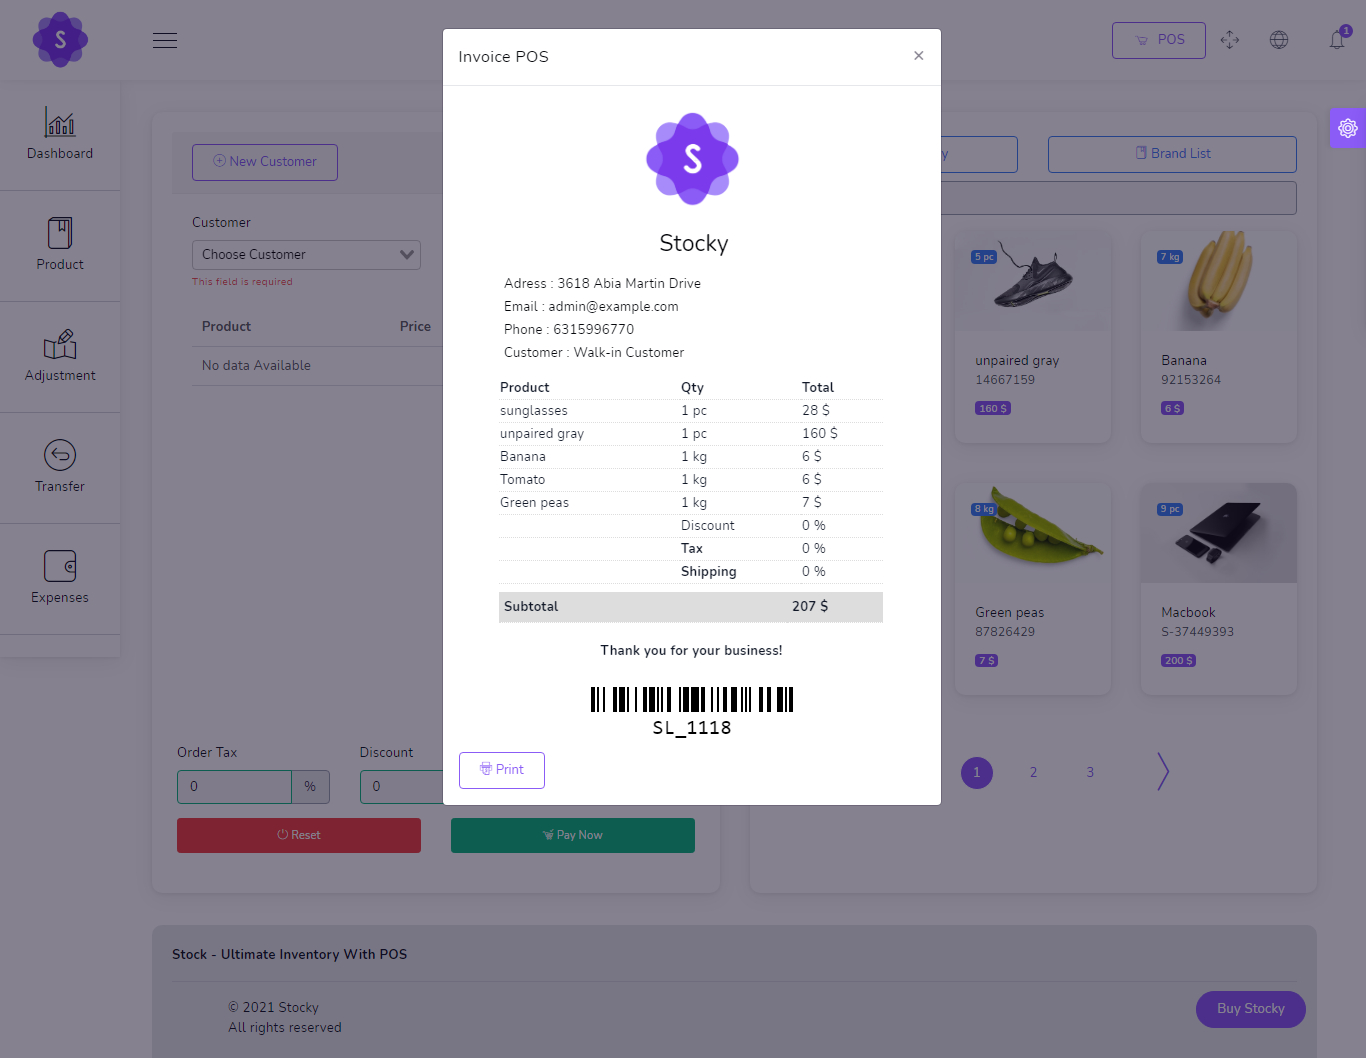
POS Invoice
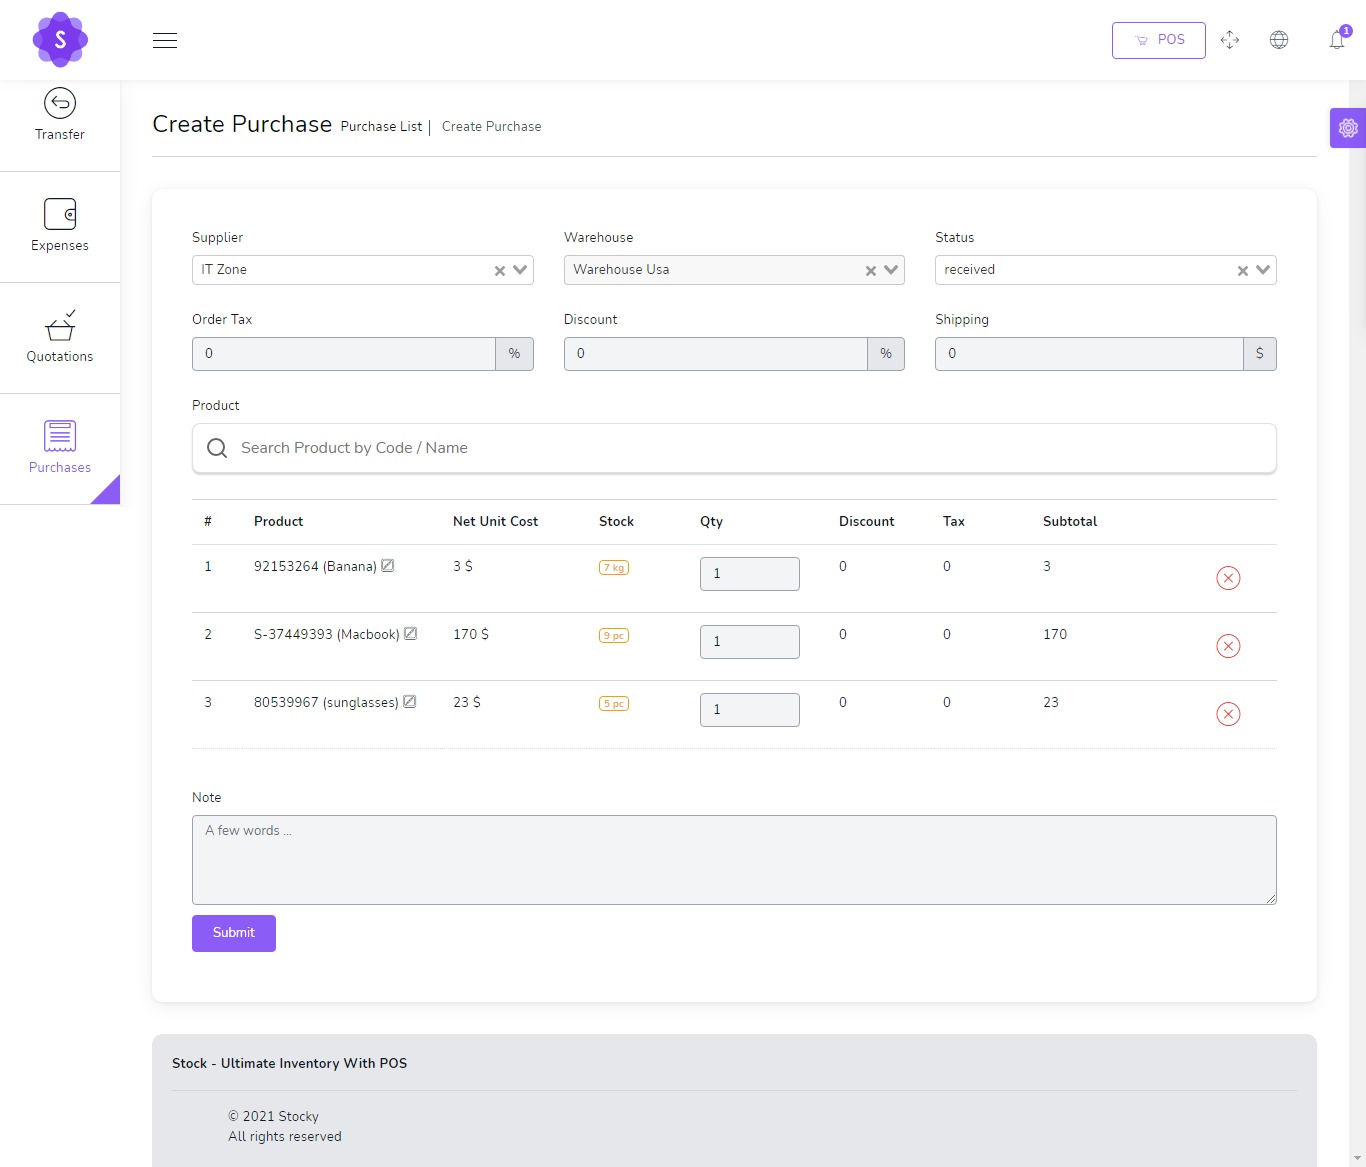
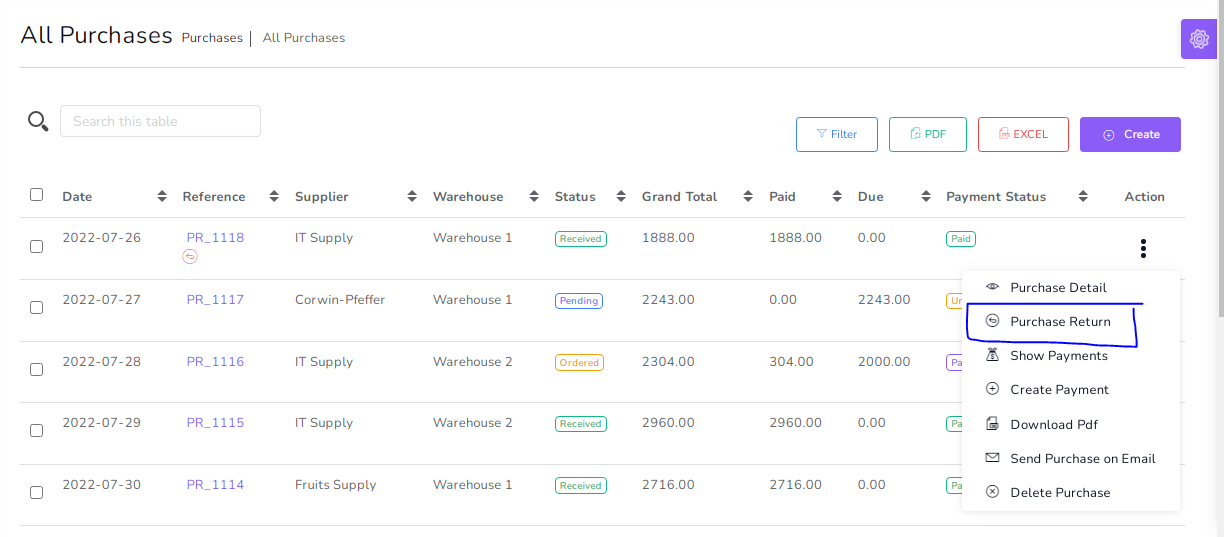
Purchases
to create a new purchase it's very easy
- Supplier
(required) - Warehouse
(required) - Status
(required)
You can manage purchase list
- Edit purchase
- View Details purchase
- Delete purchase
- Send purchase on email
- Generate purchase list in PDF
- Generate purchase list in Excel
- Filter purchase by Date, Reference , Supplier , Warehouse , Status , Payment status
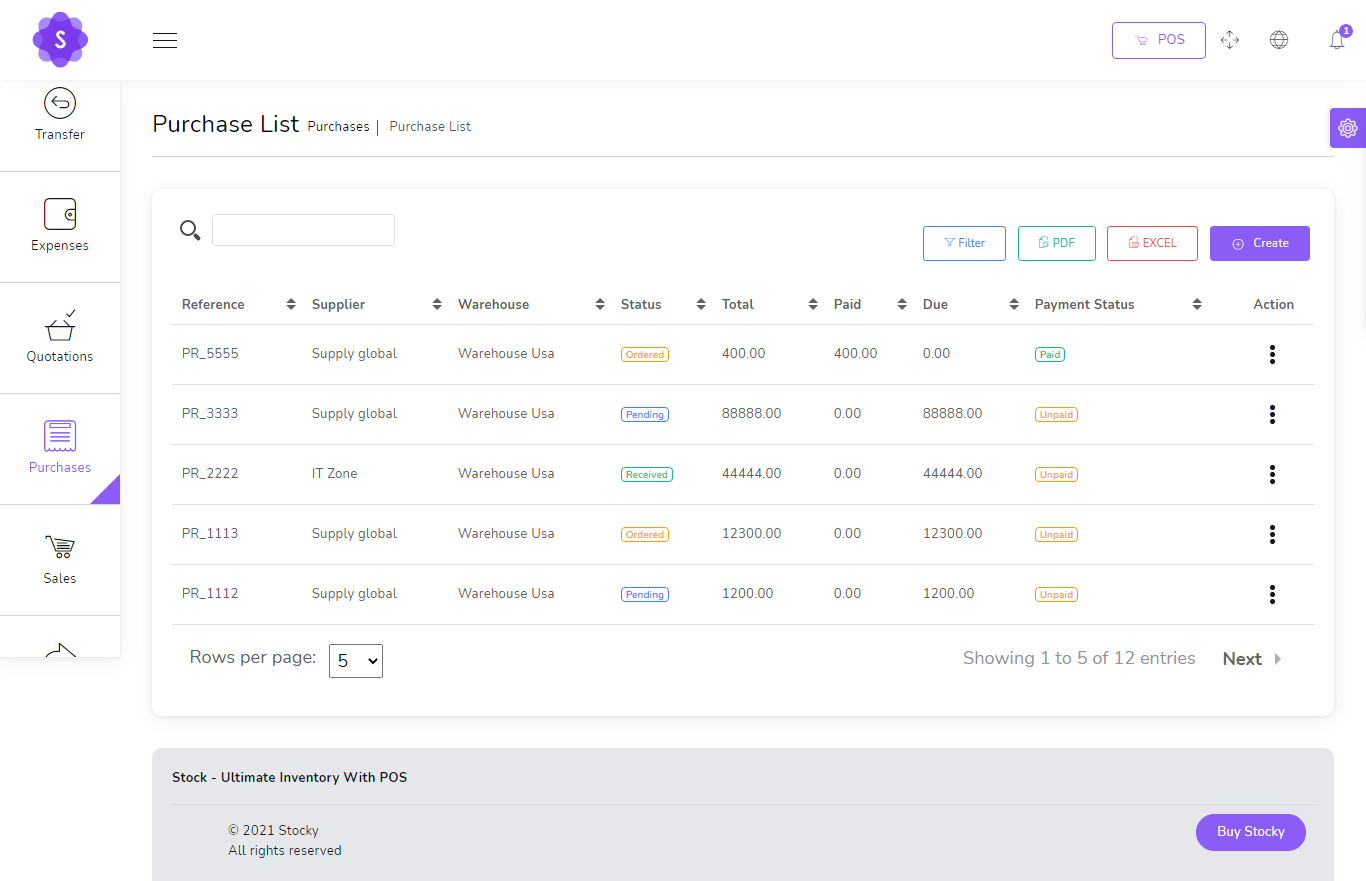
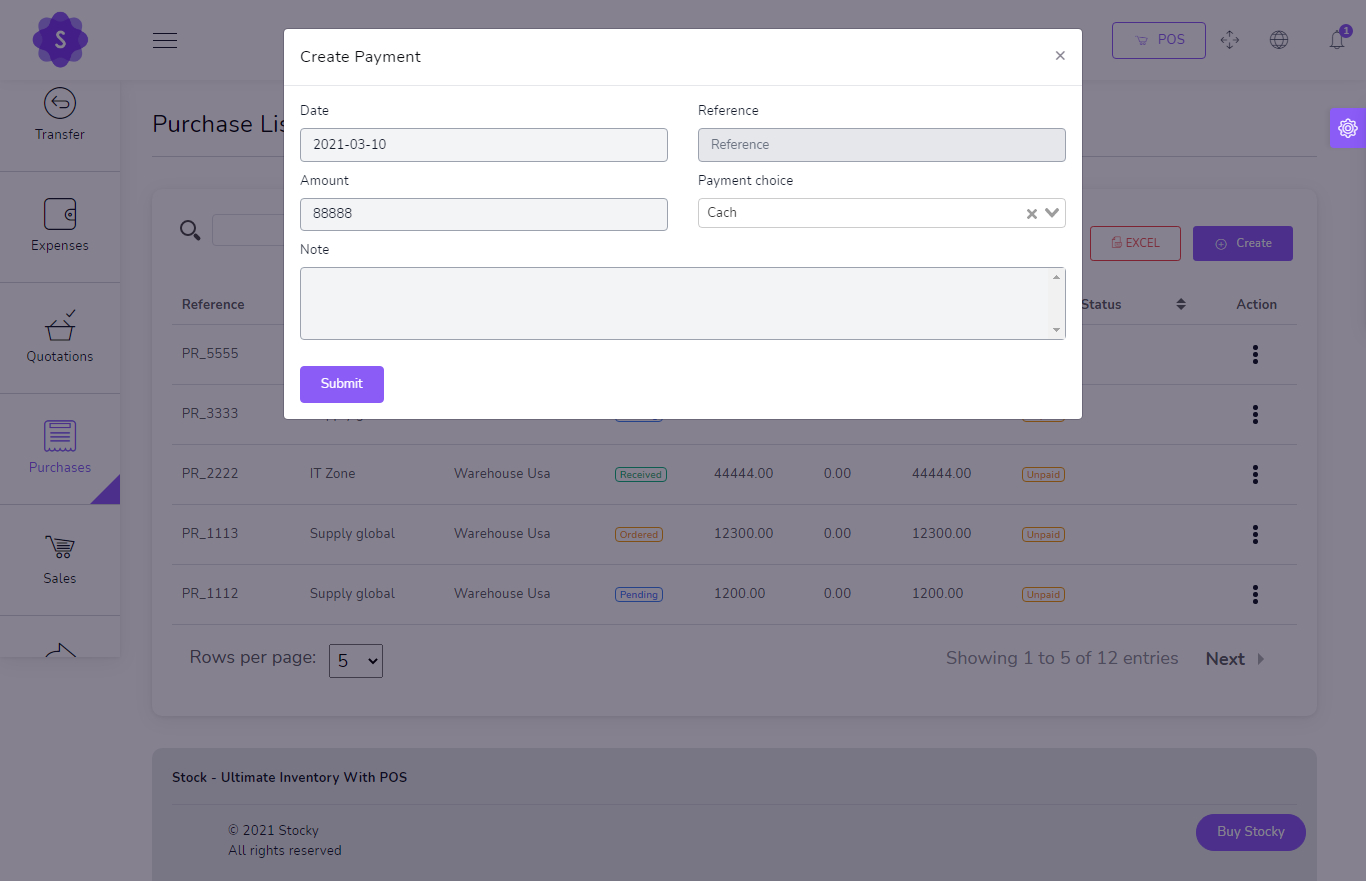
Show Payment
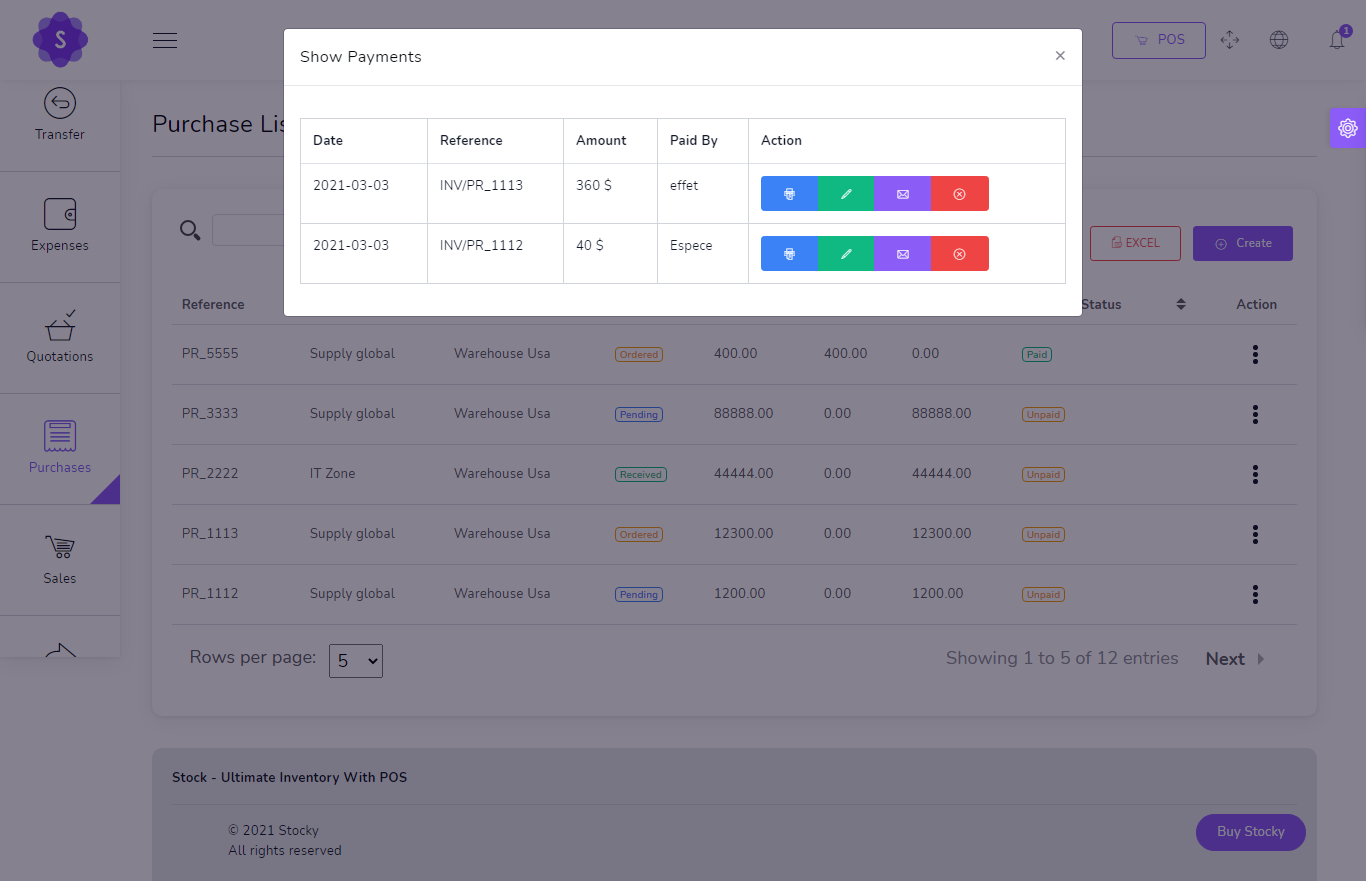
Add Payment
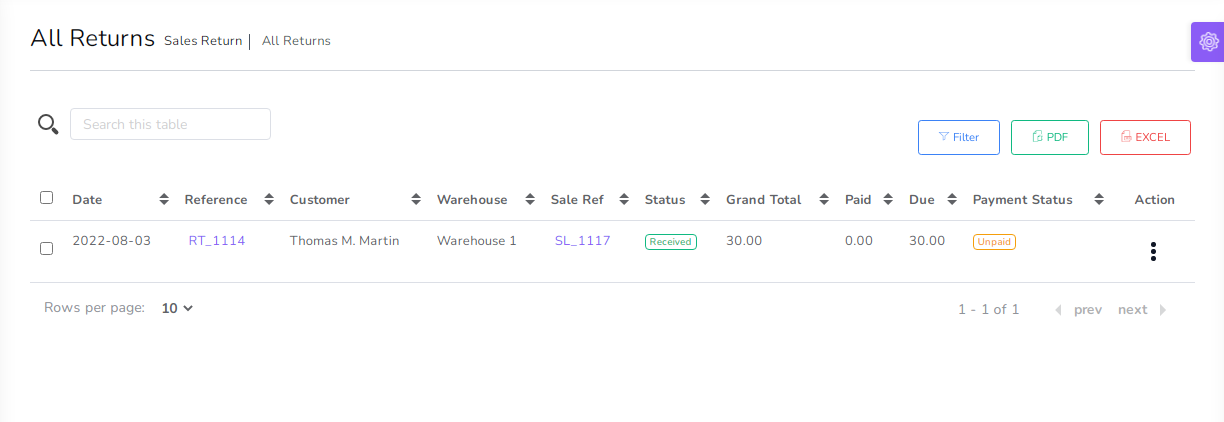
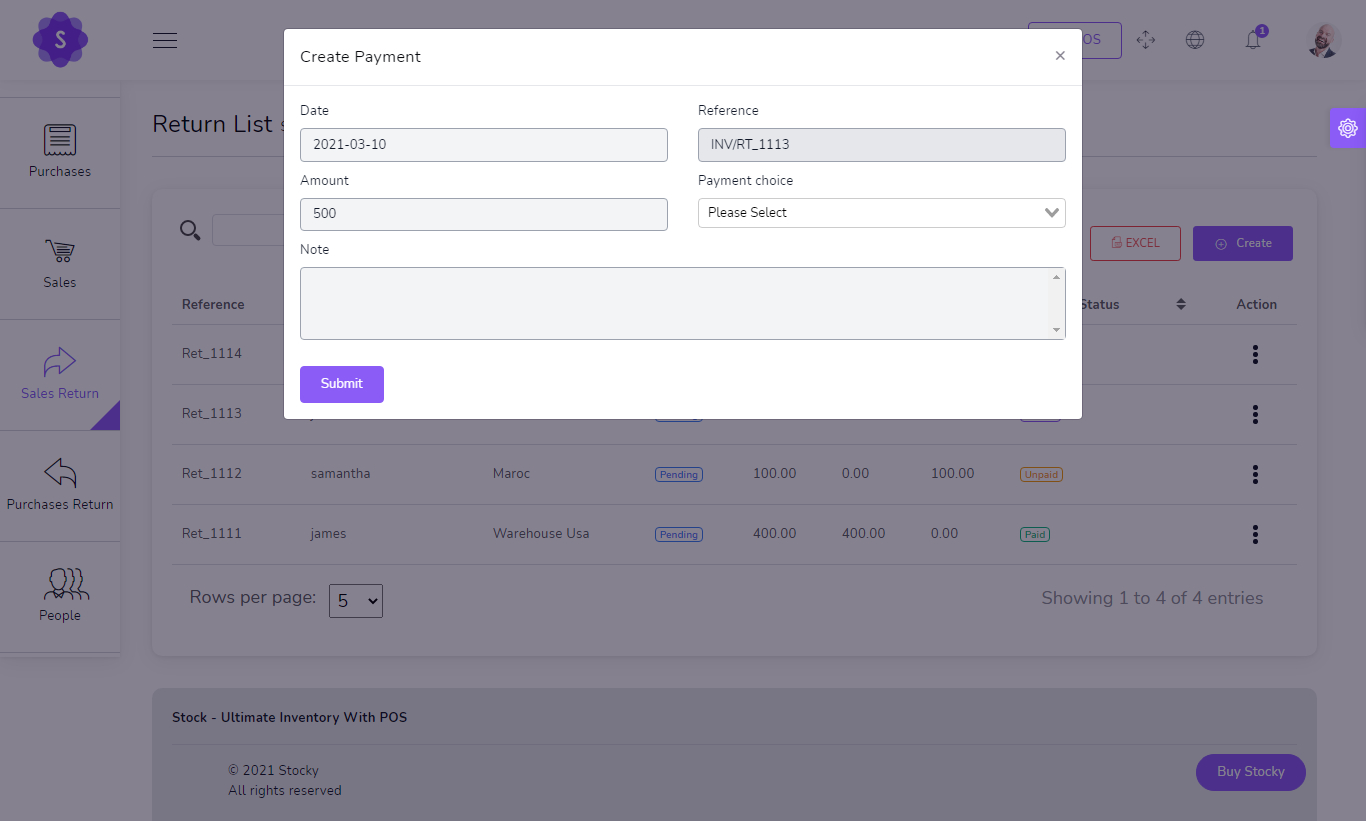
Sale Returns
to create a new Sale Return it's very easy
You can manage Sale Return list
- Edit Sale Return
- View Details Sale Return
- Delete Sale Return
- Send Sale Return on email
- Generate Sale Return list in PDF
- Generate Sale Return list in Excel
- Filter Sale Return by Date, Reference , Customer , Warehouse , Status , Payment status
Show Payment
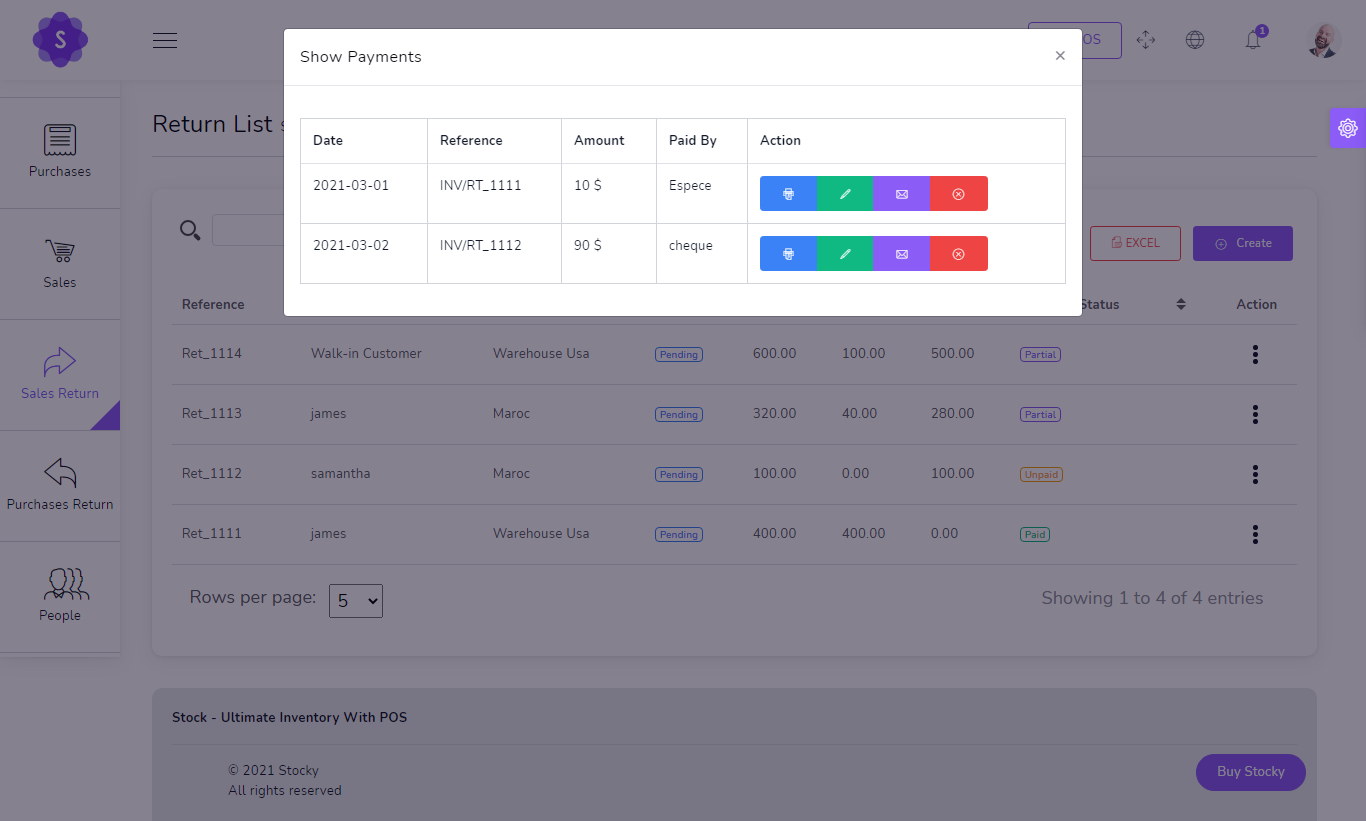
Add Payment
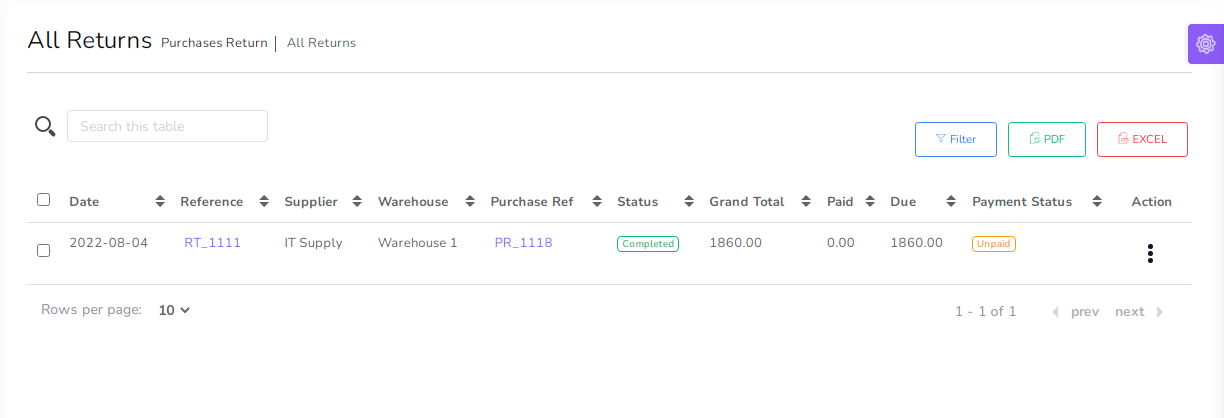
Purchase Returns
to create a new Purchase Return it's very easy
You can manage Purchase Return list
- Edit Purchase Return
- View Details Purchase Return
- Delete Purchase Return
- Send Purchase Return on email
- Generate Purchase Return list in PDF
- Generate Purchase Return list in Excel
- Filter Purchase Return by Date, Reference , Supplier , Warehouse , Status , Payment status
Show Payment
Add Payment
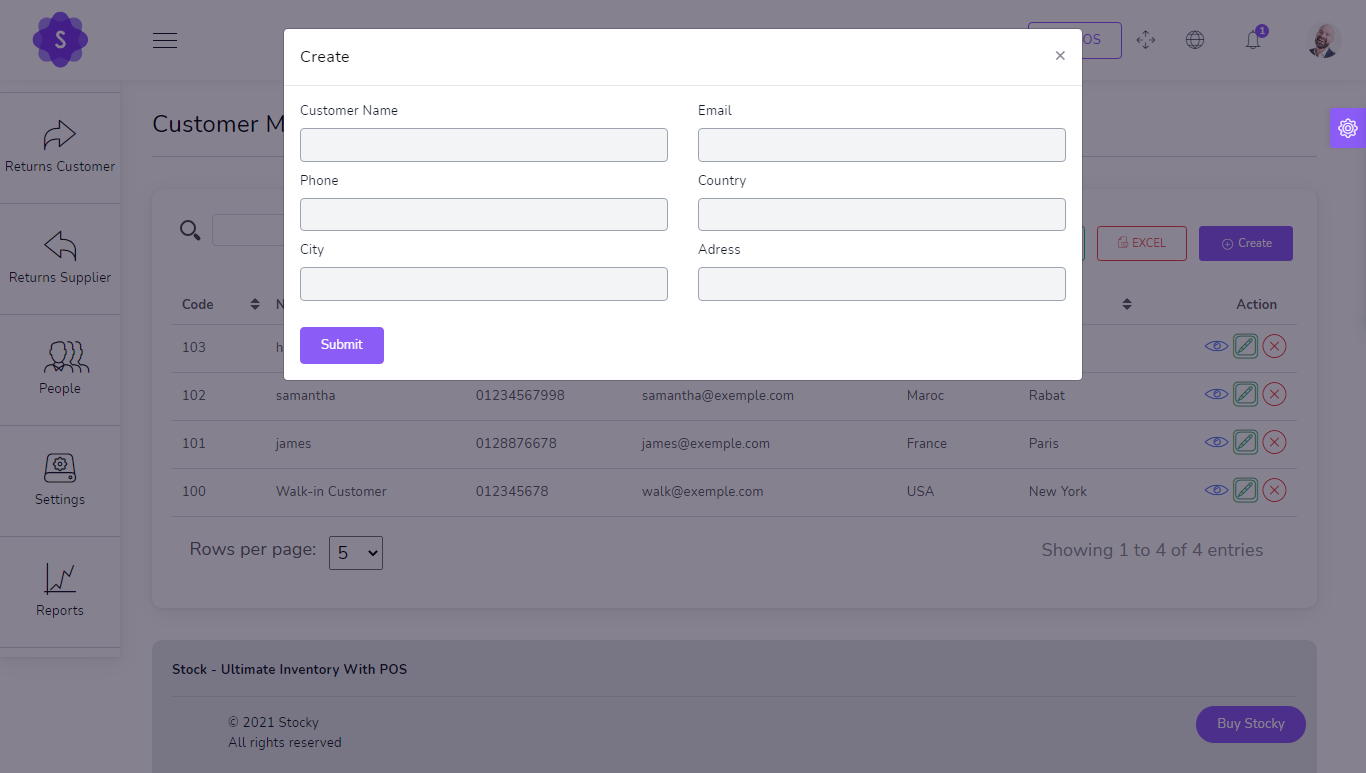
Customers
to create a new Customer it's very easy
- Name
(required) - Email
(required)
You can manage customer list
- Pay all sell due in single payment
- Pay all sell Return due in single payment
- Edit customer
- Delete customer
- Generate customer list in PDF
- Generate customer list in Excel
- Search customer
- Filter customer by Name ,Code , phone , Email
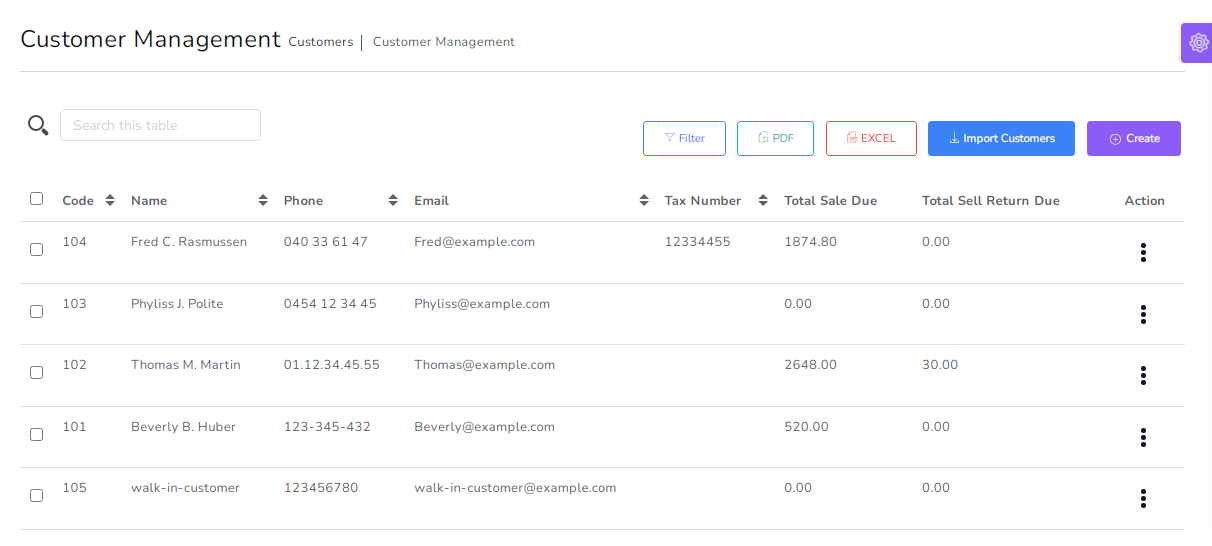
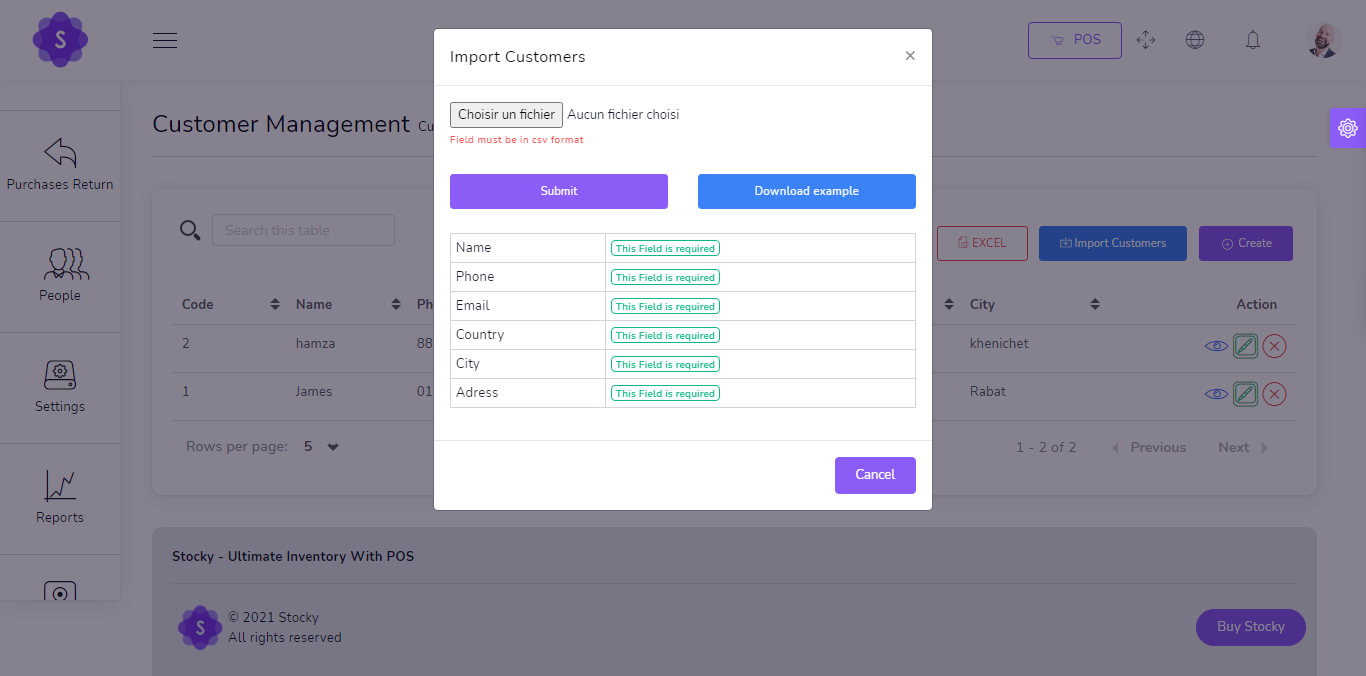
Import Customers by csv
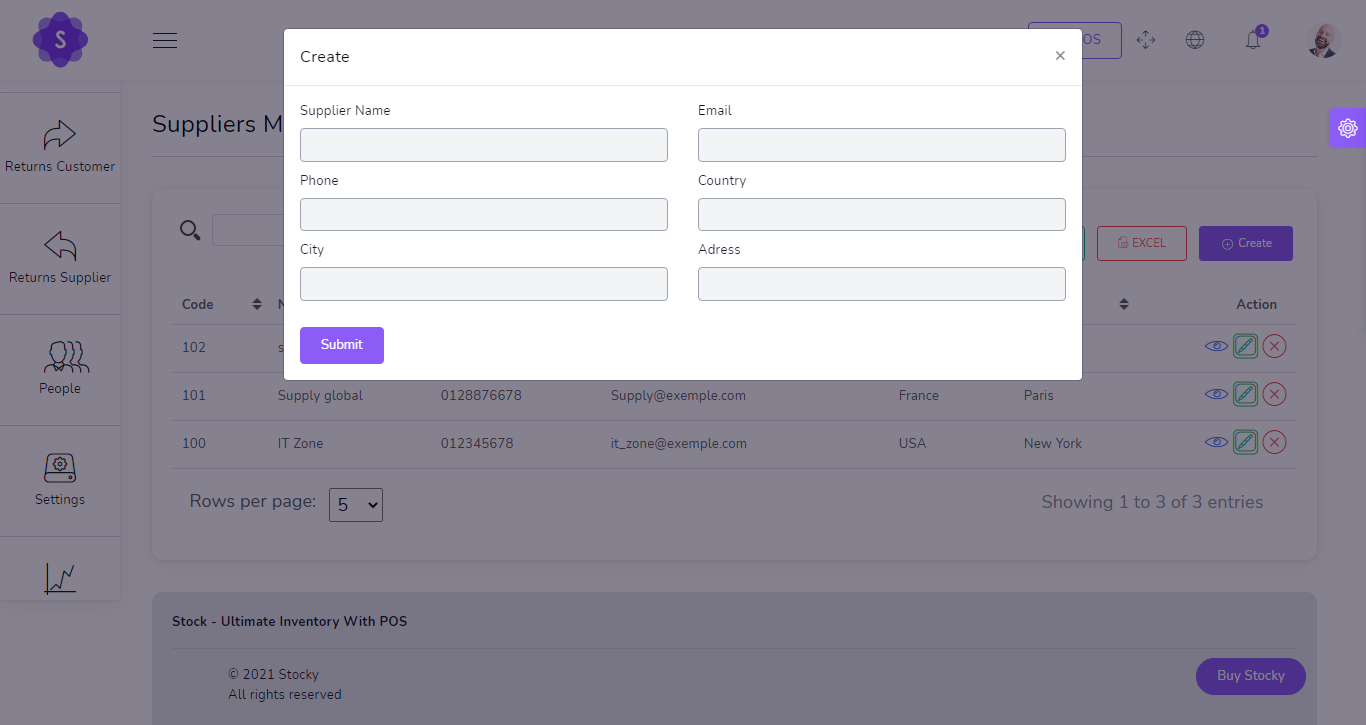
Suppliers
to create a new Supplier it's very easy
- Name
(required) - Email
(required)
You can manage Supplier list
- Pay all Purchase due in single payment
- Pay all Purchase Return due in single payment
- Edit Supplier
- Delete Supplier
- Generate Supplier list in PDF
- Generate Supplier list in Excel
- Search Supplier
- Filter customer by Name ,Code , phone , Email
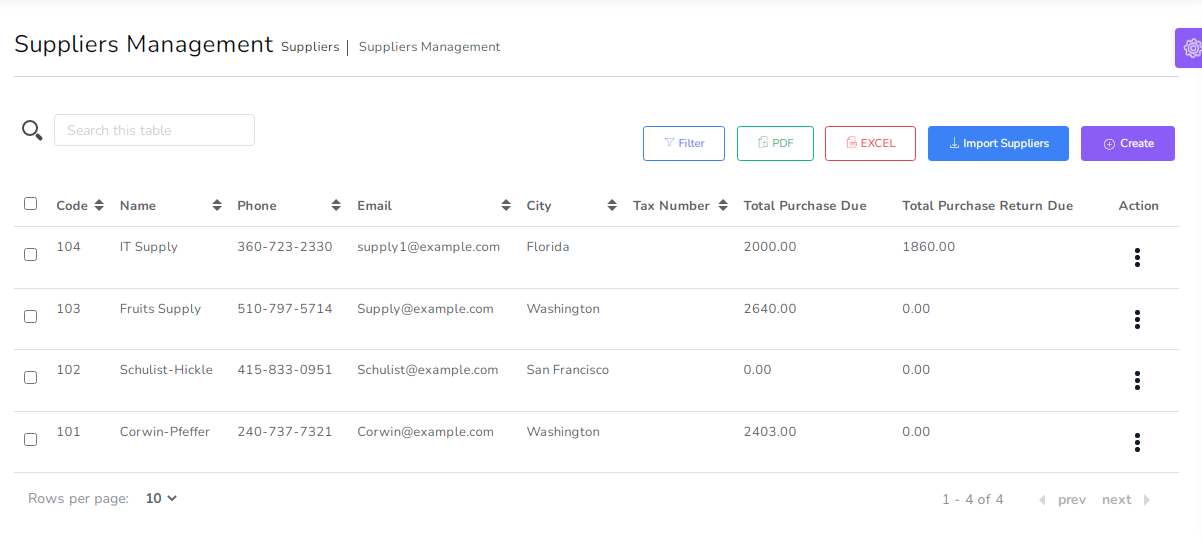
Import Suppliers by csv

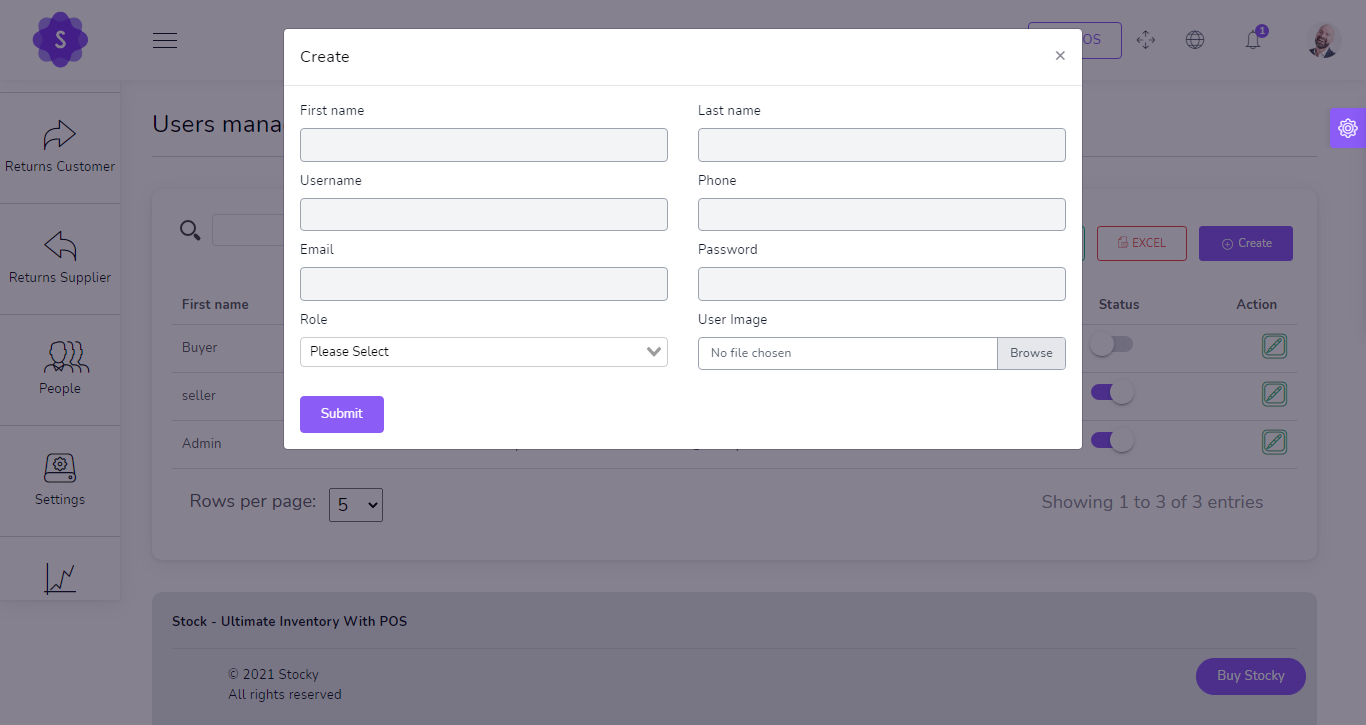
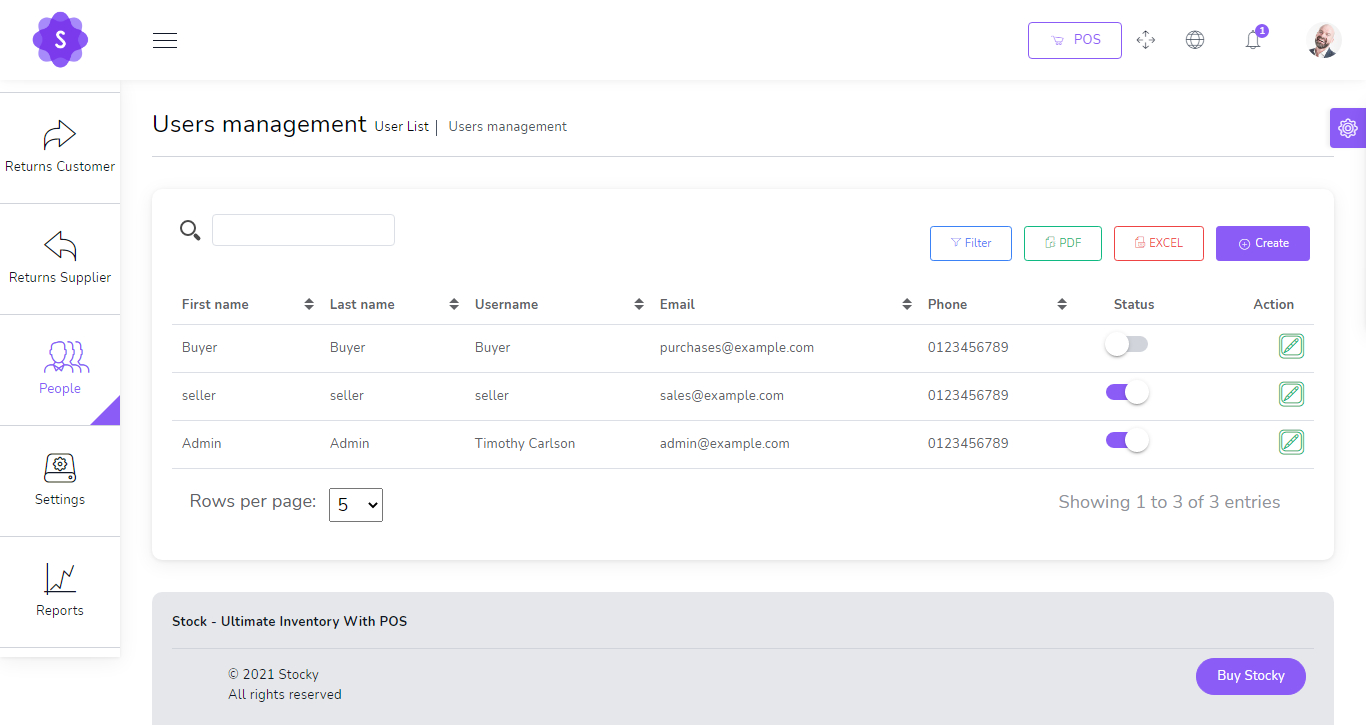
Users
to create a new User it's very easy
- First Name
(required) - Last Name
(required) - Username
(required) - Phone
(required) - Email
(required) - Password
(required) - Role
(required) - Avatar
(Optional)
You can manage User list
- Change Status User
- Edit User
- Generate User list in PDF
- Generate User list in Excel
- Search User
- Filter User by username , phone , Email , Status
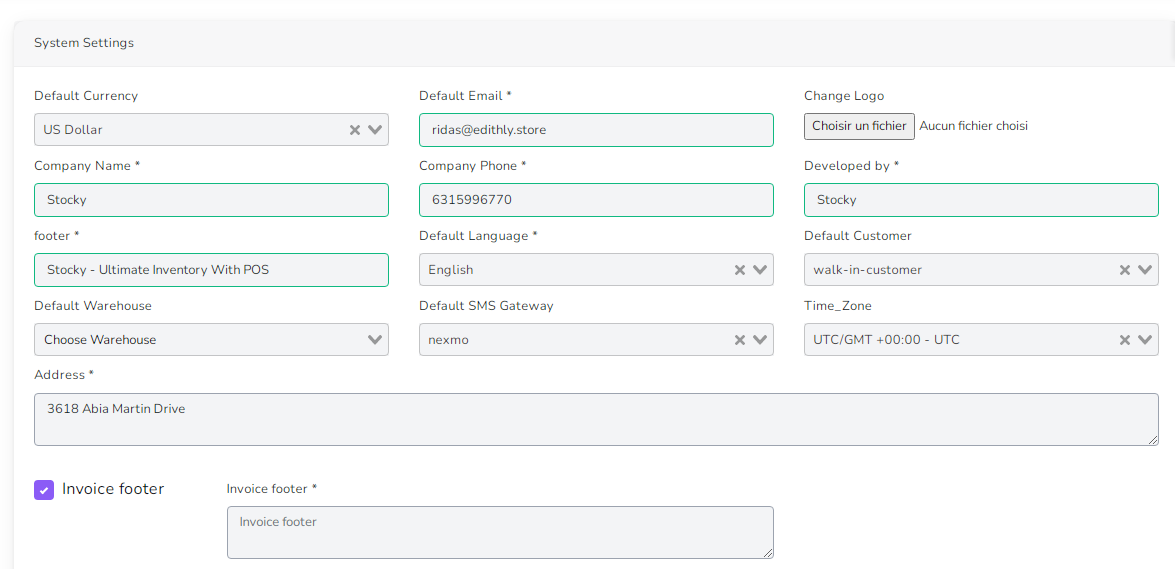
System Settings
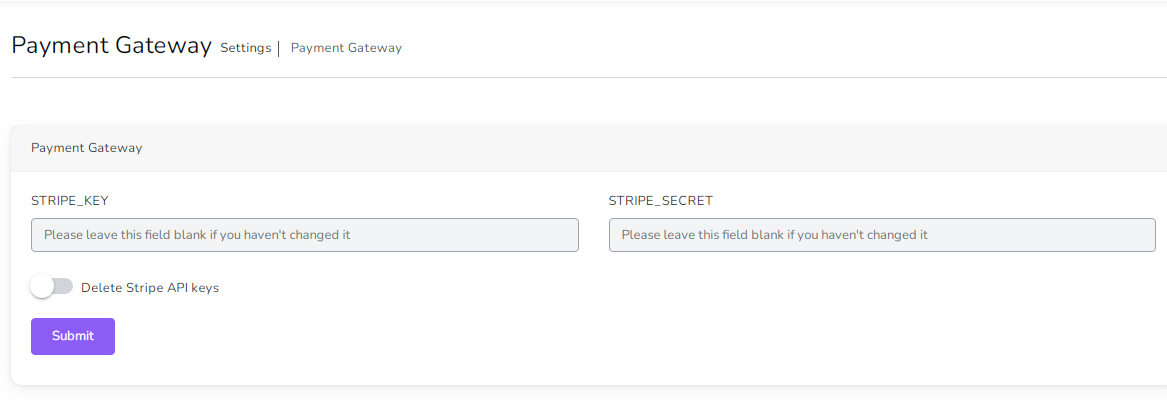
Payment Settings
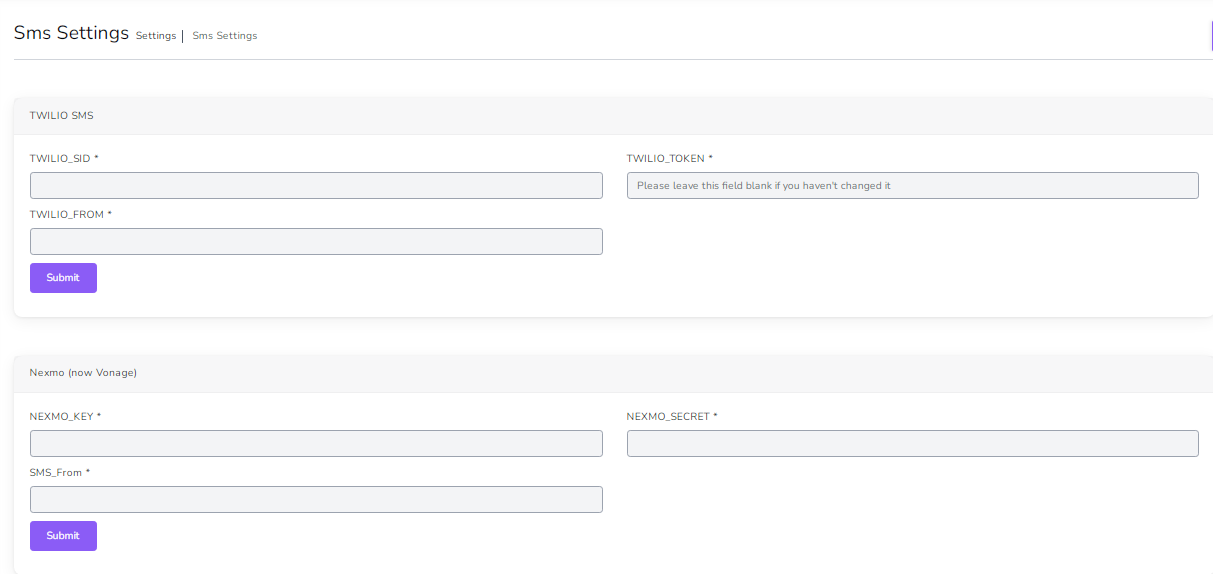
SMS Settings
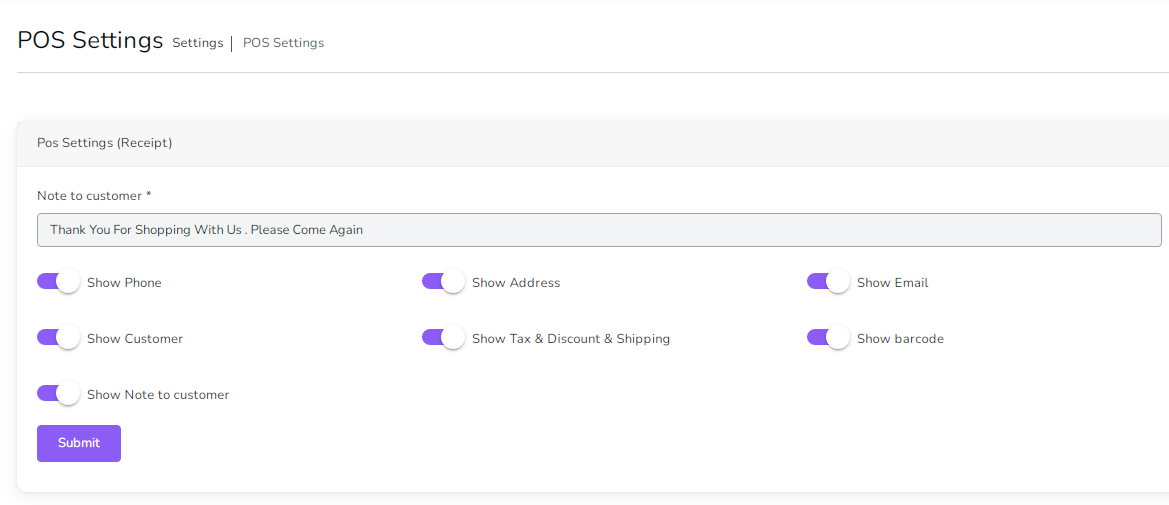
POS Settings
Mail Settings

- Host : Host smtp mail server
- Port : 25 or 587 or 465 or 2525)
- Sender Name : From Name
- username : your username smtp mail server
- password : your password smtp mail server
- Encryption : tls or ssl
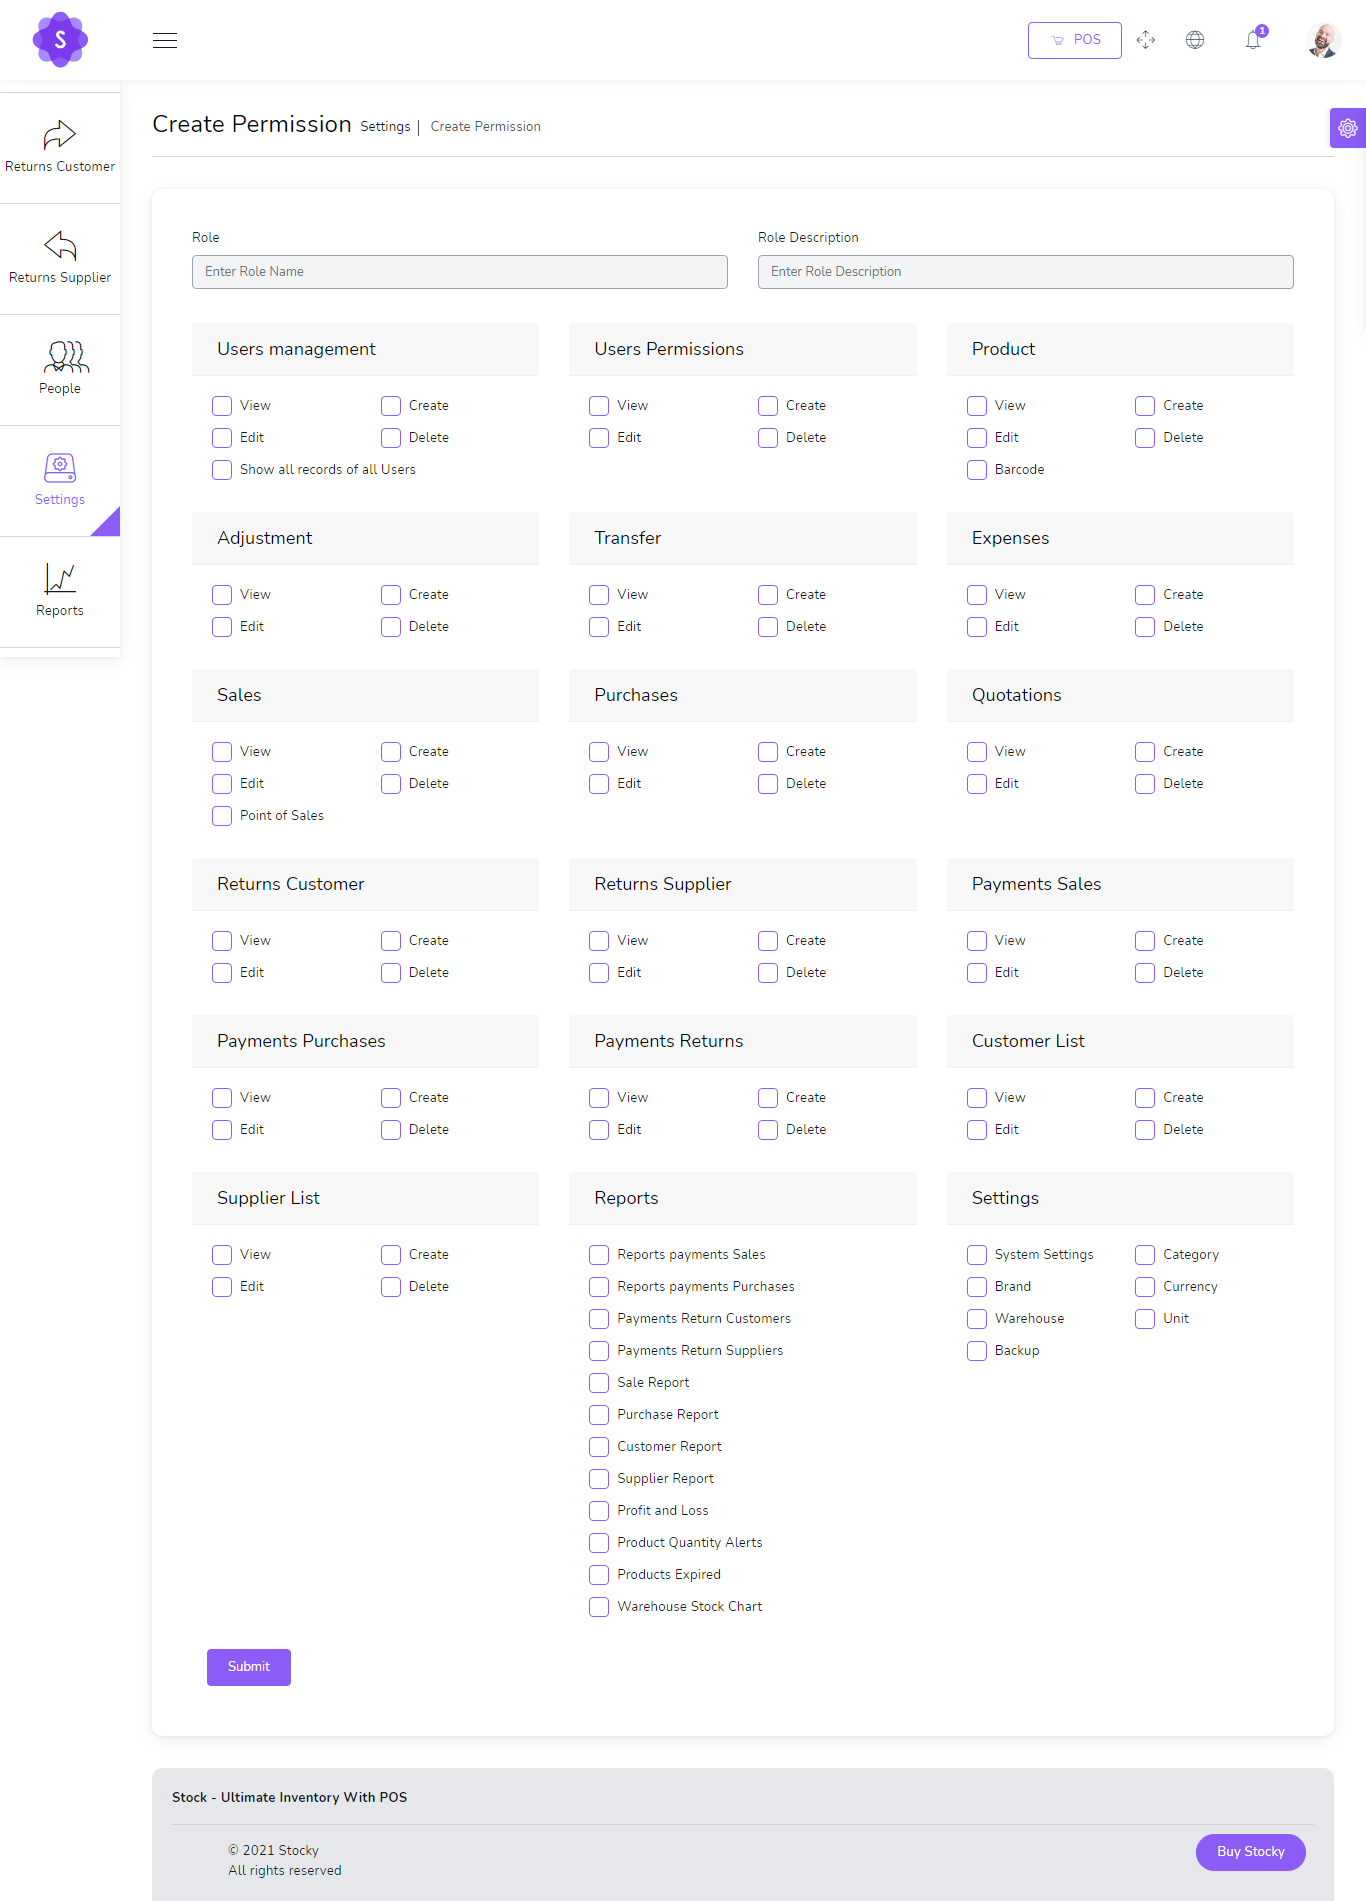
More Than 110 Permissions
if you want show all records of all users , Check Show all records of all users
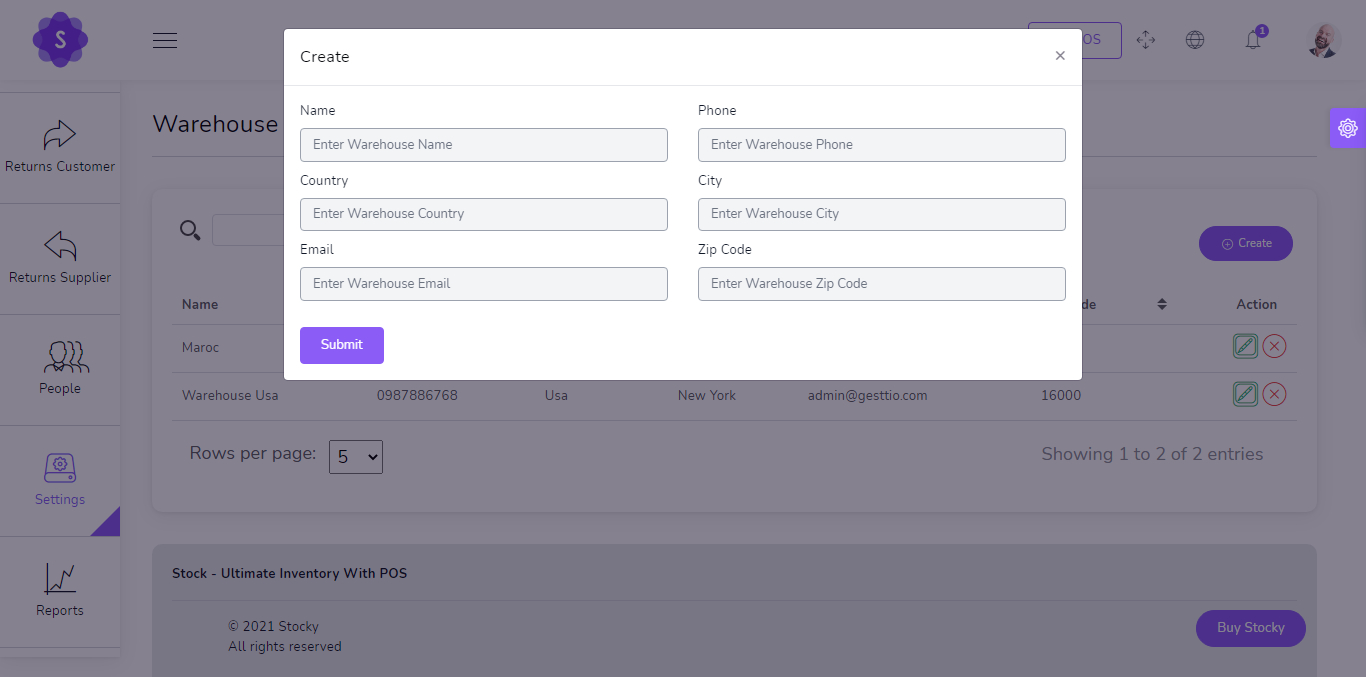
Create new Warehouse
- Name
(required) - Phone
(optional) - Country
(optional) - City
(optional) - Email
(optional) - Zip code
(optional)
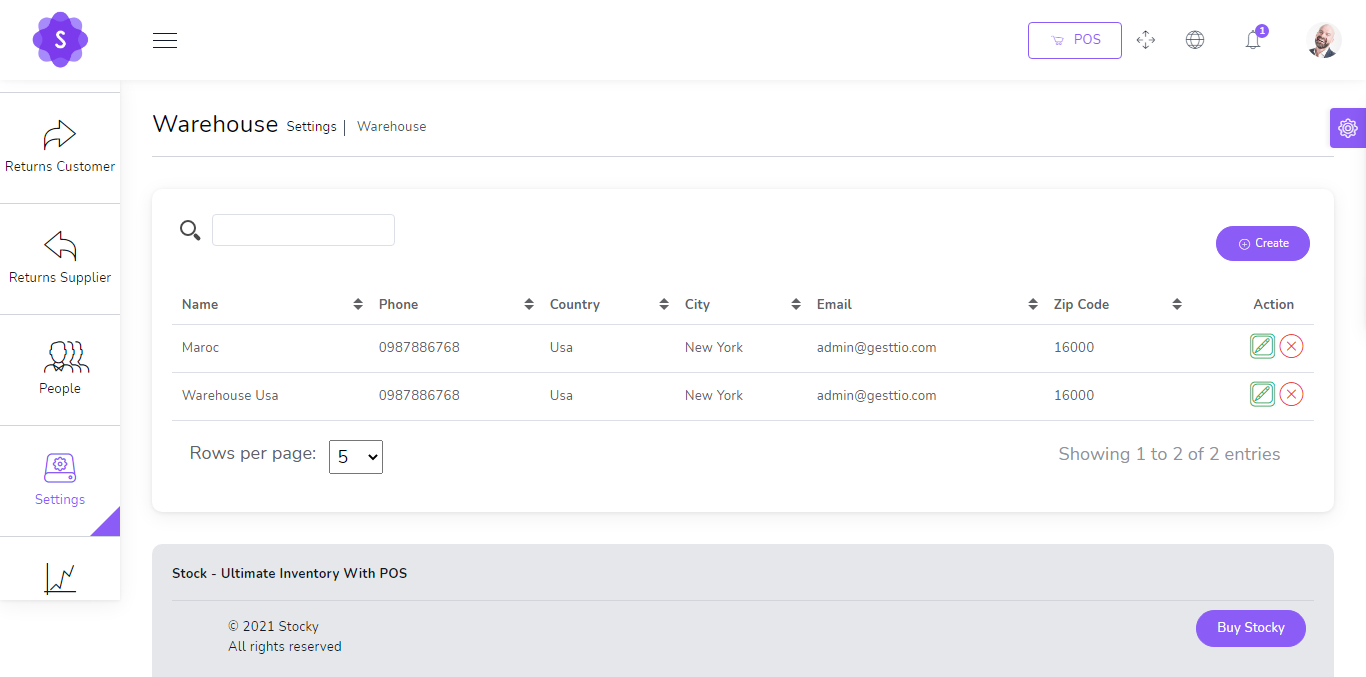
You can manage Warehouse list
- Edit Warehouse
- Delete Warehouse
- Search Warehouse
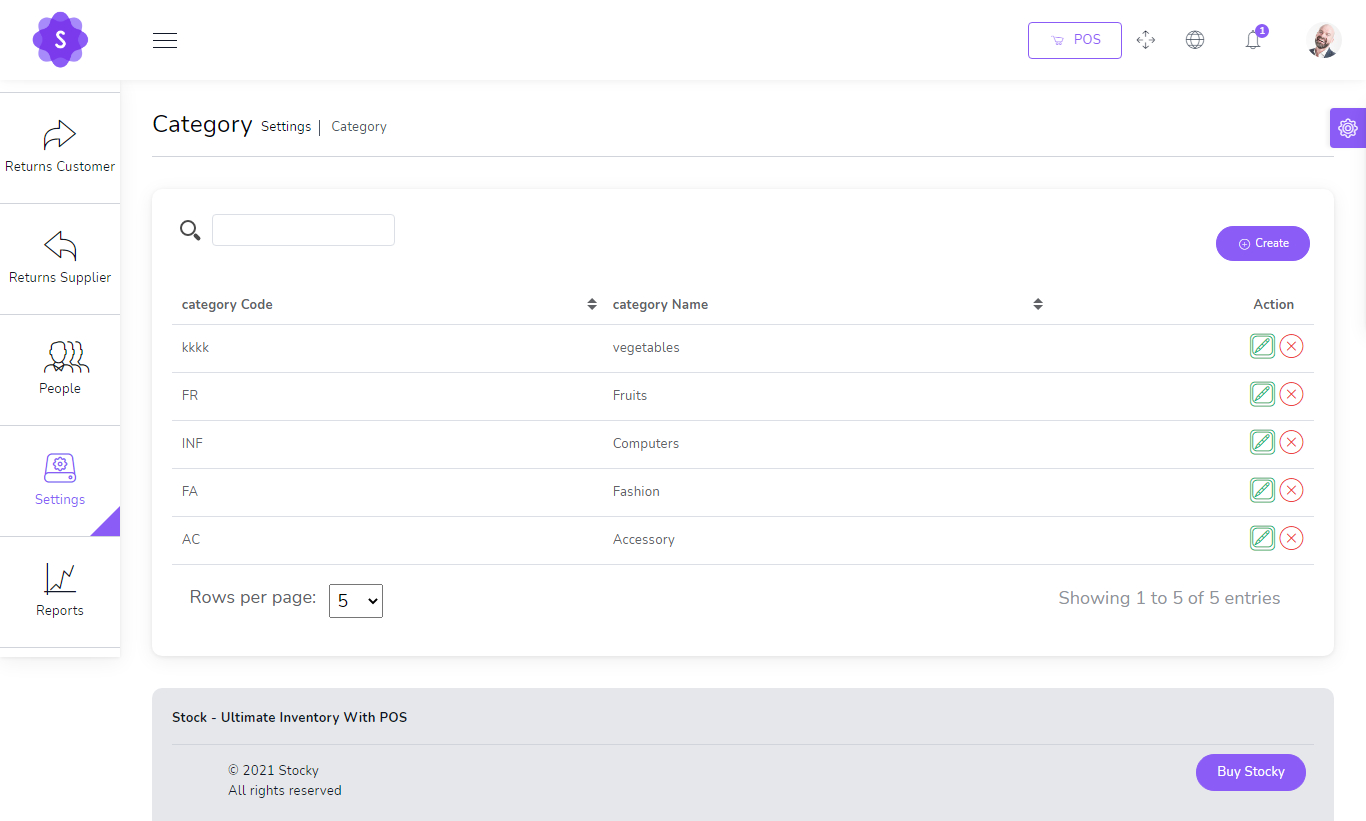
You can manage Category list
- Edit Category
- Delete Category
- Search Category
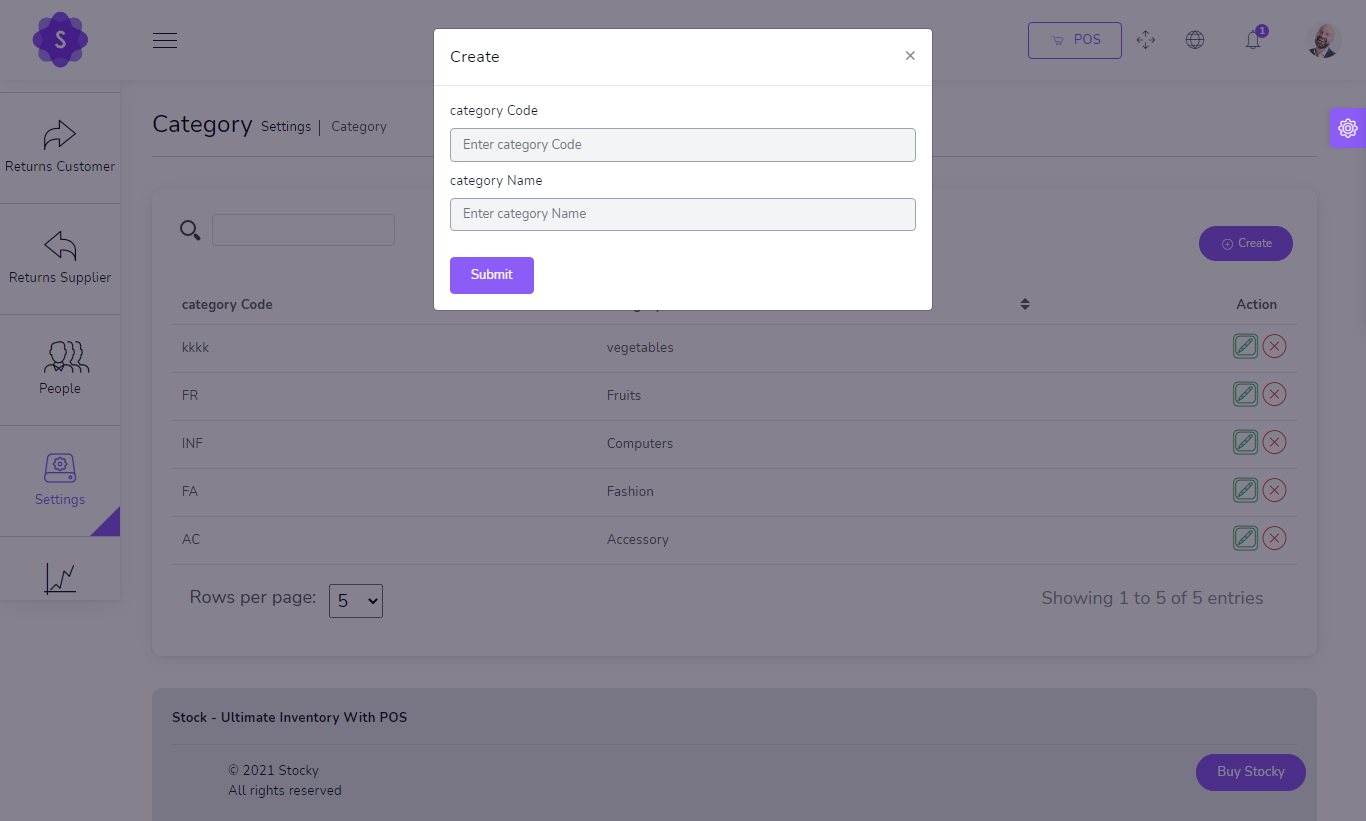
Create new Category
- Name
(required) - Code
(required)
You can manage Brand list
- Edit Brand
- Delete Brand
- Search Brand
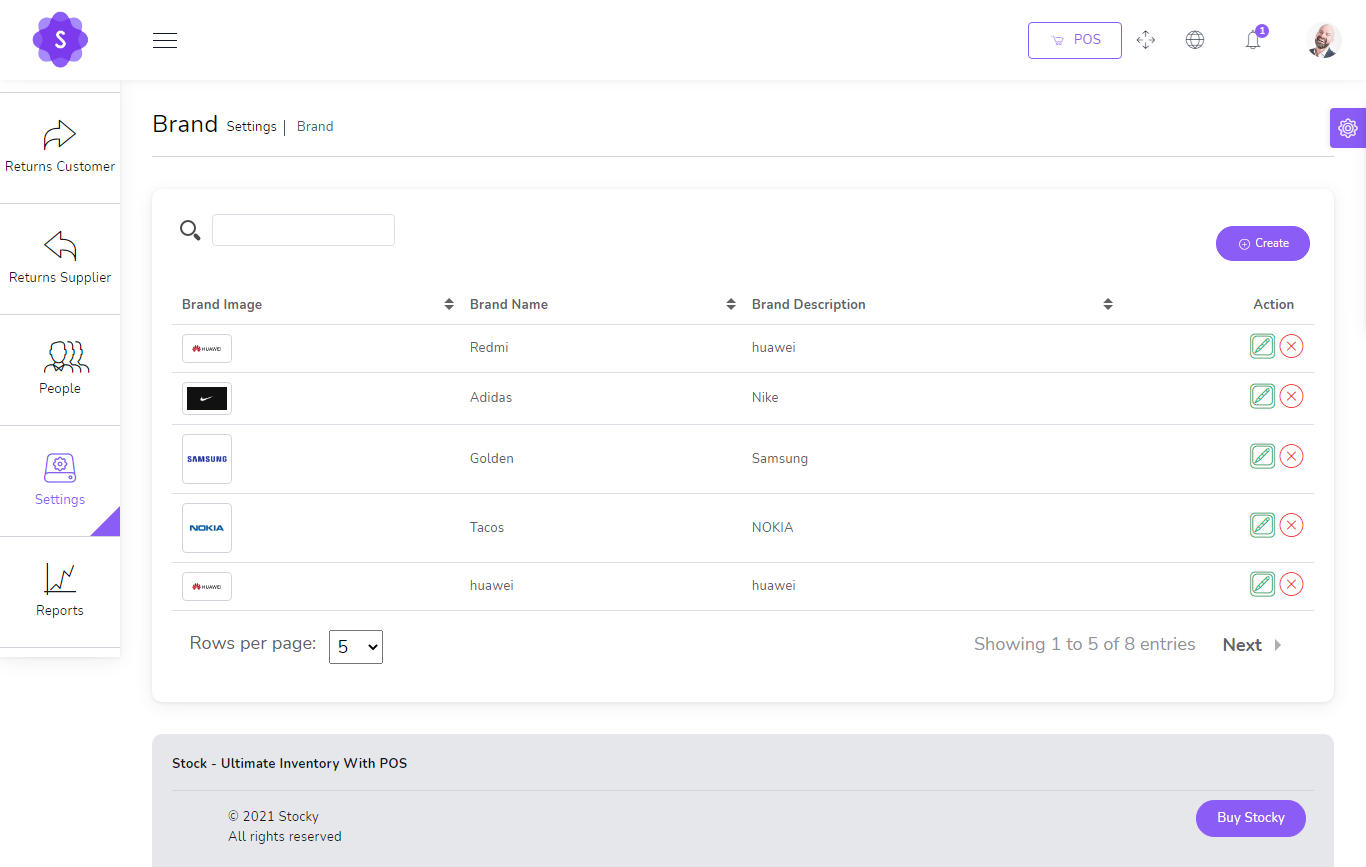
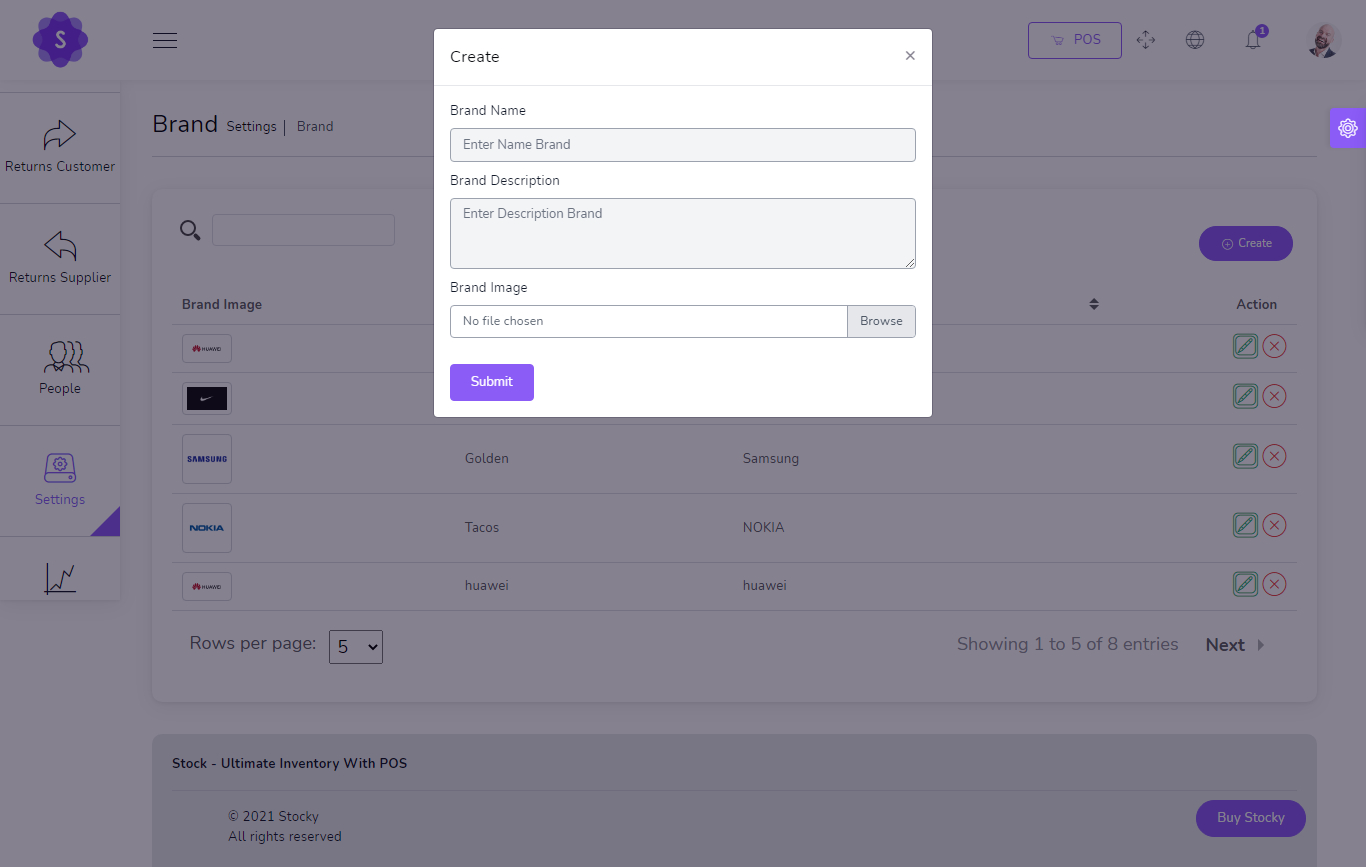
Create new Brand
- Name
(required) - Description
(optional) - Image
(optional)
You can manage Currency list
- Edit Currency
- Delete Currency
- Search Currency
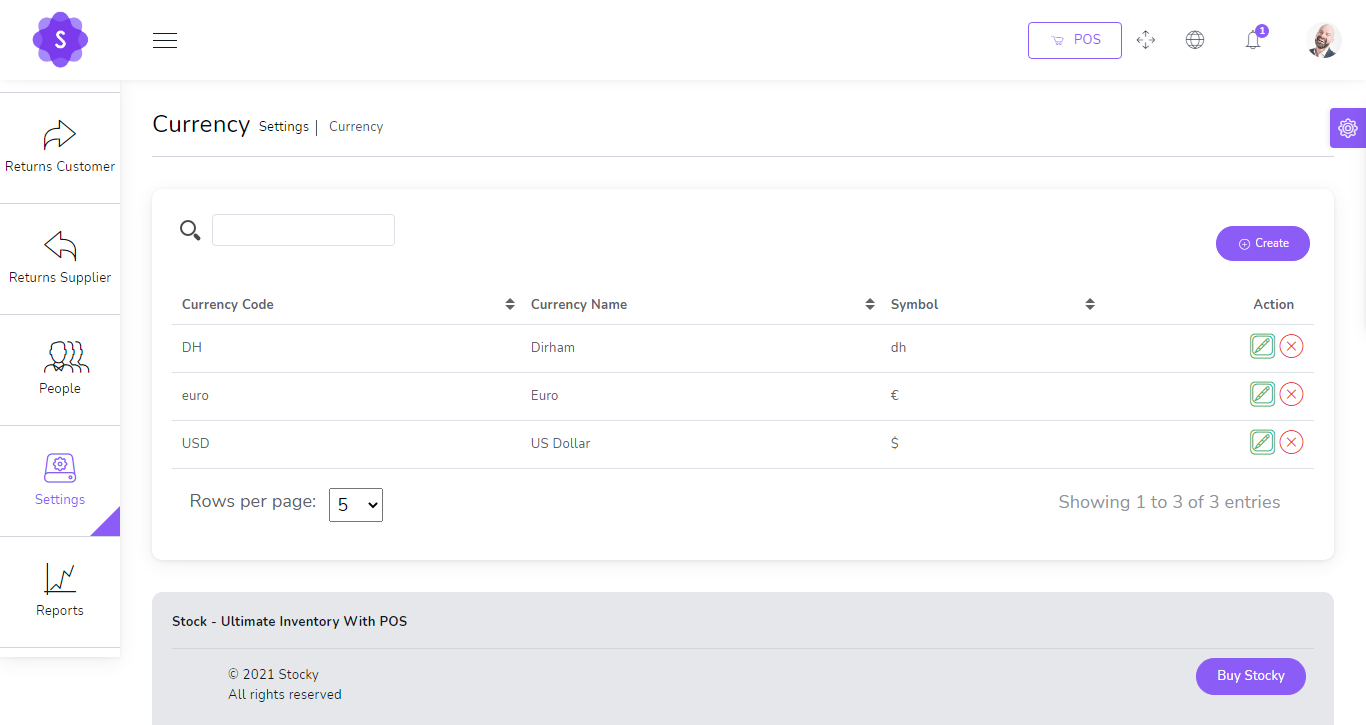
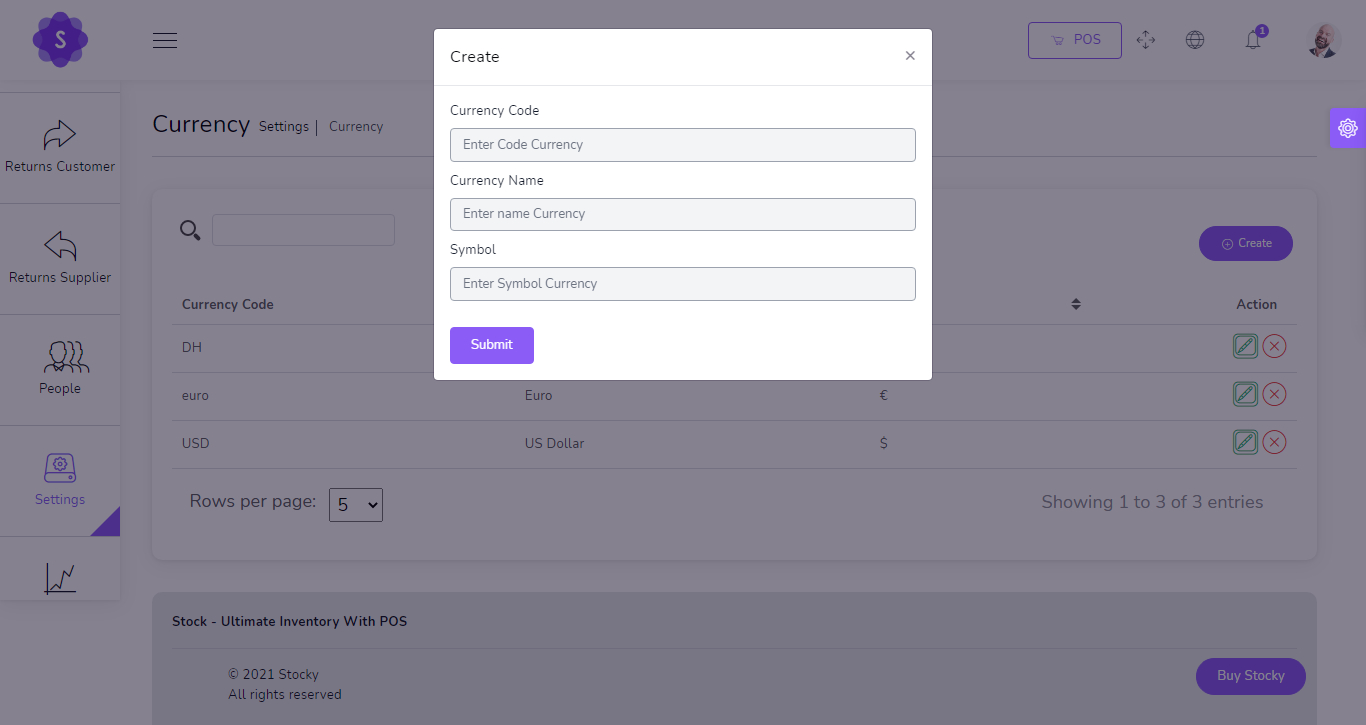
Create new Currency
No Live Exchange Just Symbol
- Code
(required) - Name
(required) - Symbol
(required)
You can manage Unit list
- Edit Unit
- Delete Unit
- Search Unit
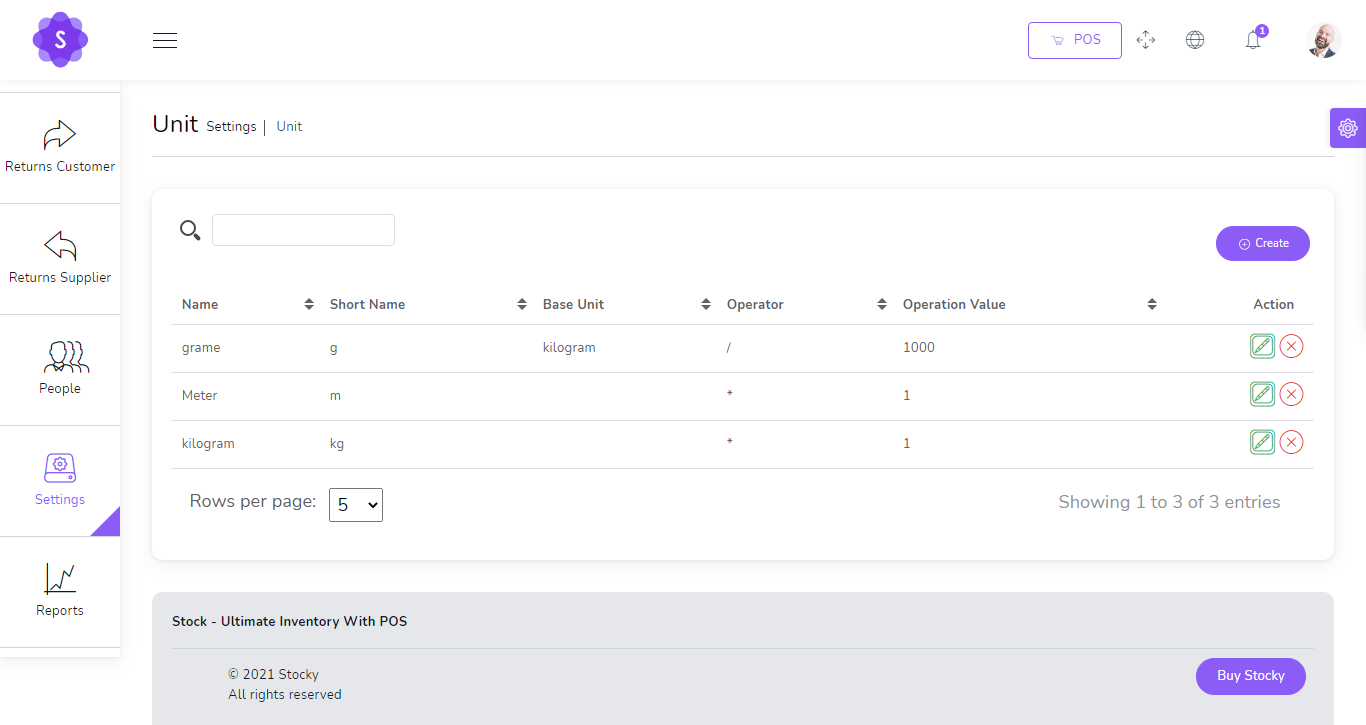
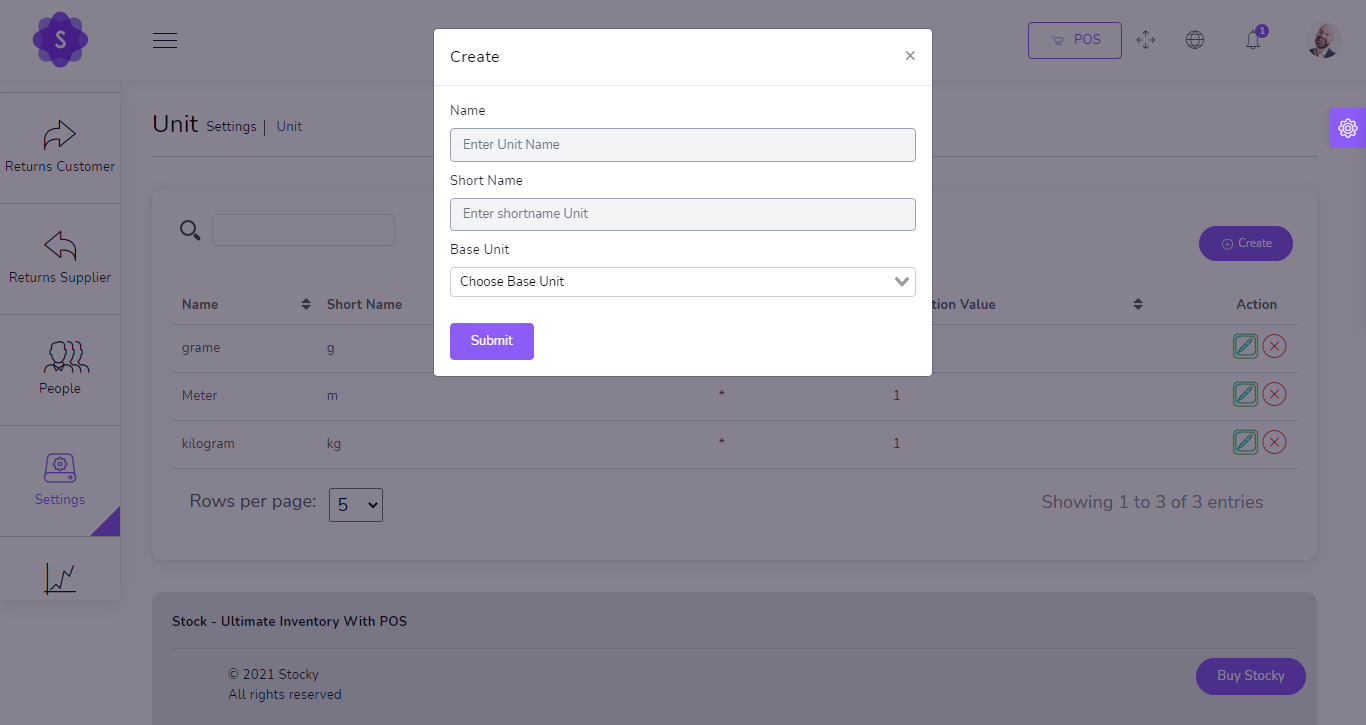
Create new Unit
- Name
(required) - Short Name
(required) - Base Unit
(optional)
Reports
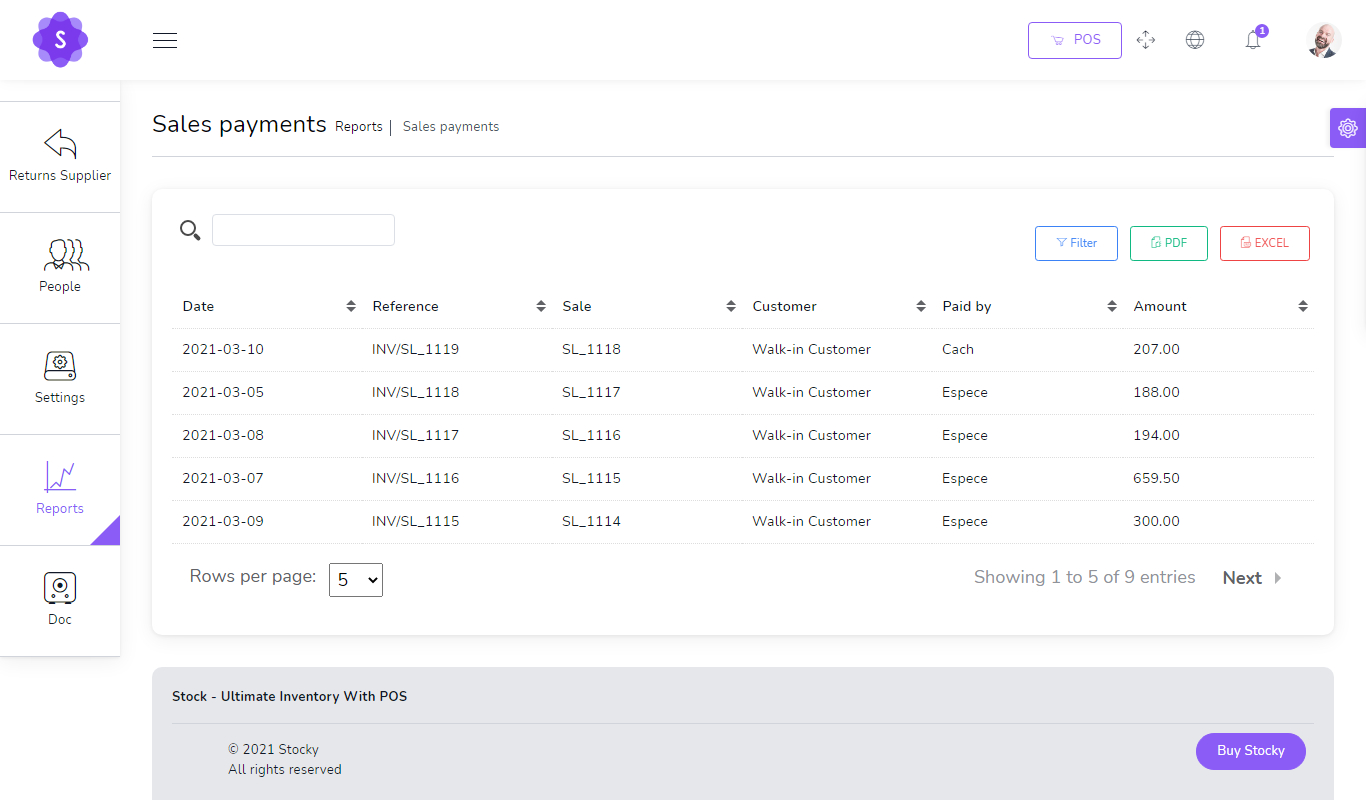
Payments Purchases

Payments Sales
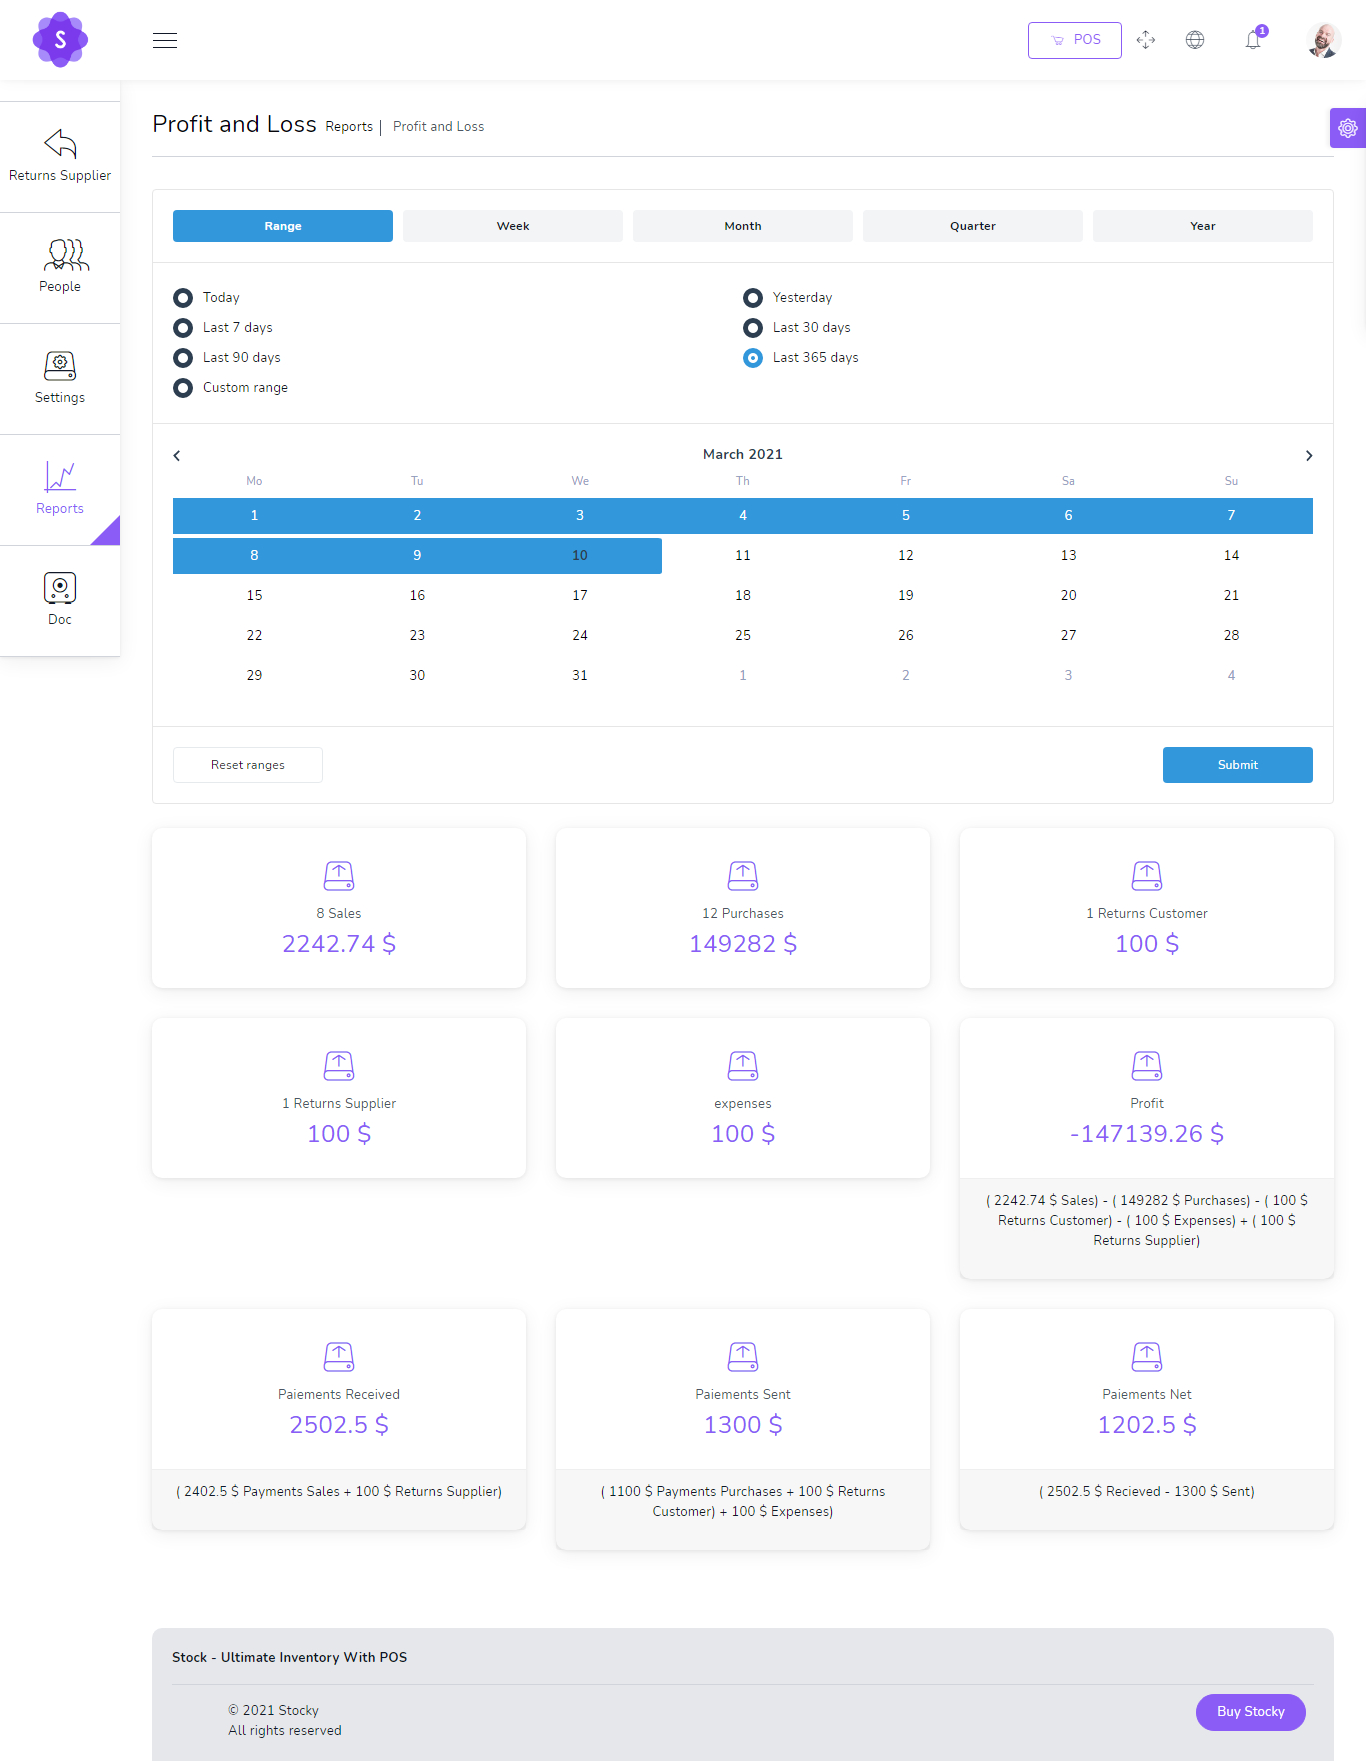
Profit & Loss
Product Alert
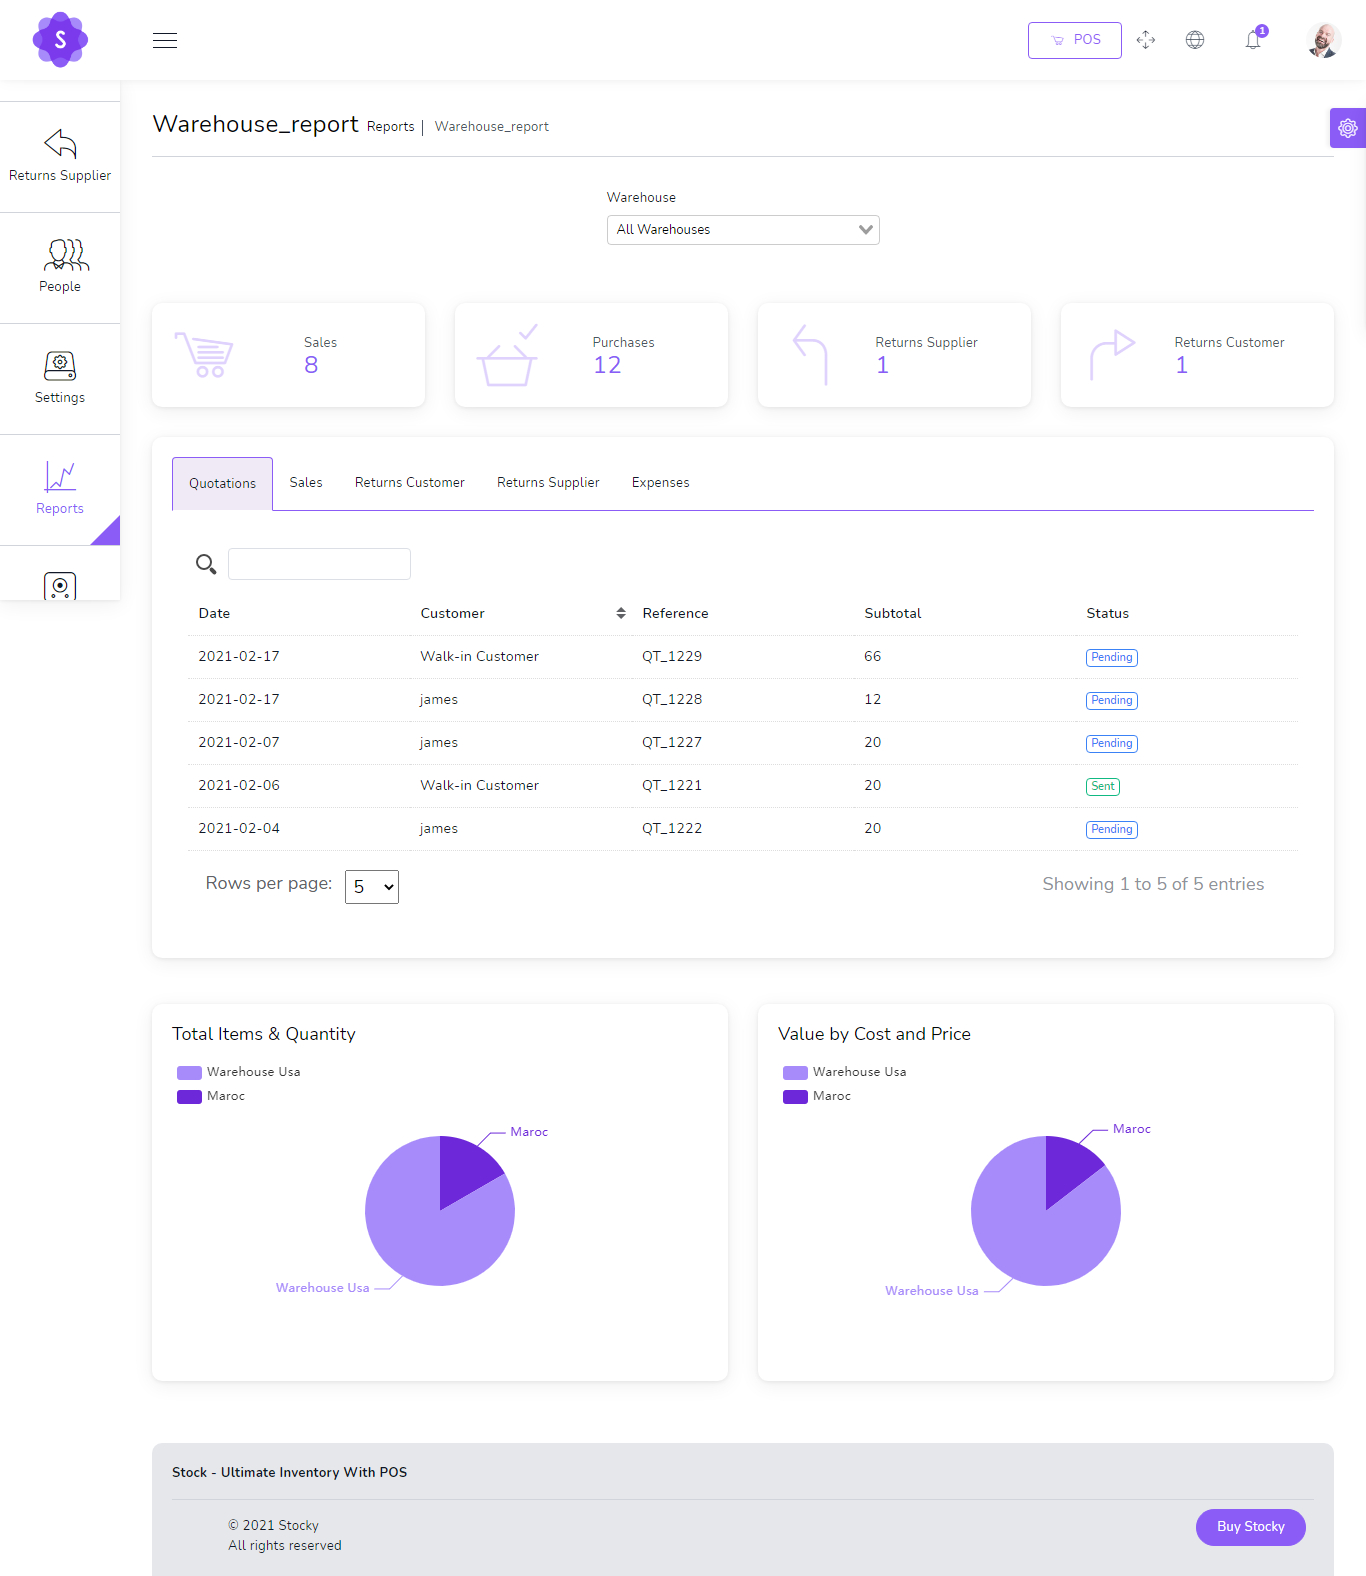
Warehouse report
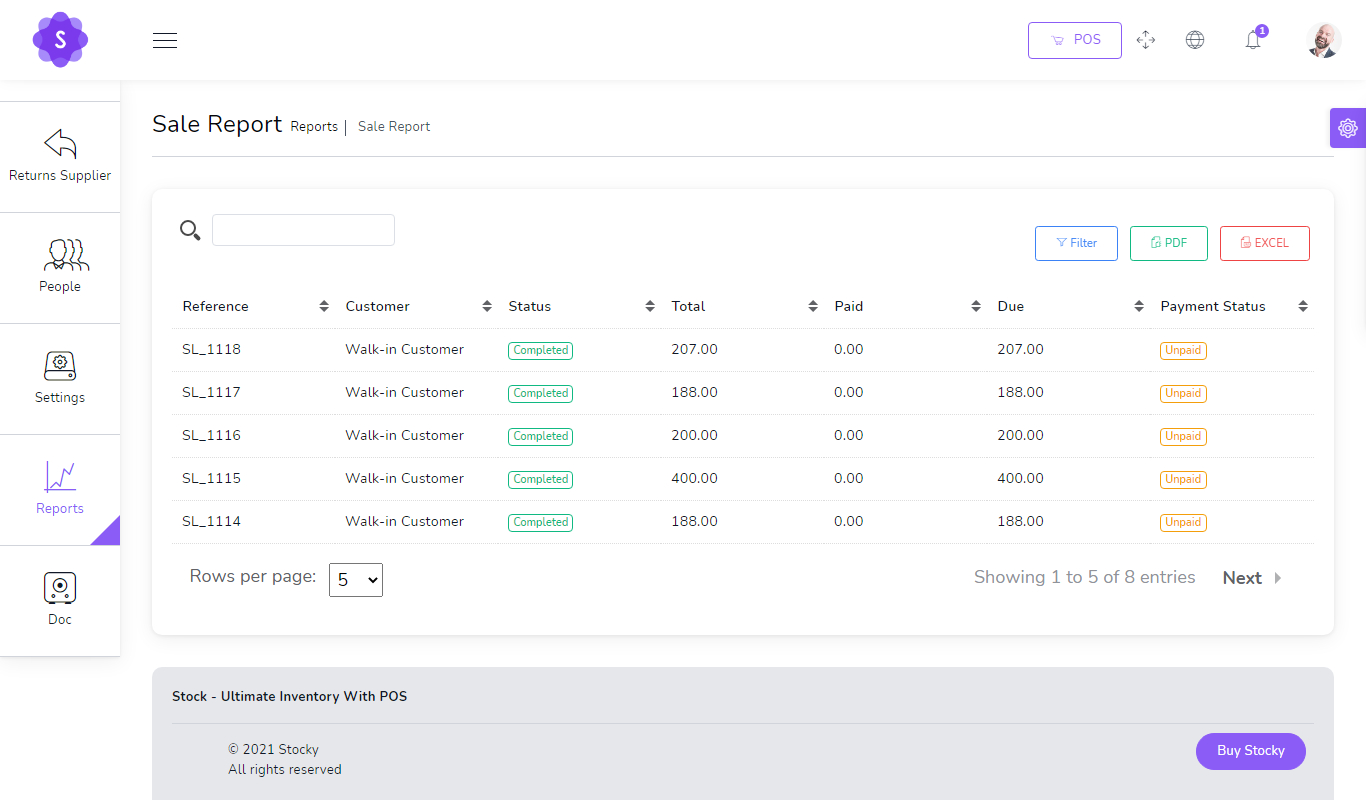
Sales report
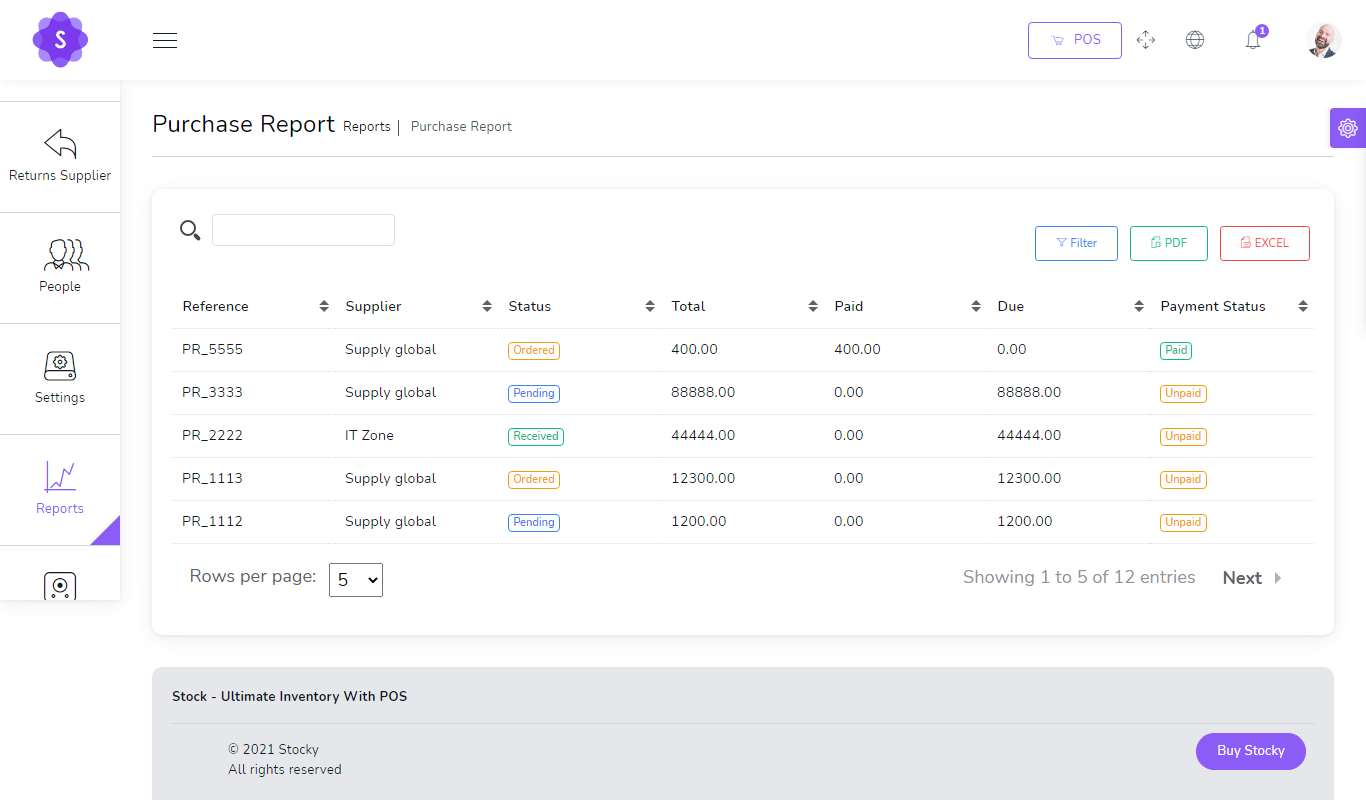
Purchases report
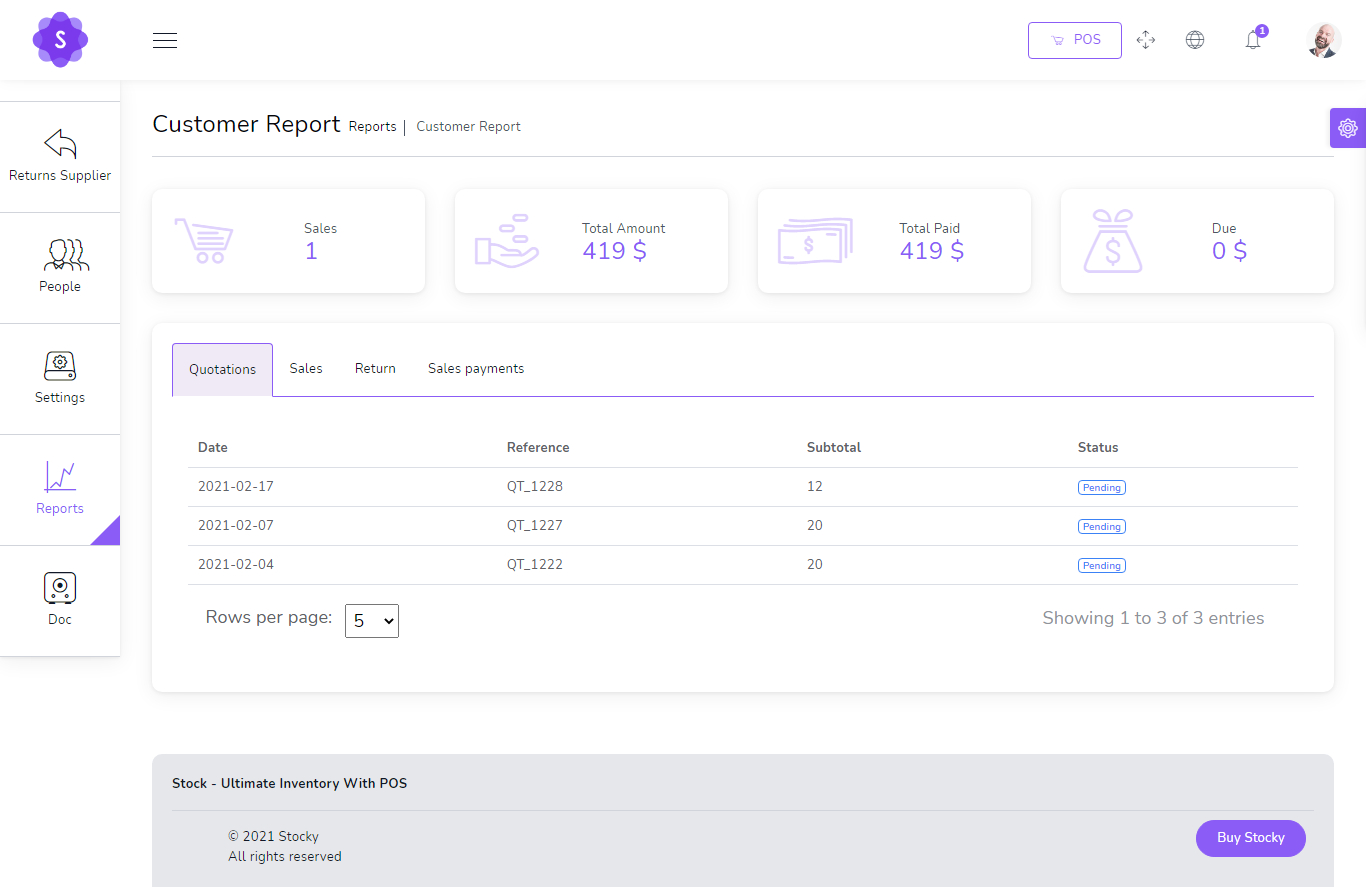
Customers report
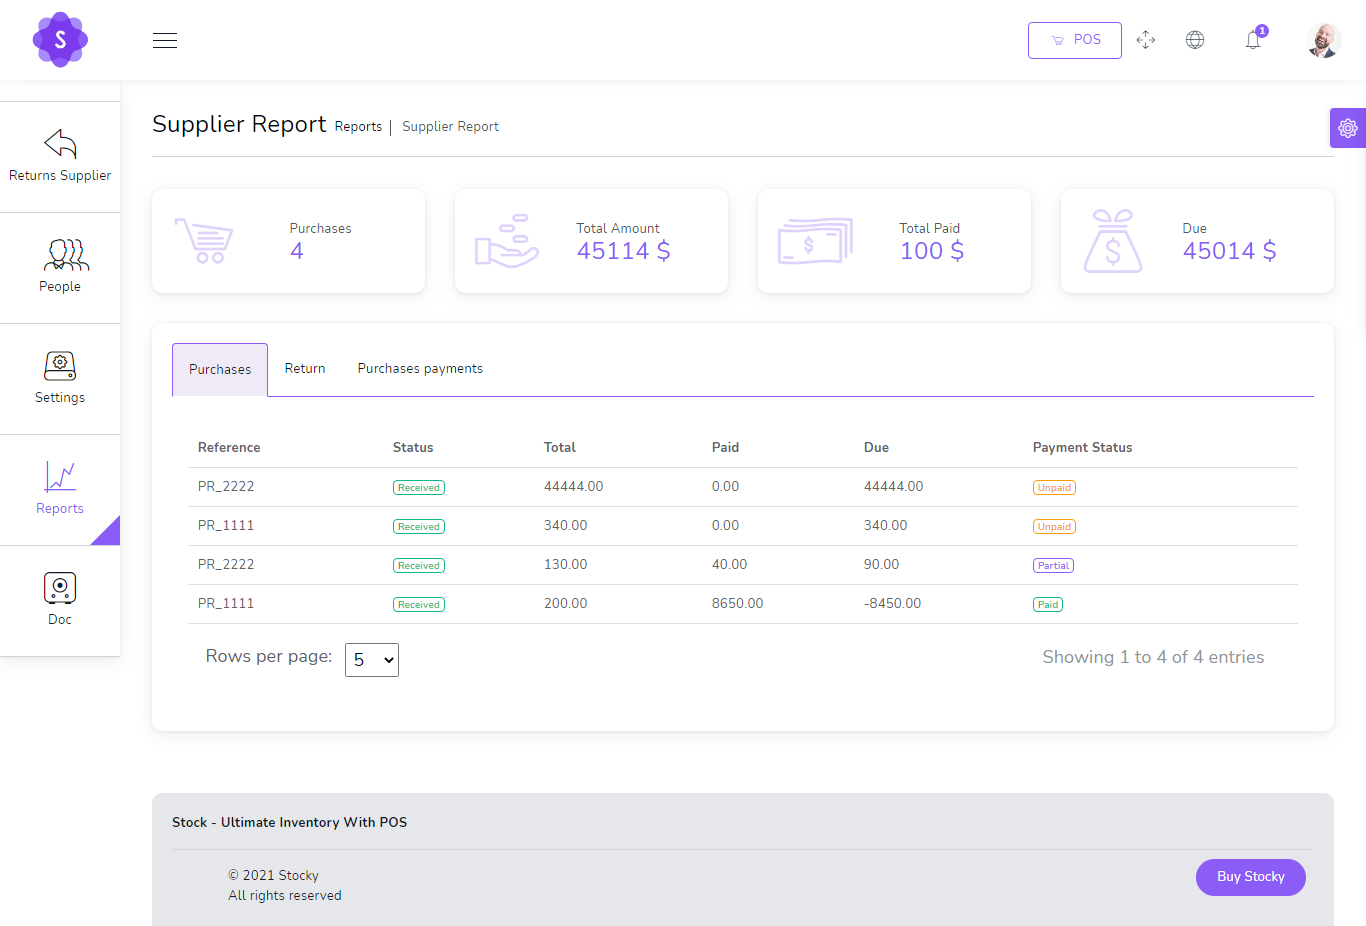
Suppliers report
Top selling products report

Best Customers report

Users report
